Tag Archives: Handmade

This particular Triumph of Perseverance Over Stupidity is complete.

offtheloom

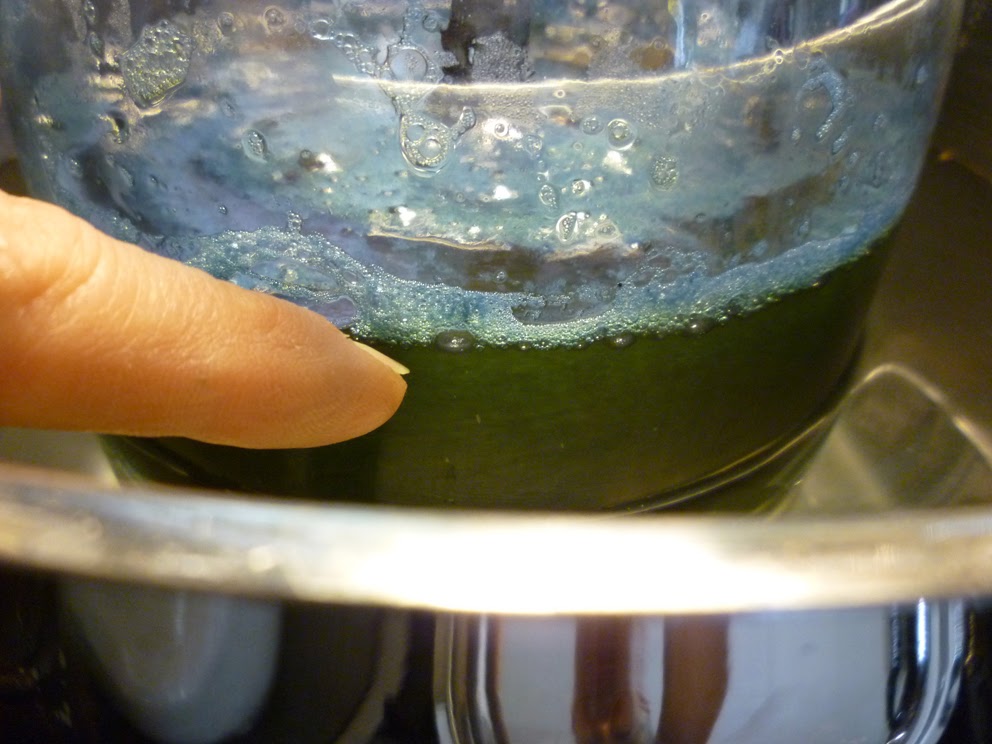
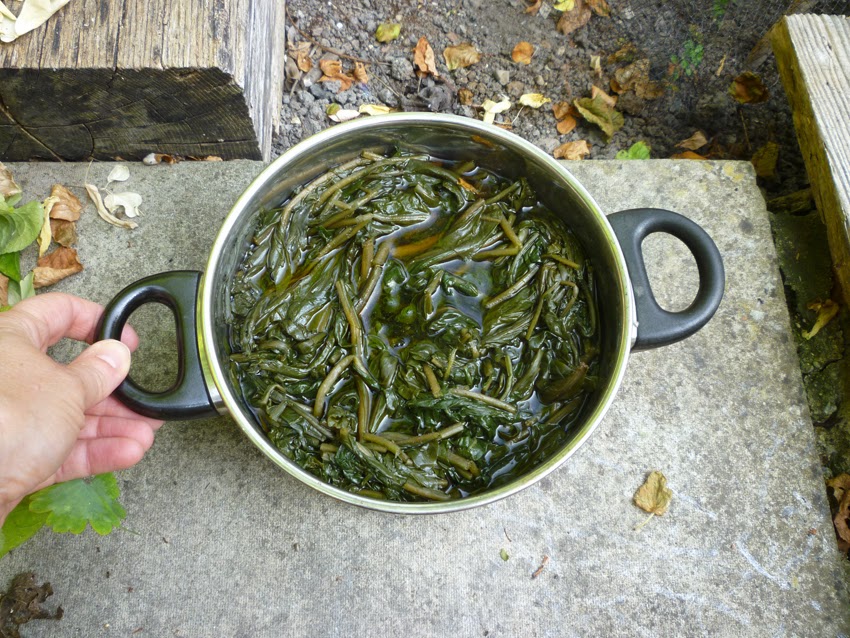
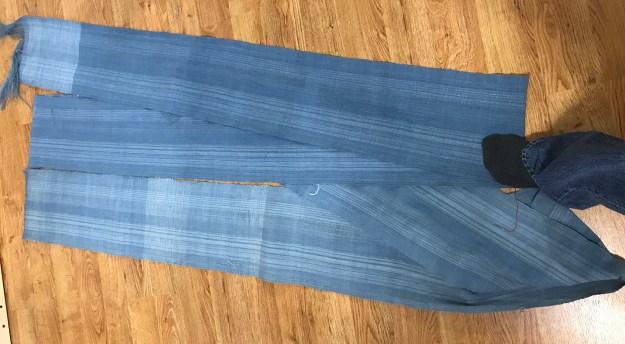
The cotton warp I described in Slow Cloth, well-travelled is woven, off the loom, finished. 6.18m/6.75yds of fabric c. 9″/23mm wide. Cotton singles warp, silk and cotton singles weft, all dyed in a (fructose, from memory) indigo vat. Note that the warp stripes are unplanned and result from differential dyeing by the different colours and types of cotton.

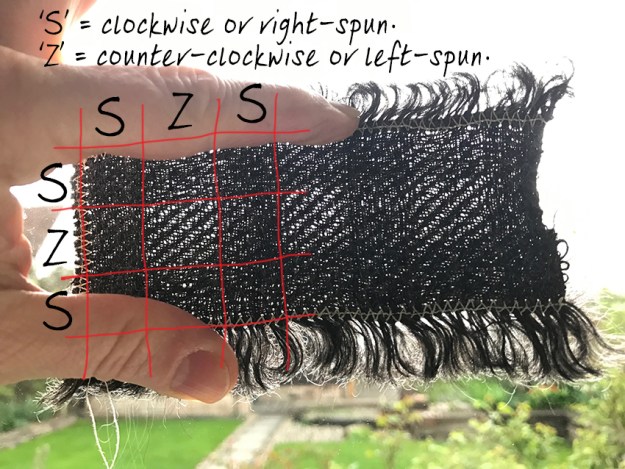
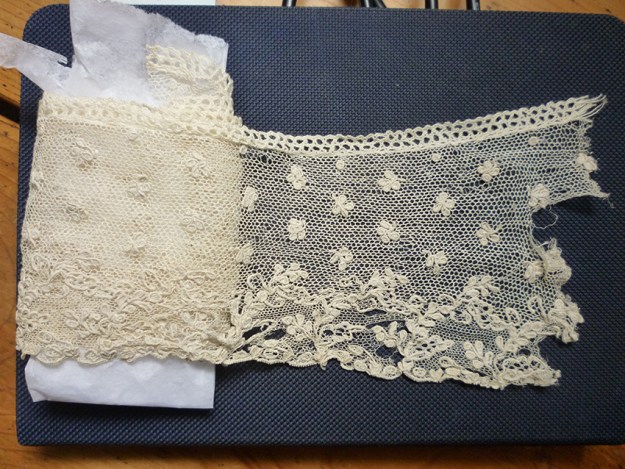
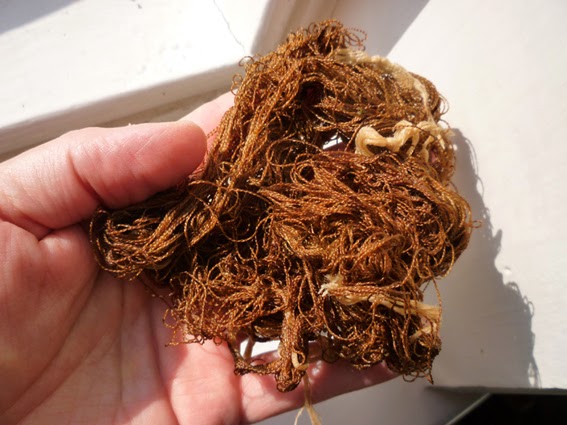
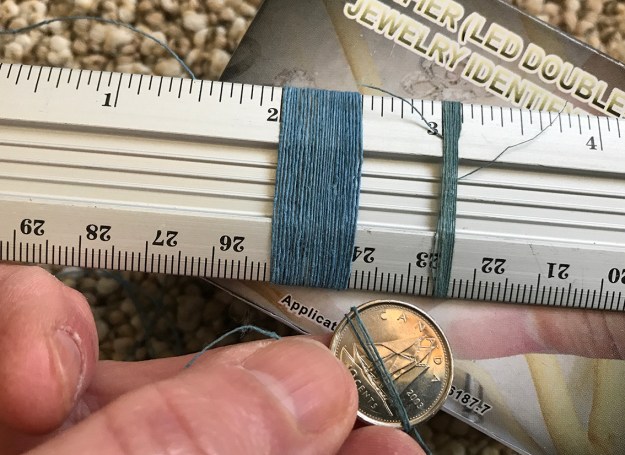
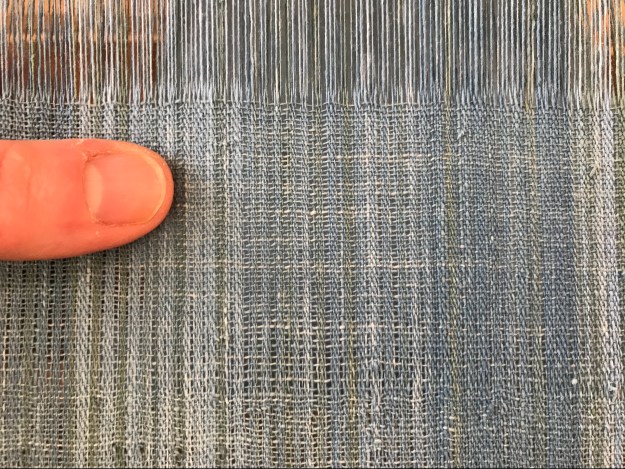
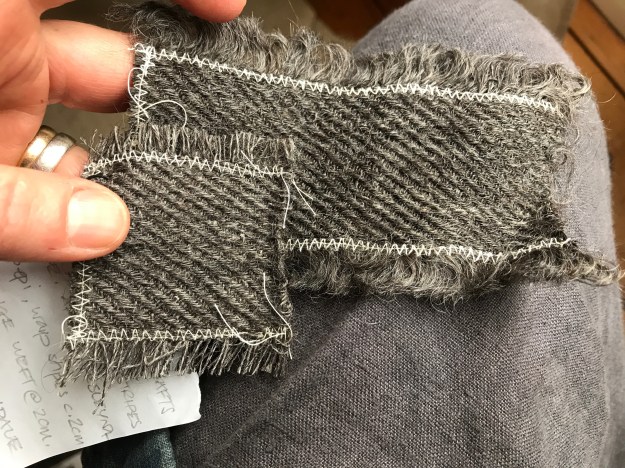
A couple of people have asked for more technical information about the yarn (wpi, tpi). Remember that this was random spinning over the last 5 years or more, not directed spinning for the project. Cottons include pima, supima, organic green and brown, spun from punis, top and directly from the seeds, on tahklis, charkha, Majacraft quill and lace flyer. All were spun clockwise, or z. The yarn(s) vary widely in grist. In the photo below of remnants of the sized warp the 1/2″ wide sample is wrapping at roughly 52-56wpi. In the 1/8″ sample the yarn is wrapping at over 70wpi. (The greenish colour is indigo over natural brown, which together with its thinness tells me this was probably tahkli spun from seeds on my lap in front of the tv. Why weave your handspun? For the memories.)

WPI

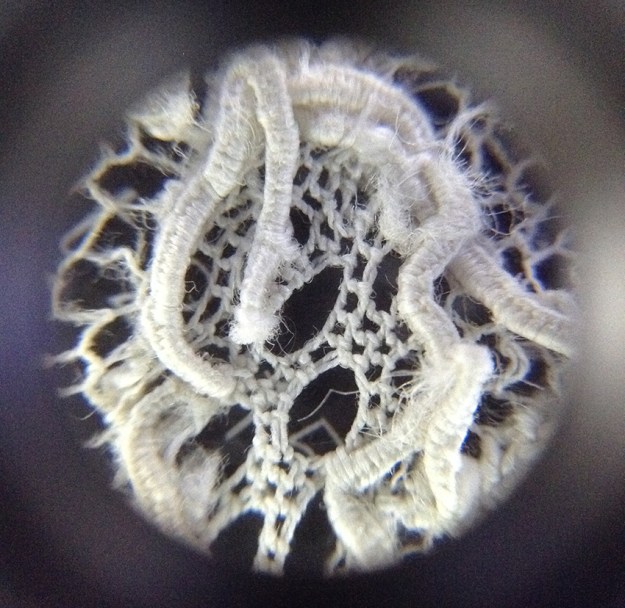
Twist per inch is also variable. It is difficult to see the twist in the sized yarn, but examining unsized yarn in the weft bag – the warp was selected randomly from the skeins of dyed yarn, so both are equally variable – with a magnifier I eyeballed twist from roughly 45° to 55–60°, assuming 90° is perpendicular to the length of yarn. So it’s reasonably high twist… and that’s AFTER boiling. The yarn was probably fractionally thicker before boiling, so add something to those twist angles for twist on the singles as they came off the bobbin/shaft. Basically, sample. That’s what this fabric is, a jacket-length sample.

I like it.

washed,ironed

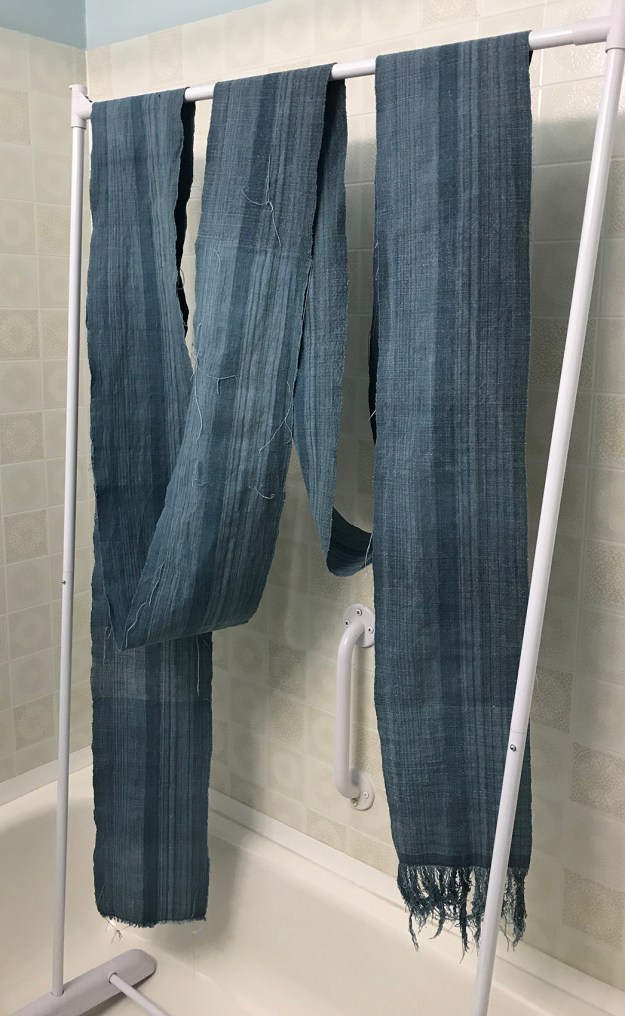
That’s the fabric finished to my current satisfaction. An overnight soak followed by wool/handwash cycle did not remove the gelatine size, so I soaked this in a bucket of the hottest water from the tap plus a couple of kettles of boiling water, washed on permanent press ‘warm’, then ironed on hottest cotton setting. It’s shrunk about 10% in width. I like it a lot. Despite the cursing and frustration, I also appreciate the lessons it has taught me. Some are unlikely to be needed again, such as: Do not expect a warp on the loom to make an international move without shifting somewhat. Others may be useful time and again.

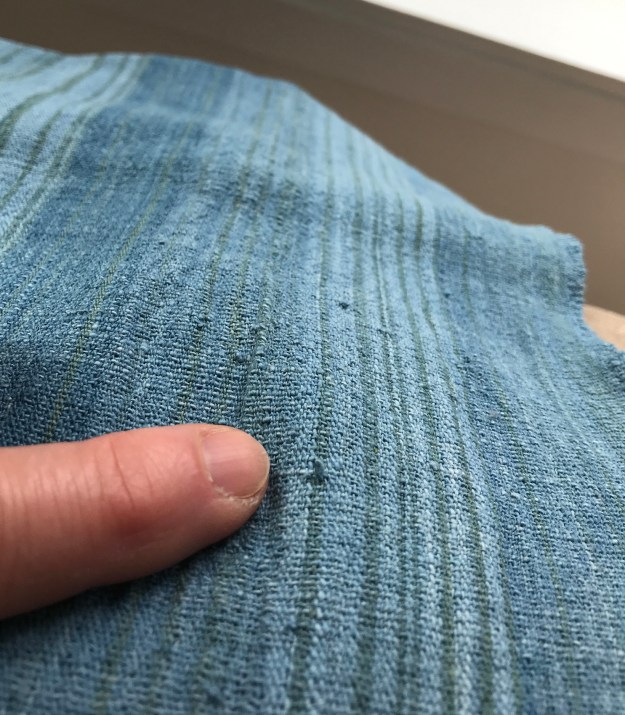
My handspun cotton weaves well, but beware of slubs.
Some of my earliest and most unevenly spun cotton singles are in this warp. Only the very thinnest singles snapped under the quite high weaving tension, and by ‘very thinnest’ I mean places where uneven singles were thinner than fine sewing thread so I confess I’m feeling smug and planning a super-thin cotton fabric. But thick slubs are as bad or even worse than thin spots: the slubs hold more size, so are stiffer and fail to bend around the weft. They stuck up out of the fabric a bit after weaving and some are still visible after finishing. I can live with this.

slub

Most of my stupid mistakes occurred during the weaving; I’m even more proud of my spinning because the singles stood up to such mistreatment.

Wind sized yarns from the skeins onto bobbins before winding the warp.
See the underline? That means this one’s particularly important. Because winding the warp from a skein held on a flexing umbrella swift with occasional pauses to break the yarn free from places where the size has stuck threads together is not exactly conducive to even warp tension, is it?

I am rubbish at winding warps.
Perhaps fractionally less rubbish now because I’ve wound a few since this one, but still. This warp was wound one thread at a time from two different umbrella swifts over the course of three days. Should I be surprised that I had to hang a chiming array of weights from slack threads? No, I should not.

Thoroughly set the weft twist before weaving.
Or be prepared to guard against pigtails forming when you slacken tension to beat it into place. I am told that many traditionally-spun and woven cotton fabrics from South America have these pigtails, so it’s authentic, but still. I prefer my fabric without.

Be open-minded about lease sticks in or out while weaving.
The lease sticks were useful for this warp, seeming to help even out the tension. But on earlier fuzzy warps (cashmere and fine merino handspun lace) the lease sticks seemed to raise the fuzz, encouraging the the ends to stick together.

But enough criticism.

ThreeFabrics

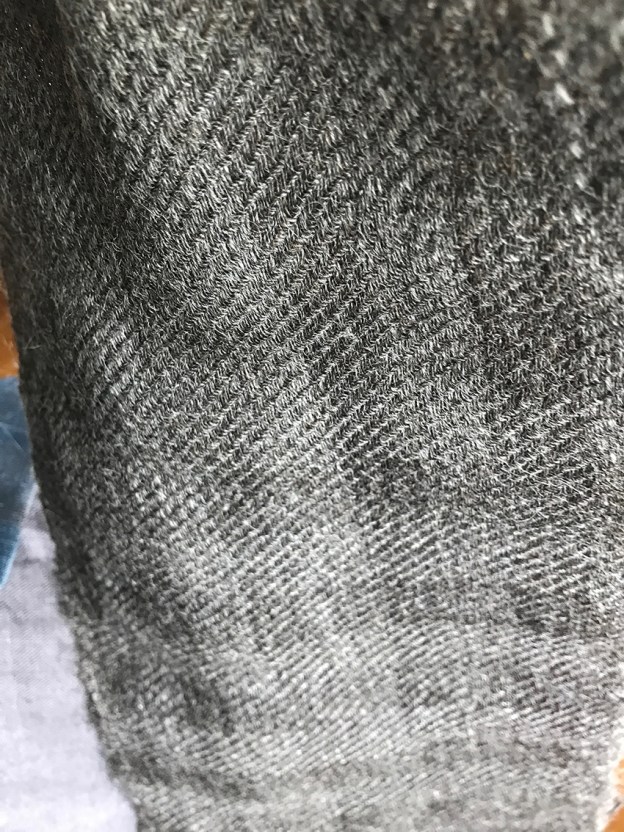
The fabric is slightly stiff even after the size has been washed out, reminiscent of the stiffness of new denim in the days before lycra. Not as stiff as those old new jeans – it’s a much thinner fabric – but similar. I’m guessing I’ve achieved my goal of spinning and weaving a cloth that will soften with wear like the denim of yore.

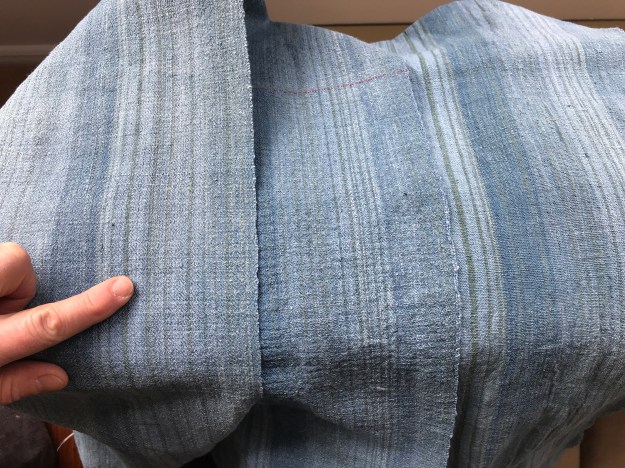
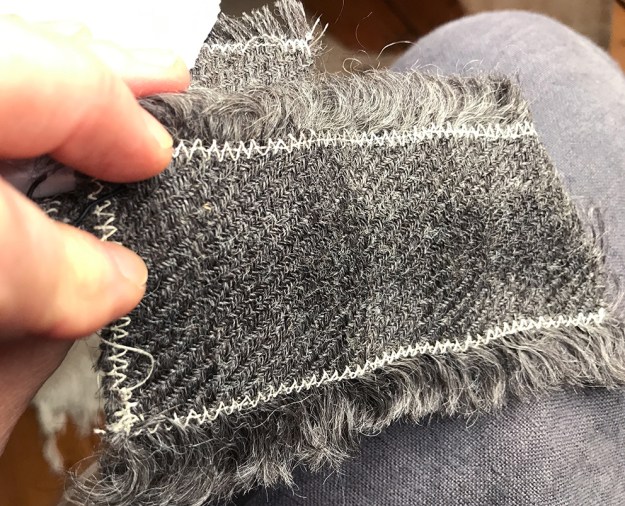
The warp was threaded for point twill; the fabric shows the three different weaves. To right plainweave/tabby; centre first twill (Strickler p.28 #94, Point twill from A German Weaver’s Pattern Book 1784–1810); left 8-shaft diamond twill. (The red line marks the point where I changed the tie-up from first to second twill.)  The width of the fabric decreased between patterns as the interlacement changed; the first twill (#94) is narrower than plainweave as the twill pattern packs threads more densely. The second twill, 8-shaft diamond, has no band of plainweave so packs even more tightly for a fabric slightly narrower than the first twill. The silk weft and denser packing of the twills makes both heavier fabrics, but not dangerously dissimilar to the plainweave with cotton weft.

The plainweave shows the warp striping most clearly and, like the wool singles fabrics I have woven, it is a little more elastic than a fabric woven from plied yarn. It’s heavy shirting in weight, noticeably lighter in the hand than either twill. To be expected, but it’s interesting to have it confirmed.plainweave

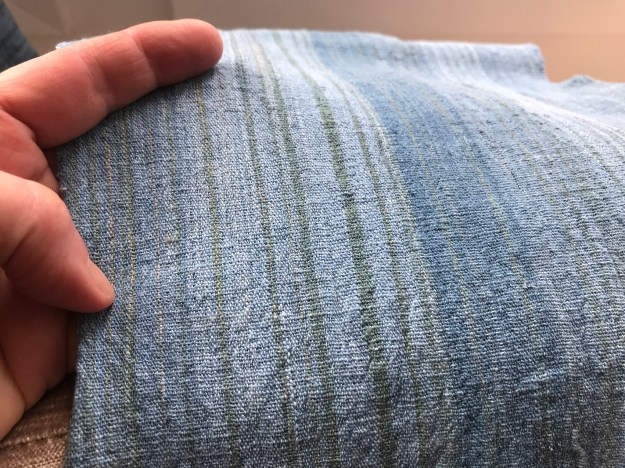
The patterning of twill #94 is less obvious in the fabric than I’d hoped. It’s there if you look closely, though.#94

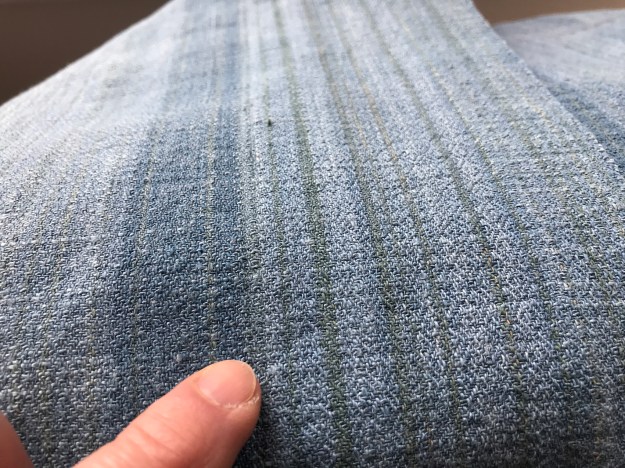
Once again 8-shaft diamond twill is just right, at least as far as I’m concerned. The fabric has the hand of lightweight denim. It looks good with the silk weft.
diamond

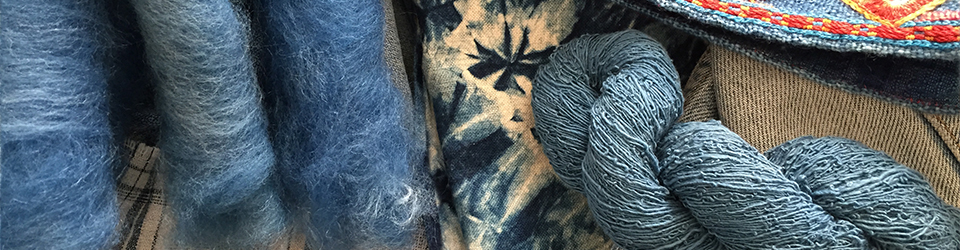
But I think it looks even better with the slightly paler blue cotton I used when I finished the silk (or at least couldn’t find any more).
diamondcotton
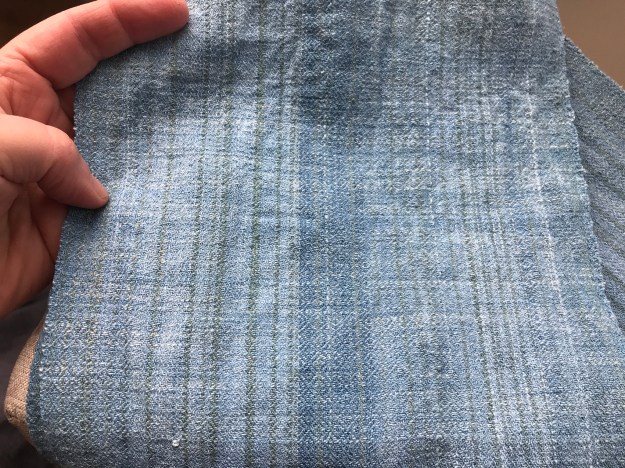
The pale blue fades in and out of the warp cottons, the diamonds seeming to shimmer in the fabric. It’s country cloth, but it’s interesting. I should play with the effect, I like it so much. I wish I had more than 24cm.

So. What am I going to do with it? Being a process rather than project person I’d really love to put it away and make the next fabric, but that defeats the purpose somewhat. There is more to be learned from this sample: I need to know how it wears. I could just bundle it into a bag and handle it until it softens but really, it’s fabric. It should be a garment. A sample can be a jacket or a shirt, and I think that’s what this will be once I overcome my fear of making garments. Why spin and weave? To make a garment from cloth you cannot buy, where one warp makes three different patterns for different parts of the garment. Eventually!

Slow Cloth update: The Triumph of Persistence Over Stupidity

Consider this the digital equivalent of a huge sigh of relief.

As you can see, the Slow Indigo Cotton warp has a new less flattering but educational name. I’ll explain that once it’s off the loom and finished, at which point I daresay more of my stupidity and – to be fair – ignorance will be revealed. In the interim, I am pleased to say my plan for it is working and we’re into the endgame.

fullsizeoutput_380

Why weave by hand? Why not just buy fabric?

Because as a hand weaver, even a new and somewhat ignorant hand weaver, I can make fabric you can’t buy. I threaded this warp for an 8-shaft point twill, then wove 3.5m of plain weave with cotton weft to get to this point, where I switch to a twill tie-up and indigo-dyed handspun silk weft. The patterned cloth will be used to accent parts of the garment made from the plain cloth. I don’t know what it will look like yet, that will depend on what the cloth looks and feels like after finishing. I’ve planned and am hoping for a hard-wearing heavy shirting/light jacket fabric, stiff to start with but softening with wear. Fingers crossed!*

* When I’m not using them to throw the shuttle.

Slow cloth, well-travelled

My last post was written in May 2017 sitting at the desk my husband made for me, beside a window looking out on my English garden in an English village (true, but much less quaint than it sounds).

This post is written from what was our kitchen table, repurposed as my temporary work desk, with a window looking out on our new garden on Vancouver Island, Canada. I’ve come home. Almost. ‘Home’ would be Alberta in the 1970s, but southern Vancouver Island is nonetheless a good place to be. Immigrants ourselves, in the summer of 2017 we fled Brexit Britain for our native land, arriving in time to celebrate Canada’s 150th. For nearly 12 months the logistics of our move – selling the house, selling everything we didn’t think worth shipping, packing – and fulfilling my spinning teaching commitments consumed all my time and energy. Only now am I starting to think and plan future textile projects.

But first I have to finish what I started.

Stephenie Gaustad taught me to spin cotton at SOAR in 2009. I fell in love with the banjo charkha, but couldn’t hide it under my sweater to bring it home when class finished so I’ve had to settle for tahklis and bead-whorl spindles, a T-frame charkha, Majacraft Suzie Pro and a Rose. I spun cotton on all of them and my bag of singles skeins grew larger. I learned to weave. One of my first projects on the Baby Wolf was a tiny warp of handspun cotton singles. Success! (Mostly.) Now I knew why I hadn’t plied those skeins, but increasingly I wondered what sort of cloth they’d make. In fact I needed to know, because there’s no point in spinning more cotton for weaving if what I’m spinning won’t make a cloth I like. There was only one way to find out: weave what I had. I’d spun natural shades of cotton from cream, brown and green through to white. I put the whole lot through an indigo vat because I like blue. Plus some handspun silk singles because I had A Plan.

IMG_3109
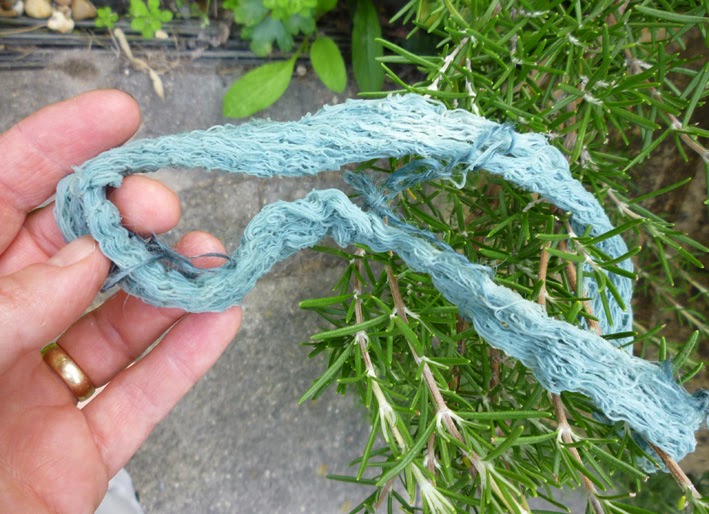
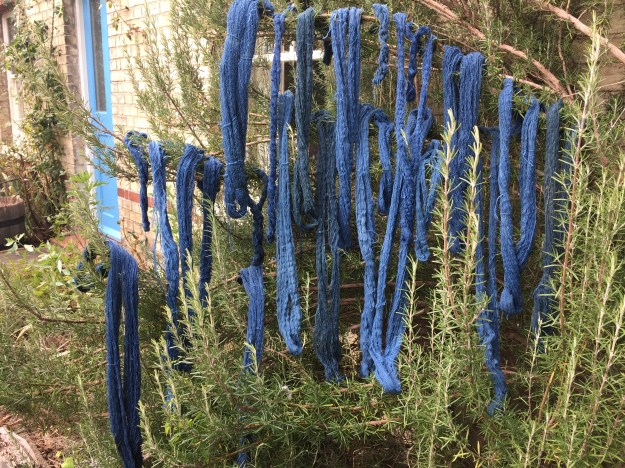
Indigo-dyed handspun cotton singles drying on the rosemary bush by the kitchen door. I miss that bush, and our North Ronaldsay sky-blue doors.

IMG_3111I had to finish drying the yarns on the radiator. Hmm. Clearly I dyed silk fibre, too. I wonder where that is? In one of the many boxes, of course.

IMG_3117
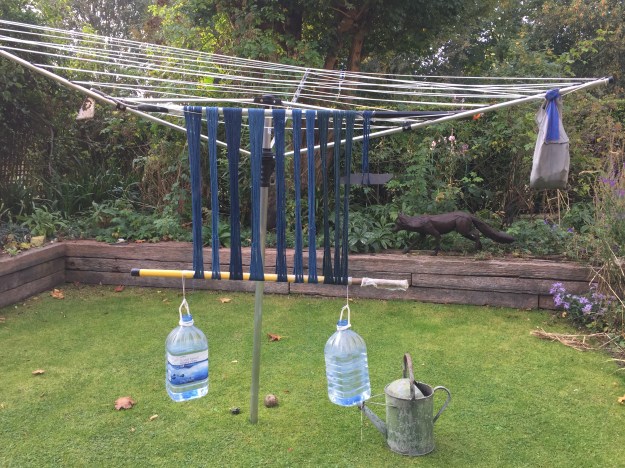
The gelatin-sized yarns drying under light tension – those water bottles are not full! – suspended between the hoe and an old rake handle wrapped in clingfilm aka Saran wrap on the clothes tree. The old grey lunchbag contains clothes pegs.

The shorter skeins were hard-spun ( which means with lots of twist) on the tahkli; I put them to one side for use as sewing thread, calculated the remaining yardage and wound a warp. I estimated the set, the number of warp threads per inch from wpi, wraps per inch around a ruler, then beamed the warp and wove a bit.

A digression dealing with the value of my time and the lifespan of the cloth I want to make. Modern fabric is generally soft when you buy it, even before you use it. The yarns are relatively softly spun, the cloth is woven and finished to be soft. Soft yarn, soft cloth doesn’t stand up to wear. It stretches out of shape, fibres pill and pull out of the fabric. This suits our ‘I want it soft and I want it right now’ society and, even better, it makes money for the manufacturers of clothing that will wear out as well as go out of style in under a year. But I invested a lot of time in spinning the yarn for this. Pre-Industrial fabrics, handspun, handwoven and hand-sewn, expensive as reflected the time needed to make them, wore well enough that clothing and bedlinens are often included in wills. I want to make cloth that reflects the time it took to make, that serves me well for years, that wears well. It will be hard to the touch to begin with but soften with wear and age.

Deciding the set for handspun yarn is tricky unless you’ve spun yarn to replicate an existing fabric. Standard set charts may be misleading: you can set your yarn like a commercial yarn of similar grist, but if your handspun is a different fibre and/or more or less tightly twisted, it will behave differently from the commercial yarn when finished and you’ll end up with a different fabric. With handspun I start with wpi, tweak it according to what I think of the cloth on the loom, and keep samples for future reference.

I looked at what I’d woven at 40epi, decided it was sleazy, unwove the inch, re-sleyed, wove a bit. Looked at it, decided it was still too open, unwove the inch, re-sleyed, wove a bit. I may have done this a third time, but kindly time blurs painful memories. Eventually what I’d woven looked enough like the fabric I wanted, warp-dominant to emphasize the stripes, that I cut the woven strip off to see what it looked like after hand washing. The small block shows the set and picks per inch off the loom, the long strip has been washed. The brown and tan cottons have dyed greenish. Other stripes are variations in the cream and white cottons, perhaps the result of variations in twist or in the fibres themselves.

IMG_3578

That doesn’t show how washing affected the density although you can clearly see the that the warp has shrunk (the unwashed sample is taller). With the light behind it the overall shrinkage is more obvious, as are the reed marks, the open lines between the groups of ends (threads) that run in each dent of the reed. They’re almost inevitable given that I had no finer reed, but I’m trying to think of them as a design feature – they can be – and they’re less obvious in the washed strip anyway. Notice also that the warp threads have moved in the washed fabric: hot water revives the twist, but the weave structure locks the threads into position. I may see some tracking in the final fabric.

img_3581-e1515077975775.jpg

On balance that sample was acceptable. It’s 50 epi set in an 8-shaft twill currently woven plain weave according to my Plan. It’s 9″ wide on the loom and I think the warp is about 5m long (the one thing I forgot to write in the book). The washed sample shrank roughly 10% in both warp and weft.

I’d hoped to have this woven and off the loom before we left the UK, but I had no time. When the movers arrived I simply folded the Baby Wolf, roughly wrapped paper around the beams, and left them to pack it. Unlike our more fragile ceramics (yes, I am bitter), the loom arrived undamaged. The warp had shifted somewhat, but less than I feared, and as it wasn’t well-wound or beamed in the first place that’s the lesser problem. I’m getting better at warping, but I need a lot of practice.

IMG_4622
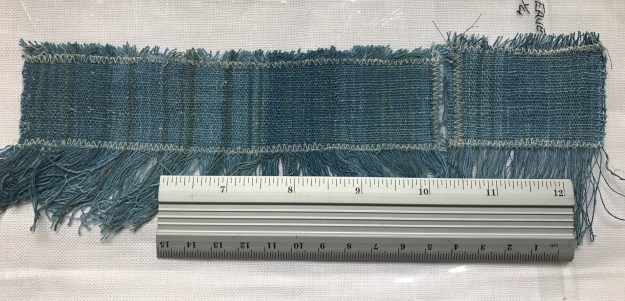
I have started weaving some fine yarns with the lease sticks in place. Like back-to-front or front-to-back warping, lease sticks in or out is something weavers seem to choose as habit early in their careers. I didn’t like the lease sticks in when weaving thicker, fuzzy yarns: my impression was that the sticks were encouraging fuzziness and binding of threads in the warp. But feeding firmly sized, finer yarns through the even tension of the lease sticks seems to correct some of my warping issues. 

img_4607.jpg

The colour is more accurate above. Below, a closer view of the fabric on the loom. The slightly more open weave below my thumb is where I started weaving again in Canada. Below that you can see some annoying imperfections, places where slightly thicker areas of the sized warp threads are stiffer and refuse to conform around the weft when beaten. They become much less obvious after washing and one could argue imperfections are part of the charm of khadi fabric, handspun and handwoven, but I’d prefer perfection. I see no reason to pursue anything less. To me the imperfections in this are a reminder that some of this is my earliest cotton spinning and weaving, because they’re less obvious now after I greatly increased the tension on the warp to pull them straight.

img_4608.jpg

At any rate my handspun singles stand up to the test. They are weavable, and they are teaching me more about weaving. Time to start spinning more cotton!

Why spin for weaving?

Sample

To make fabric like this.

I can’t look at it without smiling.

The seeds of this project were sown at SOAR, the Spin-Off Autumn Retreat at Tahoe in October 2012 when I attended Stephenie Gaustad’s ‘Spinning for a replicate or reenactment textile’ aka the Class of Awesome!  It truly was a Class of Awesome: I left with far more knowledge and confidence about spinning for weaving as well as a class handout containing descriptions of several historic textiles. ‘Donbæk Check’ – named for the burial site where it was found, near Frederikshavn in Denmark – sounded fascinating. Dating from the Iron Age, the 2/2 twill fabric had a chequerboard pattern produced by the light falling differently on the intersections of singles spun clockwise and counter-clockwise in the warp and weft. I’d heard of/seen pictures of twist-patterning in tablet-woven bands but hadn’t thought about it on fabric. Back in the UK I made a special expedition to the University Library to photocopy the reference and vowed I’d try this one day.

Fast forward to January 2017, when I was preparing to teach my first ‘Spinning for weaving’ workshop. While I enjoy making *any* fabric from my handspun, I wanted to show the students something memorable, a fabric that would be impossible or at least very difficult to weave from commercial yarns… and I remembered the Donbæk Check. Perfect. I had 2 x 100g packs of charcoal grey Wensleydale combed top from Julia Desch/Diamond Fibres: this is not pin-drafted top from giant drum carders, this is real (commercial) combed top. It’s special. It’s lovely.  I spun each 100g in a different direction using a short forward (‘worsted’) draw for a dense and shiny singles yarn that would – I hoped – reflect the light effectively.

WensFibre
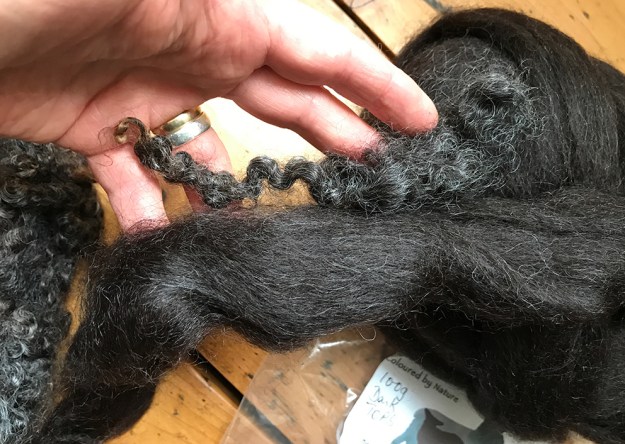
The fibre: a slightly darker version of the Wensleydale top, together with a washed lock from a Wensleydale fleece. Shiny!

Sized&unsized
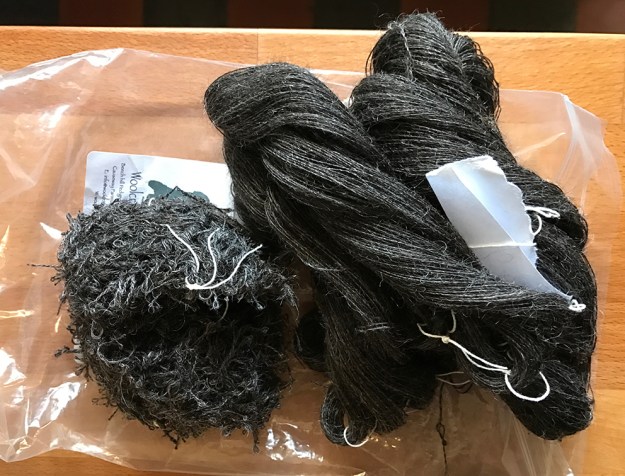
The singles, before and after steaming to set the twist.

I wanted to protect the smooth surface of that yarn and wasn’t sure how much I’d use for the warp, so I used a gelatine size on all of it.

sizing
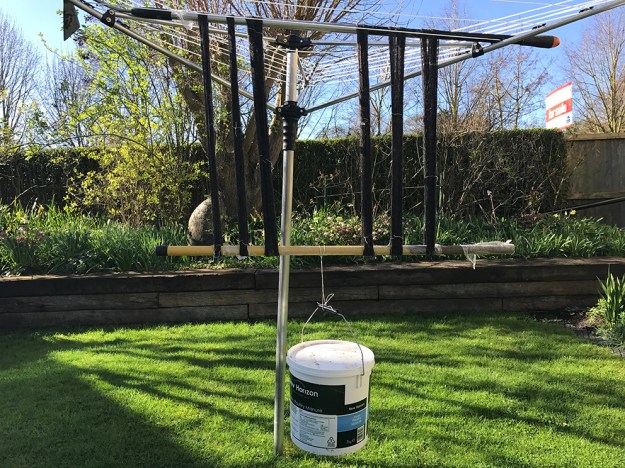
The sized singles yarns drying on the clothes tree. The plastic bin is weighted with just enough water to hold the singles taut, removing the pigtails, but with minimal stretching. Remember that wet wool is weaker than dry wool.

I wound a warp from just over half the yarn by weight, alternating clockwise and counterclockwise yarns every 26 ends to yield a rough 1″ check. Sett at 27epi for twill calculated from wpi it was seriously sleazy. I unwove the first 2″ and re-sleyed at 36epi, an eyeballed guess. This produced what I think is a lovely looking fabric that wove with a delightfully clear shed; although I hadn’t spun the yarn particularly tightly, the fact that it’s a longwool meant there were fewer ends, well locked down, so relatively little fuzz.

OnLoom

I was worried at this point because although I’d dutifully alternated the clockwise and counterclockwise singles in the weft (carrying the unused yarn up the selvedge), I could not see a pattern. I checked the underside… no pattern. Well. I needed to know how the cloth would behave after finishing (simple washing, in this case), and as the class had been moved forward I needed an example of it as soon as possible, so I cut that strip off as a sample, roughly stitched it to bind the ends and create a tiny ‘loom state’ sample, then washed the slightly larger piece.

Swatch

SwatchCheck

Magic.

The size was obscuring the pattern on the loom state fabric. It’s even more subtle than I expected: if the fabric is flat so the light does not play on the surface the pattern is scarcely visible.

TwistPatternStraightdown

I didn’t have time to finish the sample warp before the class, so I took the table loom and that small sample to show them, which was probably better than the finished sample alone, as students who hadn’t woven were able to try their hand.

Then I raced home to weave it off the loom, stitched the ends and threw it into the wool wash cycle of the washing machine. I ironed the damp fabric on the counter top (not the ironing board, which is too soft), using all my weight and the ‘linen’ setting to flatten it: the chequerboard formed hills and hollows in the unironed fabric.

Sample1
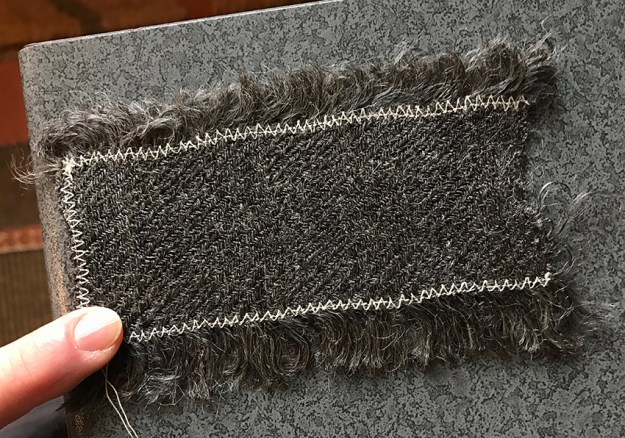
Unsurprisingly the weft stripe is more obvious on one side, the warp stripe on the other, but the chequerboard is visible on either side if the light is right.

It’s even more visible if light passes through the fabric. Isn’t that interesting?  I’ll just go and find a hand-lens so I can mark the twist directions of the singles in the sample…

TwistPatternTranspDiag

In The Big Book of Handspinning Alden Amos wrote “If warp and weft have the same twist direction, the threads will bed together better during the weaving … If the warp and weft have opposing twists, the individual yarns will be plainer or clearer in outline, the cloth will not be quite as dense.”

First I must consider another factor: the amount of twist I put into the singles when spinning. I almost always spin singles clockwise or ‘S’ – it’s the modern tradition – and this means my hands don’t get as much practice drafting while spinning counter-clockwise. Spinning counter-clockwise felt awkward, and I had to adjust my whorl and treadling to accommodate the slower drafting. When I look at the singles at 20x magnification, I can see that the counter-clockwise singles have a shallower twist angle – less twist – than the clockwise singles.

In that photo the clockwise (S) singles certainly do exactly as Alden suggests: they bed together tightly, forming the densest squares (S/S). Looking more closely at the fabric than I can photograph – you’ll have to take my word for it – I see that the counter-clockwise singles also bed together tightly, but only in small areas of the Z/Z squares: the variation in twist is interfering, and this is why on average the squares look less dense. In the S/Z or Z/S squares, the yarns do seem to form a more regular grid, as though the warp prevents the weft yarns from cuddling together and vice versa. It occurs to me that this sort of interaction would have caused the hills and hollows in the fabric when it came out of the washing machine – and that my hot iron and heavy pressing may have altered the ‘natural’ interactions of the singles.

All food for thought. Further experimentation is required!

Copenhagen drain covers: gotta catch ’em all!

Well, maybe not ALL of them. I noticed some days ago that many of the street access covers are much more attractive than those in London. Like New Orleans’ ‘Crescent City’ water company meter covers, they add interest to the street. Also note that most of the pavements/sidewalks are cobbled. And despite frequent street sweepers, there are lots of cigarette butts: it’s surprising how many people smoke in a city full of organic food shops!


We were puzzled by a frequent but irregular ‘whoosh’ sound outside the flat. It wasn’t the lift bridge, the rumble of car tires over the wide pavement. Nothing was moving, but still there was The Noise. Yesterday morning we worked out what it was:

Nyhavn has so many tourists, so much garbage, that these bins are self-emptying: the whoosh was the vacuum sucking the waste to a central, more accessible collection point.


Another indication of just how many people visit the bars (and drink Copenhagen’s own beer): the beer is delivered by tanker. This one holds 9000 litres.

thoughts on seeing a piece of antique lace

I think I’ve mentioned somewhere that I’m a hand spinner. I use my hands and various tools such as spindles and spinning wheels to make what I’ll loosely term ‘yarn’  from loose fibres by twisting them together. It’s an ancient skill. Yarn and the cloth made from it doesn’t usually survive to be dated (it rots, especially the early yarns made from plant materials), but sometimes the impressions of texture and pattern made by cloth and string in mud or soft soil do survive. Fragments of clay found in the Czech Republic show the pattern of cloth thought to have been woven 27,000 years ago. Some of the ‘Venus’ figures found in Europe dating from 20,000 BC have carefully carved string skirts, some so detailed that they show the skirt string is plied. Left dangling loose, a single strand of twisted fibre rapidly untwists to become loose fibre. Only if two strands – known as singles – are plied, twisted together in the opposite direction, will the dangling string remain string. Given the skills demonstrated by the things that have survived, it’s been suggested that people – probably women, as men are traditionally hunters – have been spinning fibre into string/yarn for over 40,000 years.

That’s a long time.

That’s many, many generations of my female ancestors. Only for the last 300 or so of those 40,000 years have women not needed to spin, at least in western Europe, where I come from. I am descended from a long line of women who could spin, and spin well, because the yarn they spun was needed to cloth their families, to be sold for money to pay the rent or feed their families. In the early days the string they made would have been knotted into nets to catch fish and birds. If my ancestors hadn’t been good, productive spinners, they and their children wouldn’t have survived. I wouldn’t be here.

So, as I’m spinning, I think of my ancestors, spinning. I didn’t gain my skill directly from their hands – my mentors passed on their own skills from their hands to mine – but my hands are doing the same things, going through the same motions, as those of my ancestors. Spinning unites us, hand to hand, across nearly 40,000 years.

Lynn, I search out antique handspun textiles because handling those textiles, learning new skills by examining them, is a direct link with the people who made them. For me, it’s all about the people, not the finished piece. I don’t care if something is tattered, too badly damaged for a ‘serious collector’: the ragged edges and loose threads mean I can see how it was made, whether the yarns are plied or singles, estimate their grist. I can extract individual fibres (of wool) to estimate staple length and fineness of fleece. Knowing these things I can try to replicate the yarn. Spinning it, I remember with respect the person who spun the original.

AlençonLace

So. Here is a piece of linen lace in the style of Alençon, in northern France, dated by style and condition to the 18th century (1701–1799). Pre-Industrial Revolution, there’s no doubt the thread used for this was handspun and, for lace, of the finest quality at the time. Because in this condition it is of no value to a collector 48″ of this cost £5, but to me it’s beyond valuation. It’s 48″ of people’s lives: the skills of the flax grower, the processors, the spinners, the lacemakers.

AlençonLace2

Detail of the lace magnified 20x. The lens circle is 1cm in diameter.


AlençonLace1

The damage allows me to examine the individual strands of yarn more closely.

AlençonLace3

Above, a damaged area magnified 20x, showing what seems to be a single thread.

Below, the same area magnified 80x. 

AlençonLace4

The lustre of the individual threads and the ‘hand’ of the fabric, even after more than 200 years, suggests this is linen. I am awestruck by the fineness of the fibres in the yarn: having done some flax processing myself (this link shows the basic principles), I have some idea of just how tricky it would be to get fibres this fine. Having spun flax, I have some idea of what it takes to spin this fine. At this point I’m not even sure whether this is plied or a singles yarn. I did find a description of the spinning process in Cassell’s Illustrated Family Paper, Vol. 4 1865 on Google Books:

“Why, the flax of which the old Brussels and the point d’Alençon were made, was cultivated on purpose; it was chiefly grown in Brabant, Halle, and Courtrai, and had to be spun in underground cellars, because contact with external air made the thread brittle. The thread was so fine as almost to elude the sight; the spinner had to go by the sense of touch, examining every inch as it left the distaff, and at the slightest irregularity stopping the wheel. The room was kept in darkness, except for one single ray of light arranged to fall on the thread, which was thrown up by a background of dark paper … “No wonder,” said Goody, “that fine lace is so costly; why, I have read lately, that at the present moment, hand-spun thread is often sold at £240 sterling for one pound only.”

MeasuringWorth says £240 in 1865 would be between £20,690 and £471,100 in 2015 pounds. I am stunned.

I hold the lace and I respect the people who made it. I remember with respect the people who, generation upon generation, developed the skill to make things like this. They may not be my personal ancestors, but without them we wouldn’t be here.

All that from a piece of old lace.

A quick post: indigo leaf prints

Just to prove I’m still playing with indigo, although I’ve had less time than I thought I would.

If you’ve only got a few leaves, try leaf prints.

IndigoLeafPrintSilk1

This is Japanese indigo. The technique also works for woad leaves, although the print is fainter than this, at least from my plants; ‘true’ indigo should also work. I am astonished by how much of the leaf structure can be captured by this technique. (The skulls were printed by rubbing fresh leaves through a stencil; I have to post this, too!)

Leaf printing seems to work best on finer fabrics like this silk; I tried it on a heavier cotton/light canvas, and the juice didn’t penetrate far enough to make a good print.
Take a leaf, put it on the fabric, cover it with a piece of clear plastic/heavy cellophane (I used a piece from a packet of oat bran). Take a dessert spoon and hammer the leaf with the bowl of the spoon through the plastic; try to make sure you cover (damage?) the entire leaf area. I think this breaks the cells to release the juice. Then put a dab of washing-up liquid on the plastic to act as a lubricant (don’t get it on the cloth) and ‘polish’ the leaf through the plastic, using lots of pressure. Too much and you can see the leaf squash into mush that obscures the detail; too little and the juice isn’t pressed into the fabric. Practice. Have fun!

IndigoLeafPrintSilk3

2015: A Summer of Blue

Or so I hope.

I’ve had a thing about indigo for longer than I care to remember. I think it started when my mother included indigo vats in a summer school dyeing class she taught in the early 1970s; in my mind’s eye I still see the shimmering metallic blue-copper-purple surface of the liquid and the cloth emerging from the vat green, turning deep indigo blue as I watched. Some years ago I started to recreate the magic. I began with the simplest chemical ‘colour run remover’ (I’ll explain these terms later) vat, and managed to dye some spinning fibre blue. I felted it too, but still: blue! I read of traditional fermentation vats and HAD to try to establish a sig vat based on the bacterial breakdown of urine. I briefly managed to get it working and saw a different blue, murkier and darker, on wool that 4 years later still retains the faint barnyard odour that for centuries indicated the finest blues.

Woad5

In 2013 my first attempt to grow Japanese indigo failed to thrive outside in a typical British summer, but I discovered that woad – the traditional blue of northern Europe – thrived. I wrote a blog post “Blue! From leaves!” about the fun I had crushing the leaves and extracting the indigo to dye blue, then using the ‘waste’ leaf matter to dye a second completely different colour known as woad pink.

The fabulous gift from A. of John Marshall’s new book on working with fresh indigo has inspired me to plan greater efforts this summer. Woad and the various plants known as ‘indigo’ that grow in warmer climates all contain the same compound – indigotin – that produces indigo blue, but woad contains less than most other indigos.

The summer of blue

I’ve made careful preparations. I want to try some of the interesting techniques that John describes; to be sure of them, I need fresh tadeai, the Japanese indigo Polygonum or Persicaria tinctoria. It won’t thrive in our semi-continental climate and clay soils; it requires a warmer maritime climate, higher humidity and reliable summer heat, and moist soil rich in organic matter. So I’ve bought a tiny greenhouse, the appropriate size for our tiny garden, complete with raised bed that I’ve filled with compost and leaf mould. I’m hoping this will allow me some control over heat and humidity.

IndigoHseGarden

I sowed the tadeai seed that John Marshall kindly included with the book indoors in April, keeping the seed tray in the warmth upstairs next to my computer. I even repurposed my drawing desk light with a grow light bulb. And I’ve had some success! Now the tadeai seedling are hardening off in the greenhouse, and seem to be thriving.

IndigoSeedlingsIndigoHse

In theory woad leaves could be used for the same techniques, although the colours might be fainter.  I need more woad! Sadly my first woad sowing either failed to germinate or, equally possible, the seedlings were eliminated by the horde of slugs and snails that reside in the garden. To the far left of the greenhouse there are three rows of woad re-sown a week ago, and I’m about to go outside to apply slug pellets and cover them to protect the birds and other animals.

Fortunately there are other sources of woad in the UK. The Woad Centre in Norfolk has been growing and harvesting it for some years. They sell indigo pigment extracted from the leaves and a variety of other products, but I am most interested in their woad balls. For centuries woad was a valuable commercial crop, preserved and transported to dyers in the form of balls formed from the chopped and kneaded fresh leaves, then left to dry. The balls can be reconsitituted for various forms of indigo vat, including the same extraction process I used in 2013. I’m now more interested in the various forms of fermentation vats, and have begun to prepare for my first attempt by ‘couching’ 100g of woad ball. This entails crushing the balls as finely as possible, moistening the mass, and leaving it to rot down/ferment into a dark green-black mass which is then used in the dye vat. I haven’t yet come across any explanation of the reason for the couching process; my guess is that the fermentation breaks down cell walls to ensure more of the indigotin compound is available to the dyeing process.

WoadBallPrepThe crushed woad ball in that dish were prepared and wetted with rainwater two days ago and I’m very happy: the mass is darker and warm to the touch. It’s working! It has a strong odour, the smell from the centre of a pile of grass clippings, and that seems right.

I have three 25litre plastic fermentation bins waiting in the garage, along with 2kg wheat bran (I can’t find rice bran) to fuel further fermentation, a pH meter, LCD thermometer strips and a ‘brewing belt’ heater to warm the vats if the British summer fails again. I have commercial natural indigo to add more pigment for a deeper blue. I am almost ready… I just have to set up a, er, urine donation facility next to the toilet :-)

Blue! from Leaves!!!

The Hat has been my main focus for the last few months and I can’t blog about it because I hope it will be published. Sorry …
But I can tell you all about another chapter in My Adventures with Indigo. It’s a long one; you might want to make a cup of your favourite beverage now, before you start. 

About 12 months ago I ordered both Japanese Indigo and Woad seeds, my cunning plan being to throw cabbages to the wind and grow blue instead. Alas, I have no greenhouse: the bitterly cold winter and late, wet spring put paid to the Japanese Indigo, which even indoors scarcely showed a leaf before giving up the ghost. This isn’t the climate it was looking for. Woad, on the other hand, was and still is grown here as a crop, so I expected more of it. To its credit, it delivered. Woad is apparently a gross feeder, in this case meaning that it needs nutrients and lots of them, rather than having no table manners. I fed it regularly with blood, fish and bone, and watered regularly in dry weather. It’s biennial; the first year leaves give colour, the second year there is no colour (can’t vouch for this yet), but you get seeds to grow more. Harvest the leaves from midsummer on. This post depicts events on July 21, my first pick.

I have both Jenny Dean’s Wild Colour (I have an earlier edition) and Rita Buchanan’s A Dyer’s Garden, both of which give instructions for dying with fresh woad leaves. It’s extremely straightforward. 

First grow your woad. I suspect it’s important to move as quickly as possible from harvest to hot water, so I set up my kit next to the woad, which is the lowish, bright green, elongated leaves to the right of the cabbages. The net is essential: everything under the net is extremely dangerous is food for the caterpillars of Cabbage White butterflies. If you don’t prevent the adults from laying eggs on the leaves, you will have no leaves. Ignore our bike gear, it’s just drying out/absorbing UV to kill bacteria.


Basic equipment for an afternoon of fun: well-wetted materials to be dyed blue, plus a large container (I used a jar because I can see the colour of the liquid in it), a large wooden spoon, rubber gloves, a glug or two of household ammonia, a BIG saucepan or stockpot (it will hold only water), with trivet and a thermometer accurate from 0–100°C. For further excitement you’ll need a saucepan you don’t use for food, and 1 tsp of alum mordant. Read the instructions below to make sure you understand what you’ll be doing and why.

Fill the kettle (really full) and put it on for tea. 
Pick the leaves as quickly as possible, and stuff them into a container. A large glass jar is good because you can see the fluid change colour, which is helpful. No need to shred them finely or anything, I just grabbed handfuls, slugs and all, ripped them in half and stuffed them into that large jar. 
The kettle should be boiling by the time you finish: pour the boiling water into the jar, enough to cover the leaves. Make tea with the leftover, if you want any; I opted for squash instead. Leave the leaves to soak. 

If you plan to go straight to dyeing once you’ve got the indigo from the leaves, at this point you should half-fill a saucepan or stockpot large enough to hold your jar with water at least halfway up the sides, put the trivet in the bottom (to prevent the glass jar from overheating on the metal) and put it on low heat (you’re aiming for 100-120°F (38-48°C). If you haven’t got a trivet, I use a layer of metal table forks.

The jar of leaves soaking in hot water.
The fluid will change from water-clear to dark sherry-brown as the leaves wilt. After an hour, remove the leaves (I used a kitchen strainer), squeezing out every drop of fluid, and put them carefully to one side. You will use them again.
 
 
The chemistry of indigo dyeing is not complicated, but it’s important. The dark brown fluid in the jar contains indigo from the woad leaves in the form of indoxyl (more detailed info on Wikepedia, scroll down to Extraction). To extract the indigo from the fluid, add a glug (about 1 tablespoon for this jar) of household ammonia to the fluid. Buchanan says baking soda will also work, I haven’t tried it.). Now pour the fluid back and forth between two containers, exposing it to the air as much as possible. You want bubbles and lots of them!
 
The foam starts yellow but turns a beautiful turquoise as the fluid is oxygenated, transforming the indoxyl into insoluble blue indigo. Once it’s as blue as blue can be, it’s decision time. You can dye with the fluid and indigo, or you can filter out the indigo particles and save them for another day. Filtering takes longer to do but much less time to describe, so I’ll show you that first. If you want to DYE NOW! skip the next section.

Filtering the indigo particles
My reading suggested that coffee filters and such aren’t fine enough to trap the bulk of the indigo particles. Some people use proper filter paper, but I didn’t have any. Instead I used two layers of extremely finely-woven commercial silk fabric to line a small tea strainer. Straining a smaller volume (I did this with the second batch of woad processed in August) took the best part of two days. Save the filtrate (the filtered fluid): it probably still contains enough indigo to dye something else blue if you follow the instructions for dyeing with the fresh indigo solution, below.


I suspect that’s very impure; there’s probably a lot of vegetable debris as well, but I see no reason for it not to work. 

I dyed a skein of cotton with the fluid that ran through the silk. A paler blue, but still blue!


Dyeing with the fresh indigo solution
If you decide to go ahead and dye with the solution, from this point the process is similar to a standard chemical indigo vat. Make a solution of reducing agent (thiourea or Spectralite), 1 tbsp in a jar of warm water and add it to the fluid in the jar. The reducing agent absorbs oxygen in the water, which transforms the insoluble blue indigo particles to the yellowish soluble form. In this form they are absorbed by the materials you want dyed. Now, given that you’re trying to REMOVE all the oxygen from the solution, once you’ve added the reducing agent you should take great care not to ADD oxygen (air!) unnecessarily. Stir gently, don’t create bubbles. To activate it, the solution must now be heated to 100-120°F (38-48°C) for about an hour. Check the temperature of your water bath and adjust it by adding boiling water or cold water as needed. Put the jar in. Stir it gently from time to time and check the colour of the fluid. It should become yellowish: with luck you can see that the bottom of the bubbles and the fluid is in fact yellowish.


When it looks like that it’s ready to use. Take the jar off the heat if it’s more convenient. Squeeze excess water from whatever it is you’re dyeing and add it to the jar.


Note the bluish tinge to the merino locks, which still contained some air. A hint of what is to come. I left the fibre and yarns (wool and silk) in the jar for about 15 minutes. When removed from the jar oxygen hits the pale green-yellow liquid: it begins to turn blue. First turquoise, then darkening further. 

You can dye more material in the jar until the indigo is exhausted, but remember that each batch adds oxygen. If the fluid becomes more blue than yellow, add more thiourea or Spectralite and repeat the heating process to drive off the excess oxygen, thus reducing the indigo to the soluble yellowish form that dyes.

Different fibres take and hold indigo differently: unlike ‘chemical’ dyes, in which the dye molecules chemically bond to the material, the soluble yellow indigo penetrates into microscopic cracks and crevices where, with luck, the insoluble blue particles are trapped, wedged firm. Those that aren’t trapped firmly will come off on your skin (and everything else) as the indigo blue ‘fades’ over time. Silk and other very smooth fibres have fewer places to trap indigo, so tend to end up paler than wool or cotton. But when they first come out of the vat, everything is simply glorious blue. In this case, glorious blue FROM LEAVES!!!


Well, not quite everything. That pinkish-brown skein of silk is just as magical, or even more. Remember I told you to save the leaves strained from the initial solution? 

Dyeing with indirubin: Woad ‘pink’
If you now treat the woad leaves from which the indigo was extracted as if they were standard fresh plant material, they will yield a totally different colour: woad pink. Mine was more brown than pink, but still absolutely astonishing to get two such different colours from a single leaf. The technique is simple: stir the strained leaves into a pan of water (I used rainwater, in case our very hard water affected the chemistry) and simmer for an hour or so.

Strain off the leaves – this time you can discard them! – and add 1tsp of alum mordant to the dye solution.


Add the material to be dyed and simmer for another 15 minutes or so, then allow the solution to cool with the material in it – leave it overnight if you can – as this yields a deeper colour. Here’s a closer view of the silk to show the indirubin colour: