Category Archives: fun!

Bad cotton.

Over the last few weeks several people have asked a FB spinning group about spinning cotton wool/cotton balls – the things sold for makeup removal – as a cheap, easy to find version of cotton. I said cotton balls aren’t like REAL cotton; they’re made of heavily-processed waste fibres so they won’t make a lovely even yarn but I do enjoy spinning them. I discovered I didn’t have any when I looked for the bag in the stash to take a picture. My local supermarket (this is the UK) also didn’t have any so I added a bag of 100% cotton balls to the Amazon basket.

Can you read the label? It looks like the label on the Amazon website but there are different words: ‘Vacuum packed to reduce packaging size’. Cotton isn’t elastic, it doesn’t rebound to its original shape in the way that wool does. The label claims the cotton balls will expand after the pack is opened, but that seems extremely unlikely.
What to do? I can’t send the stuff back, I’ve opened the pack.

Was this decent cotton before it was abused?

No, and I didn’t expect that it would be. Cotton balls are a way of making money from waste fibre. In the photo below the top fibre is cotton sliver (technical term for the cotton version of what spinners know as wool top) opened to show fibre alignment and nepps. Fibre below it is one of the cotton balls.

At this point spinners are wondering why anyone would bother. Keep reading :-)

Rehabilitating bad cotton
First thing is to encourage the cotton to rebound and expand as much as it can. Heat and moisture help, so I put the balls in a colander over a bowl of steaming water and left it overnight, mixing top to bottom a few times before I went to bed.

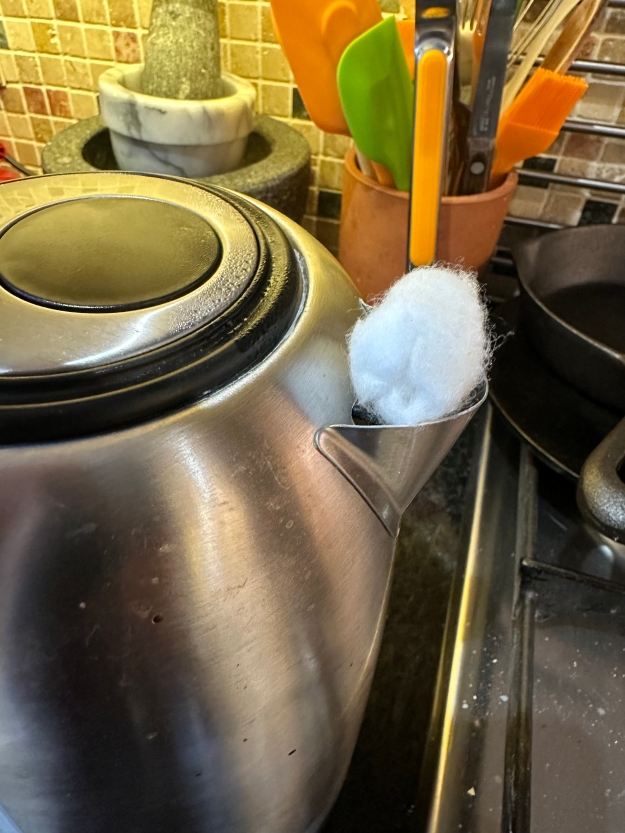
That helped but not much. I tried Extreme Steam at the spout of a boiling kettle; do this with real cotton sliver and you can actually see it expand; this, not so much.

Oh well.

How can I prep this for spinning?
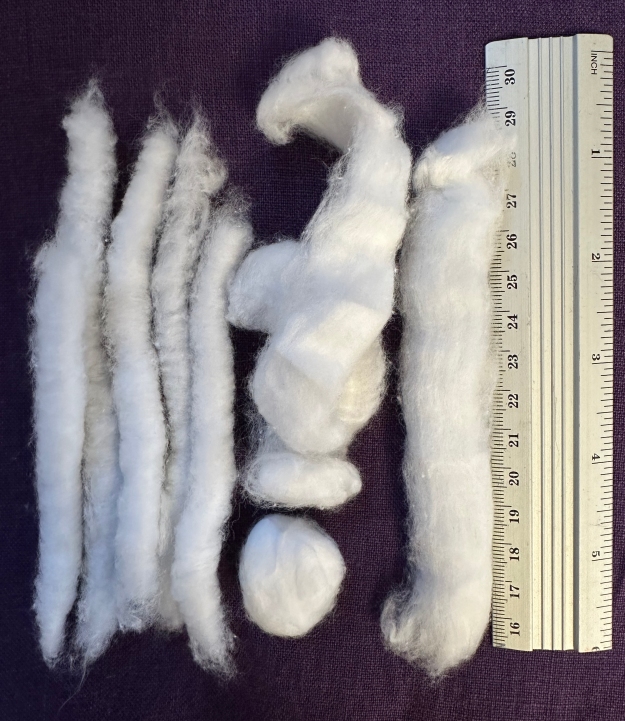
The three obvious options are shown in the photo below.
Centre, one of the cotton balls and above it, a couple of the balls unfolded to show the firmly set creases, a truly awful thing to see in cotton, each compacted area will be a difficult or undraftable slub in the yarn. But I can spin this.
To the right, next to the ruler, one of the balls unfolded and then carefully passed through steam from the kettle, allowed to rest, then steamed and rested again. The creases are still visible but it’s an improvement.
At left, five punis. Each is 2 1/2 (3 was too much, 2 seemed ungenerous) cotton balls unrolled and carded on my small Clemes & Clemes handcards. I don’t doff all the fibre onto one card at the end; instead I use a fine knitting needle to roll the fibre off each card, then slide the rolled fibre off. Moisten the needle with just the right amount of spit to catch the fibres at the start of the roll.

There wasn’t a lot of difference between spinning the unfolded fibre and the steamed unfolded fibre. Spinning with the tahkli (a support spindle with high speed good for spinning fine fibres) yielded a finer yarn but dealing with the slubs was more fiddly than spinning on the Majacraft Rose; both methods yielded a good somewhat slubby singles that plied up nicely.

Spinning a singles from the unfolded cotton ball on the Majacraft Rose lace flyer.

Carding the cotton for the punis opens and rearranges the fibres, so I’d hoped they would draft more easily even if the yarn was still slubby. They did, but not in a good way. The cotton drafted easily into a succession of long slubs that, when double-drafted for a competent yarn tended to snap in the thin sections between the slubs. My theory is that the additional carding, even if only 2 brushes of the cards to spread the fibre evenly, did too much damage: too many of the fibres had been weakened or shortened.

Spinning a singles from a puni made from cotton balls. Note the long, large slubs.

Verdict
I’d spin this from unfolded balls, steamed once or twice and allowed to rest before I spin them. Why bother? Because the end result is a good and interesting yarn.
On the left, tahkli-spun; on the right, wheel-spun. Both are competent. The really fluffy bits of the wheel-spun are the puni slubs; these will probably shed fibre and pill even if a weave structure locks the fibres into place, and they might fail under warp tension. So if I was spinning this for use in knitting or weaving I’d avoid slubs this large and loose.
Best way to do that is buy nicer cotton balls, avoiding ones that have been vacuum-packed. The ones I bought from Superdrug in Canada were lovely.

The Queen of the Night and an Upstart Cat in Puffling Pants

This story started a couple of years ago when a friend posted pictures of a custom doll, a dog made in memory of a much-loved pet, from one of Jenny Barnett’s kits.<https://www.etsy.com/ca/shop/JennyBarnettFelt>
I had thought of dollmaking as ‘interesting, no idea how it is done’, but when I saw that dog An Idea sprang full-fledged from my forehead. As they do. I wanted to make a cat, a beautiful blue cat to remember all the cats I loved. Jenny was only too happy to help and in due course sent pics of two blue cat kits, asking which one I wanted. I wanted both. I couldn’t choose. So both kits arrived. And sat on the shelf, because I wanted to make something of my own, not follow the pattern supplied. and I didn’t know how. I bought patterns for small stuffed toys — a bird, a cat, a rabbit –– and made them, revised patterns and re-made them, drafted my own patterns and made my own creatures. I made a teddy bear, I made another teddy bear. I made a hare.

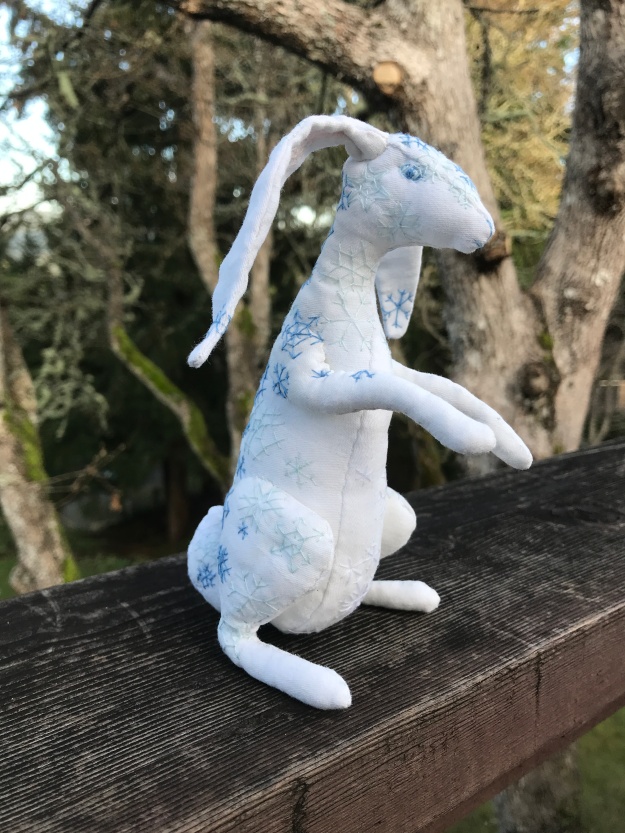
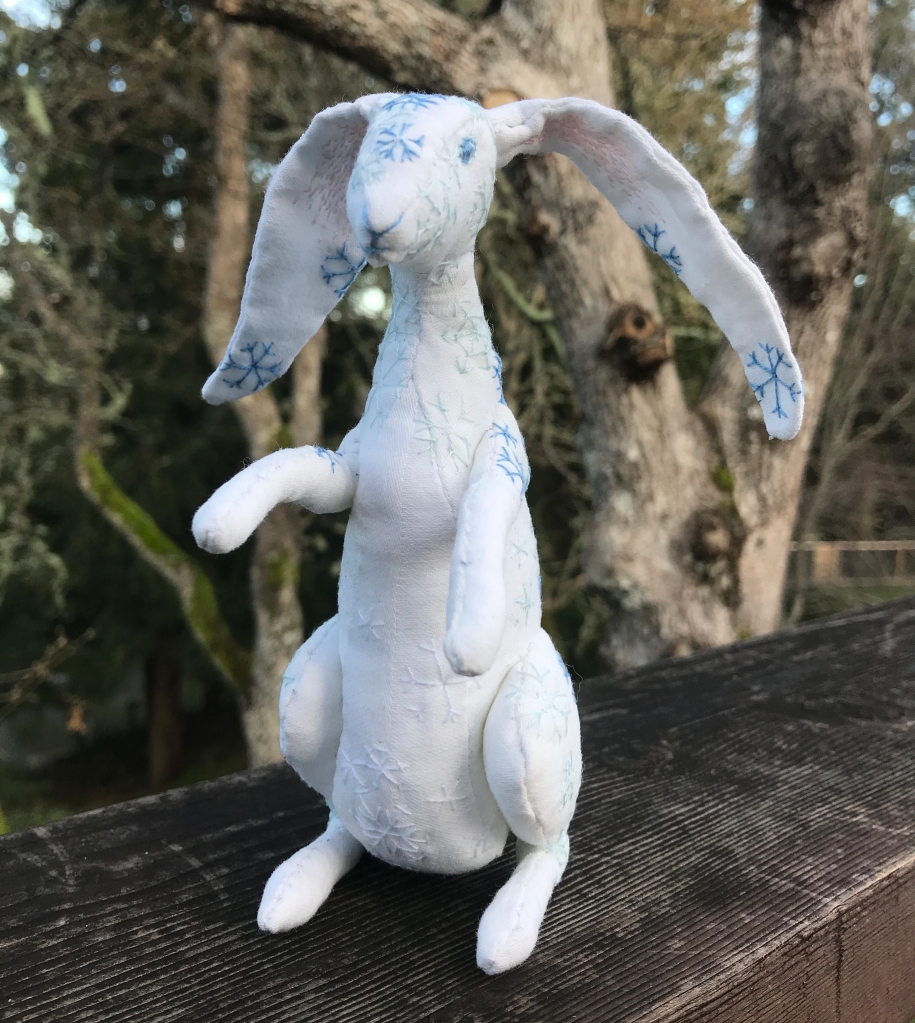
Handstitched and embroidered white cotton hare
Winter Hare, my own pattern cut from an old pillowcase.

The Queen of the Night
I chose the darkest of the two cats. I drafted a pattern for a female body (for some reason the cat spirit was female) and stitched a draft. Modified the draft. Found the fine cotton lawn I’d dyed with indigo last summer, cut the pattern, and stitched.

The body is offered to the head.

I tested the fit and when I was satisfied, I stitched more, in indigo-dyed embroidery floss and fine reeled silks, and the hand of the lawn changed, became stiffer, the figure became more real, more characterful . I spent days thinking about how to attach the arms and legs, whether or not she should have a tail (I decided not, but I’m slowly changing my mind). I thought about jointing, I tested indigo-dyed wooden beads, but in the end I opted for tiny mother-of-pearl buttons and spent hours online to find them. Every thought, every decision, every stitch added weight to her presence until she became more than simply ‘the blue cat’. Welcome the Queen of the Night.

The Queen of the Night

The Queen of the Night should have a cloak to conceal her glory. I found a fragment of blue silk velvet I bought because it was beautiful, spent hours online looking at cloaks and capes, thought and sketched and stitched more. The cloak has a high collar so the Queen’s head is crowned by silver moonlight.

An Upstart Cat in Puffling Pants? Or the Prince of London in Darkness?*
But wait, I hear you say, ‘What happened to the other kit?’
My original cunning plan was to make both cats and send one to tell M that I miss her, but it took so long to make the first cat that I wasn’t sure I’d live long enough to make the second, and it would have to be done exceptionally well because she’s not only a special person, she’s an accomplished sewing person. And a cat person. I cheated and asked if she’d like a doll kit to play with, no strings. She said yes! And that was, I thought, the end of it. I was curious about what she might make of it, but I’d given it to her so it was no longer my concern. I did once say that if by chance it was sitting on a shelf nagging at her, she should send it back; she said she had an Idea but had to work out how to accomplish it.

Time passes. Imagine the fluttering calendar pages.

And then a box arrived. The customs declaration said ‘doll’, and I discovered that adult anticipation is far more complex than that of a child. I remember desperately wanting to know what was in the parcels under the Christmas tree but, holding that box, my anticipation was different. I knew what must be in the box, but … I didn’t know what was in the box. The uncertainty balanced against the certainty that whatever it was would be *wonderful*.

I opened it and collapsed the possibilities. And caught my breath with delight.

An Upstart Cat in Puffling Pants. Or the Prince of London in Darkness.

I posed him with some of the books containing imaginary London. Because, holding him for the first time, I imagined him stalking, cat-arrogant, along the Thames beside The Globe as sunset fades to darkness. He would be acquainted with the Marquis de Carabas, he would emerge from the shadows to assist the Midnight Mayor (should the Mayor require assistance; he often does). He is part of *my* much-loved London made real in my hands, possibly the most thoughtful gift I’ve ever received, and he is one of the few things I would pack in my go bag because that night, after opening the parcel and meeting him, I dreamed of him stolen and I was desolate.

He’s wearing an Elizabethan costume made entirely of glove leather, stitched with copper thread. His doublet is trimmed and ruffed (is that a word?) with black lace stitched with copper. He has more weight, more presence, than the Queen of the Night, and my friend who made him real is Awesome.

* The card had two names for him. ‘An Upstart Cat in Puffling Pants’ refers to ‘Upstart Crow’, a UK sitcom and (with added ‘The’, a play) about the life of Shakespeare. ‘Puffling pants’ is one of the jokes; it refers to the trunk hose, with lining visible between the slashe
https://peterviney.com/stage/the-upstart-crow/

He might (also?) be a? the? Prince of London in Darkness. I wouldn’t speculate, he might take offence.

White felt disc hand-embroidered with flowers in brightly-coloured handspun silk

Spinning thread for handstitching, Part II. Spinning silk.

This is what started it all. Spin Off Autumn Retreat 2010. A pile of dyed mulberry silk top and some felt discs on a table in Robin Russo’s class, and the comment that spinning your own silk embroidery thread and stitching a needle case is good fun. So I spun the silk using a top-whorl spindle to insert quite a lot of twist, used an Andean plying bracelet for the short lengths I spun, and used the embroidery stitches I could remember from my childhood. It was good fun. And that was my first gentle reminder that stitching could indeed be fun.

I’ve used this needle case gently for the last 11 years and the silk threads are still in reasonably good shape. 

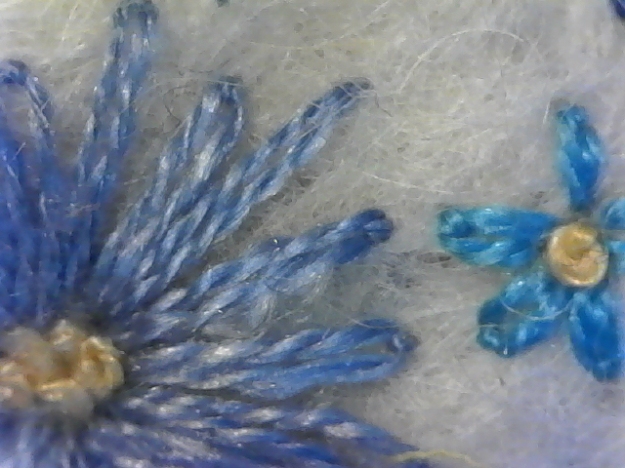
250x view of blue handspun silk embroidered flower petals showing relative lack of wear.
250X view of some stitches from the needle case to show wear of areas with less twist.

You may be able to see some slight ‘fuzziness’ indicating wear on the areas with very little twist.

Twist is good!
Twist locks the fibres in the yarn together to make a competent yarn: too little twist allows the fibres to slide within the yarn, which will then stretch under tension or even drift apart entirely (don’t ask me how I know this, it’s not a pleasant memory). But tight twist also means the fibres tightly spiralling on the thread are less exposed to wear in any one location on that thread. Tight twist locks the ends of fibres more tightly into the spun yarn. 

But not always!
Uncountered twist makes a yarn — or in this case a thread — that is lively. Most stitchers either add twist or untwist their thread ever-so-slightly with every stitch; if you add twist, you’ll know it because your thread starts tying itself in knots. A lot of twist results in a thread that may not flatten and spread to cover the underlying fabric. It might even stay entirely round, which is good if you’re couching it down, not so good for satin stitch. Like cotton, silk can take a lot of twist before it becomes wire: on average, when in doubt, always add a little more twist to silk.

Choose a yarn structure: sample silk threads
I learn a lot by looking at and handling examples of things to understand how they behave. 
In the image below silk threads are shown at 250x; they’re all from the same shot, split to allow me to name them. The white line indicates a 45° angle. [I’ve spelt ‘Gutermann’ incorrectly: it should be Gütermann. Sorry.]

6 different silk threads photographed at 250x to show twist angle and structure.

Using a needle to unpick the thread and a jeweller’s loupe to see the result I can say the first three (1,2, and 3 in case of doubt) are all 3-ply threads. 4, the embroidery floss, is 2-ply. Why? 3-ply yarns are almost circular in cross-section, so they look much the same diameter regardless of how they lie on the fabric, whereas 2-ply yarn is roughly oval in cross-section: it has a flatter, wider side and a narrower side.
So a 3-ply sewing thread will make a more uniform line of stitches, and being circular and tightly-spun might even move more smoothly through the fabric. The 3-ply Sajou and Soie Perlée stand cylindrical, high and glossy above a ground fabric or other stitches to catch the light and provide structure to a design.
By contrast the 2-ply embroidery floss will lie relatively flat on its flat side and because it is relatively loosely plied (compare the twist angle) it will spread even flatter to cover more of the ground fabric.

5, the 2-ply handspun silk top, is almost as tightly spun as the commercial threads, it’s just a bit thicker. It’s relatively ‘fuzzy’ with a halo of ends around the thread by comparison with the spun reeled silks above it,  but that is not proof that they are reeled and the handspun is spun from silk top: heat is used to burn that fuzzy halo off yarns mill-spun from silk top.

6  I will explain a little later. 

Other factors to consider
Sewing thread and most embroidery threads (leaving aside those attached to the fabric by other threads) have to pass through a fabric multiple times. Fabric is hard on thread. Every slub will catch on the fabric, the leading edge of the slub will abrade more and fray and eventually fail. The slub will enlarge the hole made by the needle, damaging the fabric and leaving the rest of the thread a bit loose in that large hole.
So unless you want texture and are happy to live with the consequences, spin consistent singles and ply consistently. You don’t need a lot of silk to make a lot of thread, so buy the best quality silk you can find. Avoid clumps of short fibres, neps, noils and other annoyances if you can, otherwise pick them out of the fibre as you spin. Or accept the consequences: it’s unlikely to be fatal or even a disaster! Uneven silk thread works well in rustic textiles sewn in the boro tradition, even in relatively precise geometric figures.    
Detail of sashiko stitched with uneven handspun silk.
There is significant variation in thread thickness and the amount of twist. Not my best spinning, but mottanai applies here: use what you have, waste nothing.back of waistcoat showing that uneven spun silk is appropriate to boro repairs.
And it looks perfect appropriate, at least to me.

I have an example of silk embroidery in my historic textiles collection.
undyed linen card case c. 1720 with yellow silk embroidery in back stitch and some satin stitch

This is probably an envelope case to hold visiting cards c. 1720 (dated by the style of embroidery). Undyed linen (note that there are two layers, the outer being a much finer weave) hand-sewn and embroidered with yellow silk. 

photo to show detail of flower and stitches worked in yellow silk on undyed linen card case with insert at 250x to show that the silk is floss, 2-ply.

A slightly closer view of the embroidery including a view of the back because embroiderers always like to see the reverse. The flowers and other details are back stitch, with a simple wrap binding the edges of the envelope. The insert detail shows more clearly the sheen of the silk – after 300 years! – and the structure of the yarn, which is a 2-ply twisted floss. 
And that’s why I tried Number 6 in the photo above, quickly twisting together a couple of strands of silk floss from Pipers Silks in the UK. It works, would work better if I used more strands for a thicker thread. But I’m not going to do that: I want to use that silk as it comes because it is so very beautiful and so very, very challenging.
pack of reeled silk floss for embroidery in various shades of blue with label from Pipers Silks.

I hope that’s enough to get you started. Use the best silk you have, spin evenly, spin reasonably tightly if not very tightly, it’s good fun!

Spinning thread for hand stitching, part 1. What do you want it for?

Talking to someone on FB the other day (an exchange of comments is what passes for conversation these days), I suggested they spin their own embroidery thread. And was asked if I’d done so, and what tips I might have. So I thought I’d start with a brief introduction to be followed by at least three posts about specific fibres and uses.

I’ve used quite a lot of handspun thread for stitching, not just boro textiles but also new garments. Just like any other yarn, when I’m spinning thread for stitching I start by thinking about how I’m going to use what I spin. It is useful to think about these factors even when considering which commercial thread and needle to use for garment repairs.
For example, if I want to stitch seams in a fine, densely woven fabric I need fine thread: a thick needle and a thick thread will break threads in the fabric each time the needle passes through the fabric. If the stitches are small and close together, over time these broken threads will weaken the fabric. If that fine thread is spun from short cotton fibres, it will require quite a lot of twist — be hardspun — to stand up to abrasion.
That fine, hardspun thread will eventually wear through softer spun threads. Traditional sashiko threads are spun softly to avoid damage to soft handspun fabrics.

Will the thread be exposed to wear, for example in boro-style repairs to clothing?
I loved my tabi so much that I wanted the repaired soles to be BEAUTIFUL.
I used embroidery floss and decorative stitching that I could admire while sitting cross-legged on the couch.

embroidery floss used for decorative repair to soles of tabi socks.

Embroidery floss is relatively soft-spun from long-staple cotton. It’s intended for surface decoration, it doesn’t wear well. So the repairs didn’t last long. I should have thought before I stitched.That’s what floorboards do to embroidery floss. But fabric also abrades thread: each time your needle and thread pass through the fabric, the fabric damages the surface, lifting fibres along the full length of thread used. That’s why embroiderers work with short lengths, because over time that abrasion from the fabric changes the character of the thread. If you want to reduce vulnerability to wear, spin a more tightly-twisted thread. Although too much twist will make a stiffer thread that might not lie as flat as you wish. Sample! 

Making things real (and the value of amuletic stitchery)

I have fallen down a rabbit hole or, more accurately, am sitting in a hare’s form looking up at the stars and sewing. As someone who has believed they hate sewing and are not good at sewing for far more than half their probable lifespan I’m doing a lot of sewing. I have a theory about the reason, but first, some of the results.

Hares. The European Brown Hare is a focus for folklore (for an overview, read Terri Windling’s ‘Following the Hare‘). For 29 years we lived in one of the last areas of the UK where hares are still relatively frequent. From late February on I’d see them in the fields, always at a distance because they are so incredibly alert to danger. Females ‘boxing’ unwanted males, single adults sitting quietly in the sun. Occasionally the mangled bloody remains left by illegal hare-coursers who set sight-hounds (lurchers and greyhounds) on them and bet huge sums of money on the dog most likely to kill.
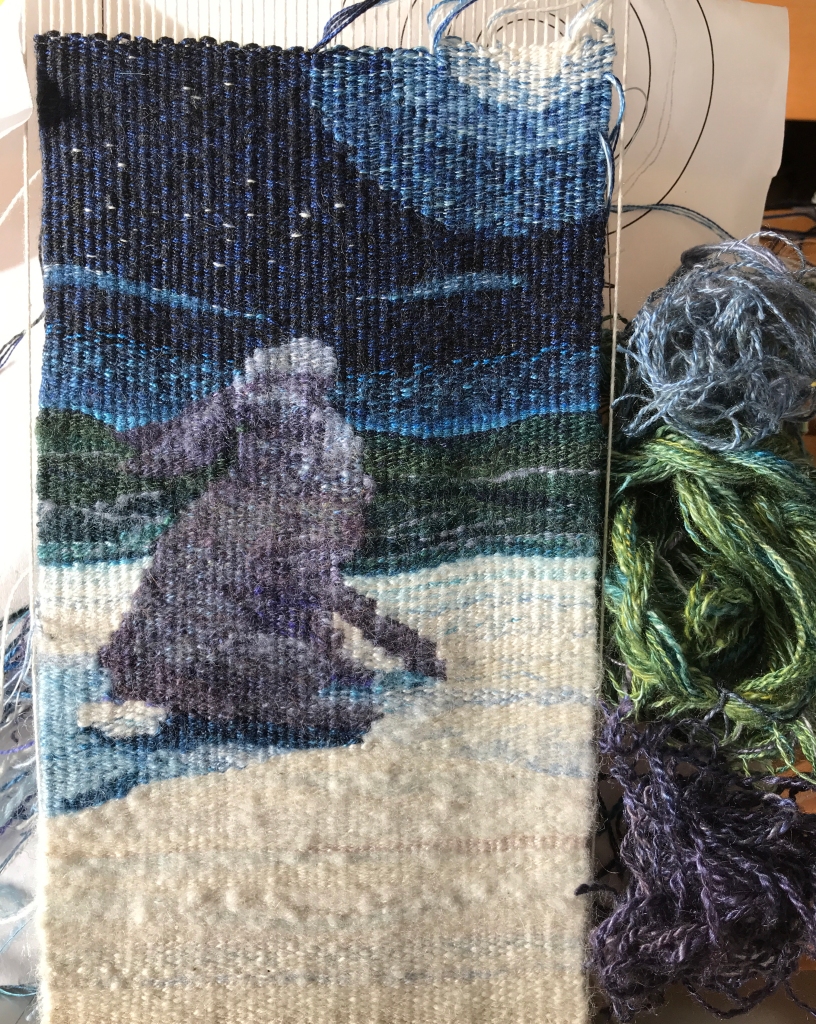
I love hares. I miss them most in late winter, when for nearly 30 years I’ve been looking forward to seeing them again. I have stitched hares and moons in handspun silk and indigo (the tattoo that completes my sleeve will be a hare-in-the-moon). My first serious attempt at tapestry last year was a tiny hare waiting in the snow for something, worked in remnants of handspun knitting and weaving yarns.

Remnants of lace yarns and handspun silk snow, the hare sits on the snowfield at midnight, waiting.

That was before I made the bears, and before I encountered the works of Mr. Finch. I had seen fabric dolls before, most painfully cute. These are not cute toys. Johanna Flanagan’s dolls (The Pale Rook) are not cute toys. How are such things made?
‘First, catch your hare’… I bought a bird pattern from Ann Wood Handmade and made a Bluebird of Happiness for a friend.

A Bluebird of Happiness worked with affection and silk threads in indigo cotton, random Indian silks.

That was tricky but satisfying. I bought another Ann Wood pattern (in my defence it was on sale) and this time modified the pattern pieces slightly even before making the first Bunny.

An Ann Wood bunny, slightly modified, in cashmere sweater and Liberty Tana Lawn blouse scraps. Very cute, very cuddly.

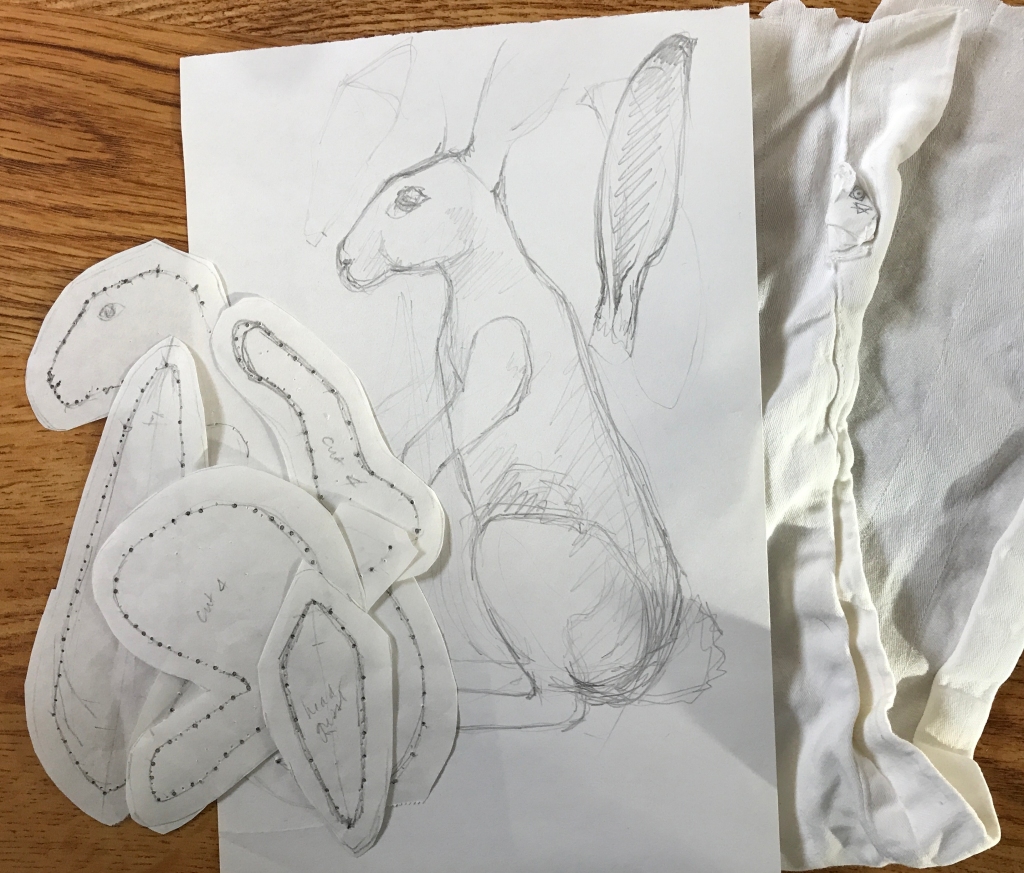
Now I thought I knew how to do this. I drew a hare, not the best hare ever, and used that shape as the basis for pattern pieces sketched directly on freezer paper (I’d read that being thicker it is better for patterns). The bears and the bird had taught me that finer and closely-woven fabrics in not-slippery material (silk is slippery) are easiest to work with, so I used an old cotton pillowcase from my ‘Indigo THIS’ cupboard.

My original bad hare sketch (no room for the ear on the page), the pattern pieces, and some of the pillowcase I used.

I am pleased. The result is not quite the shape I imagined but, having made it, I know how to change the pattern pieces to make what i see in my mind’s eye. My Winter Hare. 15cm (about 6 inches) high, entirely hand sewn, no armature. It works. I made a HARE. With an enigmatic expression.
I love it.

The tail was a nuisance. Everyone’s first thought — including mine — is a pompom or other soft fluffy thing. Total fail, or at least I thought so.
The Hare is not quite complete as it stands. Eventually it will stand on its own tiny piece of snow, a handspun handwoven tapestry, but I have to finish another tapestry to free the loom to weave that.

I had only the Winter Hare in my head when I started this. Now this is the December Hare, the first of a Calendar of Hares, each a hand-stitched tiny sculpture. I know what the January Hare will look like if I can work out how to cut the pattern pieces. And some of the others are taking shape in my head, too.

Why am I sewing? I have asked myself that question many times, sitting in my chair in the evening making tiny stitches (I wear +3.5 magnifying glasses for some of this work), unpicking those in the wrong place, trying again. I look at my book collection: the Japanese semamori stitches at the back neck of a child’s jacket lacking the line of stitches down the centre of an adult jacket needing two lengths of fabric for the width of adult shoulders, and I think of Sheila Paine’s books charting the meaning of stitch across different cultures. Amuletic stitches, each a tiny wish and hope from the maker for the well-being of the person for whom the item is made. And I know that this is why I am stitching so much: 2020 has been a very bad year. Worse, for myself and my friends in the UK it is the culmination of a series of bad years each of which has been worse and offered less hope than those before it. I feel powerless to help myself, let alone my friends. All I can do is stitch. Tiny precise stitches, each a hope and a wish for better times for those I care for. It’s a very strange and very moving experience to realise that my fingers, my mind and my heart are working together as the fingers and minds and hearts of women have worked together for as long as we’ve had needles and thread to make things for those we love.

With every stitch I wish to mend the world.

Cabbage to his friends

Cavolo when he’s on the dance floor talking to the ladies.

Cabbage because my friend the costume-maker calls her fabric remnants ‘cabbage’ and he’s made from a selection she sent as a birthday gift.

I had thought the burgundy velvet would become a stage bear, glittering larger than life in the spotlight. I drew a new pattern to make his head larger, his body heavier, a little less mild-mannered ‘teddy bear’ and a little more ‘bearish’. By the time I’d finished the head I knew this would be no glittering stage character. I thought he might become a Regency toff, but no. By the time I’d sewn all the parts he’d become a 1960s hip bear, a bear in with the In Crowd. I gave him a silk and lace cravat sewn on with a stickpin to prevent amorous ladies appropriating it as a souvenir, and designed a waistcoat lined with — I have today discovered — a genuine 1960s designer silk.

Like Berwick he’s a button-jointed bear, but Cabbage has Czech glass dragonfly buttons for a hint of psychedelic glitter.

His profile shows his shortened muzzle. He also seems to be a hopeful bear, but not wistful. I think Cabbage is more forceful, more bearish than Berwick.

There is at least one more bear to come — I have the fabric — but I have yet to decide whether the new pattern needs revision and if so, how.
In the interim Berwick and Cabbage are becoming acquainted. I think they make a good pair.

Cloth characters

‘Boro’ and visible mending is fundamentally about the repair and re-use of functional items, but I believe it’s important to remember that there are many possible functions for the things we make by hand. It’s as important to feel loved as it is to feel warm.

A doll made for a Roman child in Egypt AD100–500. Roughly-stitched linen stuffed with papyrus and rags with fragments of wool suggesting hair and a blue bead that might have been a hair ornament.
https://www.britishmuseum.org/collection/object/G_1905-1021-13


I try to give my students some idea of the variety of things they can make with scraps of fabric and thread, slow stitching by hand. Bags are good, in fact bags are excellent. Patch your clothes, make new clothes from assemblages of patches. Scarves! Pincushions! Needlebooks! All so very practical. I wanted something more off-the-wall. That Roman doll made from a twisted scrap of cloth made me think about how much we want to give children something tangible to say “I love you” every time they hold it.
Stuffed toys.

Wandering idly around the Internet when I should have been working, I found Ann Wood‘s pattern for a tiny cat figure. I made one from tiny scraps of Japanese quilting cotton and discovered I need more practice making tiny stitches let alone choosing an appropriate fabric for tiny stitches. But the result was cute.

My first attempt at a sewn cat figure

So I tried again, re-drafting some of the pattern pieces for a more complex but more cat-like shape. Despite an even more disastrous fabric choice (scrap damask linen napkins that frayed as soon as I cut the pieces due to linen being SO SLIPPERY) the result was so cute I made it clothing. A Japanese jacket and trousers, because I could. Note that the jacket has a centre back seam because Japanese adult clothing has a centre back seam. And it is lined. And has a gore for the cat’s tail. The trews open at the back and are tied with a drawstring that leaves a gap for the cat’s tail. Both Jacket and trews have genuine patched repairs. I’d say ‘How sad am I?’, but in truth I am not sad: it doesn’t look much like a cat but I smile every time I see it.

Pinterest found Kapital Kountry’s limited edition Teddy Bear that seems to have been sold for USD350 in 2018. Not a child’s toy, more an accessory or collectible, I think.

But… teddy bear. Hmm.

I searched for patterns. So many are ‘Disney bears’ of very little brain and less character. I found ‘Barbara Ann Bears’ selling patterns for much older bears on Etsy and chose ‘Fosdyke’.^1 I have almost no experience making garments, let alone stuffed toys, and I wanted a button-jointed bear rather than the internally-jointed one in the pattern, but managed to muddle through. I stitched ‘boro’ patchwork compositions onto the pattern pieces before assembling them, and experimented with some interesting but philosophically-dubious^2 techniques for distressing fabrics to make them look ‘older’. Note that the result is very definitely NOT child-safe. There are buttons, and beads, and loose fibres. You could certainly make a child-safe bear in this way, but it would be more honest to make the bear properly so the child or children can love it to pieces properly in the traditional manner.

Two quarters of the body sewn together.

As I stitched the pieces together I realised that the pattern really was designed for a mohair fabric, where the pile of the mohair conceals some things and accentuates others. Stitched flat cloth shapes quite differently.

I was able to overcome some of this by using internal stitches to re-shape things to my liking. Bear 1.0, aka Berwick is the result. I did not expect him to be so lovely. Fudging the neck join in lieu of a rotating joint left his head wonky, giving him a wistful air of hopeful affection. He hopes to be liked. I know how he feels.
He even stands upright although this may be short-lived as the soles of his feet round out.

I thought he needed a friend so gave him a pocket mouse and a pocket to keep him safe.

After some time spent admiring Berwick I drew a new pattern to create the shapes I prefer, and to better account for the difference between mohair and flat fabric. I was about to cut it from the same (old hand-dyed Thai pants) fabric when a box of ‘cabbage’ aka scrap costume fabric arrived from my friend in the UK. It included a wonderful burgundy brocade velvet.
Once again i have made a disastrous fabric choice for a novice sewer: it unravels, you can’t mark the velvet side, the velvet *creeps* as the pile moves as I sew, and I sort of forgot/did not realise that velvet is directional and it matters. I have made 2.5 heads in order to get one worth stuffing. But still, glorious. If he comes together as I hope I may make him a waistcoat of velvet embroidered with gold, an antique lace cravat, and name him ‘Liberace’.

A burgundy velvet leg.

^1: Because Fosdyke was a Tonkinese of brief acquaintance and extreme character fulness, ‘the ugliest kitten ever seen’ who so over-flowed with character and self-interest that we had to re-home him after 6 months, before his bullying was the death of our aged Siamese.

^2: ‘boromono’ and mottanai are concepts based on respect for the intrinsic value of fabric, to preserve its functionality as long as possible. Artistically distressing a perfectly decent and useful piece of fabric by cutting holes in it or staining it to make it look ‘used’ is not in accord with the spirit of ‘boro’. But it’s art, so that’s alright. Right?

Why spin for weaving?

Sample

To make fabric like this.

I can’t look at it without smiling.

The seeds of this project were sown at SOAR, the Spin-Off Autumn Retreat at Tahoe in October 2012 when I attended Stephenie Gaustad’s ‘Spinning for a replicate or reenactment textile’ aka the Class of Awesome!  It truly was a Class of Awesome: I left with far more knowledge and confidence about spinning for weaving as well as a class handout containing descriptions of several historic textiles. ‘Donbæk Check’ – named for the burial site where it was found, near Frederikshavn in Denmark – sounded fascinating. Dating from the Iron Age, the 2/2 twill fabric had a chequerboard pattern produced by the light falling differently on the intersections of singles spun clockwise and counter-clockwise in the warp and weft. I’d heard of/seen pictures of twist-patterning in tablet-woven bands but hadn’t thought about it on fabric. Back in the UK I made a special expedition to the University Library to photocopy the reference and vowed I’d try this one day.

Fast forward to January 2017, when I was preparing to teach my first ‘Spinning for weaving’ workshop. While I enjoy making *any* fabric from my handspun, I wanted to show the students something memorable, a fabric that would be impossible or at least very difficult to weave from commercial yarns… and I remembered the Donbæk Check. Perfect. I had 2 x 100g packs of charcoal grey Wensleydale combed top from Julia Desch/Diamond Fibres: this is not pin-drafted top from giant drum carders, this is real (commercial) combed top. It’s special. It’s lovely.  I spun each 100g in a different direction using a short forward (‘worsted’) draw for a dense and shiny singles yarn that would – I hoped – reflect the light effectively.
WensFibreThe fibre: a slightly darker version of the Wensleydale top, together with a washed lock from a Wensleydale fleece. Shiny!

Sized&amp;unsizedThe singles, before and after steaming to set the twist.

I wanted to protect the smooth surface of that yarn and wasn’t sure how much I’d use for the warp, so I used a gelatine size on all of it.

sizingThe sized singles yarns drying on the clothes tree. The plastic bin is weighted with just enough water to hold the singles taut, removing the pigtails, but with minimal stretching. Remember that wet wool is weaker than dry wool.

I wound a warp from just over half the yarn by weight, alternating clockwise and counterclockwise yarns every 26 ends to yield a rough 1″ check. Sett at 27epi for twill calculated from wpi it was seriously sleazy. I unwove the first 2″ and re-sleyed at 36epi, an eyeballed guess. This produced what I think is a lovely looking fabric that wove with a delightfully clear shed; although I hadn’t spun the yarn particularly tightly, the fact that it’s a longwool meant there were fewer ends, well locked down, so relatively little fuzz.

OnLoom

I was worried at this point because although I’d dutifully alternated the clockwise and counterclockwise singles in the weft (carrying the unused yarn up the selvedge), I could not see a pattern. I checked the underside… no pattern. Well. I needed to know how the cloth would behave after finishing (simple washing, in this case), and as the class had been moved forward I needed an example of it as soon as possible, so I cut that strip off as a sample, roughly stitched it to bind the ends and create a tiny ‘loom state’ sample, then washed the slightly larger piece.

Swatch

SwatchCheck

Magic.

The size was obscuring the pattern on the loom state fabric. It’s even more subtle than I expected: if the fabric is flat so the light does not play on the surface the pattern is scarcely visible.

TwistPatternStraightdown

I didn’t have time to finish the sample warp before the class, so I took the table loom and that small sample to show them, which was probably better than the finished sample alone, as students who hadn’t woven were able to try their hand.

Then I raced home to weave it off the loom, stitched the ends and threw it into the wool wash cycle of the washing machine. I ironed the damp fabric on the counter top (not the ironing board, which is too soft), using all my weight and the ‘linen’ setting to flatten it: the chequerboard formed hills and hollows in the unironed fabric.

Sample1Unsurprisingly the weft stripe is more obvious on one side, the warp stripe on the other, but the chequerboard is visible on either side if the light is right.

It’s even more visible if light passes through the fabric. Isn’t that interesting?  I’ll just go and find a hand-lens so I can mark the twist directions of the singles in the sample…

TwistPatternTranspDiag

In The Big Book of Handspinning Alden Amos wrote “If warp and weft have the same twist direction, the threads will bed together better during the weaving … If the warp and weft have opposing twists, the individual yarns will be plainer or clearer in outline, the cloth will not be quite as dense.”

First I must consider another factor: the amount of twist I put into the singles when spinning. I almost always spin singles clockwise or ‘S’ – it’s the modern tradition – and this means my hands don’t get as much practice drafting while spinning counter-clockwise. Spinning counter-clockwise felt awkward, and I had to adjust my whorl and treadling to accommodate the slower drafting. When I look at the singles at 20x magnification, I can see that the counter-clockwise singles have a shallower twist angle – less twist – than the clockwise singles.

In that photo the clockwise (S) singles certainly do exactly as Alden suggests: they bed together tightly, forming the densest squares (S/S). Looking more closely at the fabric than I can photograph – you’ll have to take my word for it – I see that the counter-clockwise singles also bed together tightly, but only in small areas of the Z/Z squares: the variation in twist is interfering, and this is why on average the squares look less dense. In the S/Z or Z/S squares, the yarns do seem to form a more regular grid, as though the warp prevents the weft yarns from cuddling together and vice versa. It occurs to me that this sort of interaction would have caused the hills and hollows in the fabric when it came out of the washing machine – and that my hot iron and heavy pressing may have altered the ‘natural’ interactions of the singles.

All food for thought. Further experimentation is required!