Category Archives: Indigo

This particular Triumph of Perseverance Over Stupidity is complete.

offtheloom

The cotton warp I described in Slow Cloth, well-travelled is woven, off the loom, finished. 6.18m/6.75yds of fabric c. 9″/23mm wide. Cotton singles warp, silk and cotton singles weft, all dyed in a (fructose, from memory) indigo vat. Note that the warp stripes are unplanned and result from differential dyeing by the different colours and types of cotton.

A couple of people have asked for more technical information about the yarn (wpi, tpi). Remember that this was random spinning over the last 5 years or more, not directed spinning for the project. Cottons include pima, supima, organic green and brown, spun from punis, top and directly from the seeds, on tahklis, charkha, Majacraft quill and lace flyer. All were spun clockwise, or z. The yarn(s) vary widely in grist. In the photo below of remnants of the sized warp the 1/2″ wide sample is wrapping at roughly 52-56wpi. In the 1/8″ sample the yarn is wrapping at over 70wpi. (The greenish colour is indigo over natural brown, which together with its thinness tells me this was probably tahkli spun from seeds on my lap in front of the tv. Why weave your handspun? For the memories.)

WPI

Twist per inch is also variable. It is difficult to see the twist in the sized yarn, but examining unsized yarn in the weft bag – the warp was selected randomly from the skeins of dyed yarn, so both are equally variable – with a magnifier I eyeballed twist from roughly 45° to 55–60°, assuming 90° is perpendicular to the length of yarn. So it’s reasonably high twist… and that’s AFTER boiling. The yarn was probably fractionally thicker before boiling, so add something to those twist angles for twist on the singles as they came off the bobbin/shaft. Basically, sample. That’s what this fabric is, a jacket-length sample.

I like it.

washed,ironed

That’s the fabric finished to my current satisfaction. An overnight soak followed by wool/handwash cycle did not remove the gelatine size, so I soaked this in a bucket of the hottest water from the tap plus a couple of kettles of boiling water, washed on permanent press ‘warm’, then ironed on hottest cotton setting. It’s shrunk about 10% in width. I like it a lot. Despite the cursing and frustration, I also appreciate the lessons it has taught me. Some are unlikely to be needed again, such as: Do not expect a warp on the loom to make an international move without shifting somewhat. Others may be useful time and again.

My handspun cotton weaves well, but beware of slubs.
Some of my earliest and most unevenly spun cotton singles are in this warp. Only the very thinnest singles snapped under the quite high weaving tension, and by ‘very thinnest’ I mean places where uneven singles were thinner than fine sewing thread so I confess I’m feeling smug and planning a super-thin cotton fabric. But thick slubs are as bad or even worse than thin spots: the slubs hold more size, so are stiffer and fail to bend around the weft. They stuck up out of the fabric a bit after weaving and some are still visible after finishing. I can live with this.

slub

Most of my stupid mistakes occurred during the weaving; I’m even more proud of my spinning because the singles stood up to such mistreatment.

Wind sized yarns from the skeins onto bobbins before winding the warp.
See the underline? That means this one’s particularly important. Because winding the warp from a skein held on a flexing umbrella swift with occasional pauses to break the yarn free from places where the size has stuck threads together is not exactly conducive to even warp tension, is it?

I am rubbish at winding warps.
Perhaps fractionally less rubbish now because I’ve wound a few since this one, but still. This warp was wound one thread at a time from two different umbrella swifts over the course of three days. Should I be surprised that I had to hang a chiming array of weights from slack threads? No, I should not.

Thoroughly set the weft twist before weaving.
Or be prepared to guard against pigtails forming when you slacken tension to beat it into place. I am told that many traditionally-spun and woven cotton fabrics from South America have these pigtails, so it’s authentic, but still. I prefer my fabric without.

Be open-minded about lease sticks in or out while weaving.
The lease sticks were useful for this warp, seeming to help even out the tension. But on earlier fuzzy warps (cashmere and fine merino handspun lace) the lease sticks seemed to raise the fuzz, encouraging the the ends to stick together.

But enough criticism.

ThreeFabrics

The fabric is slightly stiff even after the size has been washed out, reminiscent of the stiffness of new denim in the days before lycra. Not as stiff as those old new jeans – it’s a much thinner fabric – but similar. I’m guessing I’ve achieved my goal of spinning and weaving a cloth that will soften with wear like the denim of yore.

The warp was threaded for point twill; the fabric shows the three different weaves. To right plainweave/tabby; centre first twill (Strickler p.28 #94, Point twill from A German Weaver’s Pattern Book 1784–1810); left 8-shaft diamond twill. (The red line marks the point where I changed the tie-up from first to second twill.)  The width of the fabric decreased between patterns as the interlacement changed; the first twill (#94) is narrower than plainweave as the twill pattern packs threads more densely. The second twill, 8-shaft diamond, has no band of plainweave so packs even more tightly for a fabric slightly narrower than the first twill. The silk weft and denser packing of the twills makes both heavier fabrics, but not dangerously dissimilar to the plainweave with cotton weft.

The plainweave shows the warp striping most clearly and, like the wool singles fabrics I have woven, it is a little more elastic than a fabric woven from plied yarn. It’s heavy shirting in weight, noticeably lighter in the hand than either twill. To be expected, but it’s interesting to have it confirmed.plainweave

The patterning of twill #94 is less obvious in the fabric than I’d hoped. It’s there if you look closely, though.#94

Once again 8-shaft diamond twill is just right, at least as far as I’m concerned. The fabric has the hand of lightweight denim. It looks good with the silk weft.
diamond

But I think it looks even better with the slightly paler blue cotton I used when I finished the silk (or at least couldn’t find any more).
diamondcotton
The pale blue fades in and out of the warp cottons, the diamonds seeming to shimmer in the fabric. It’s country cloth, but it’s interesting. I should play with the effect, I like it so much. I wish I had more than 24cm.

So. What am I going to do with it? Being a process rather than project person I’d really love to put it away and make the next fabric, but that defeats the purpose somewhat. There is more to be learned from this sample: I need to know how it wears. I could just bundle it into a bag and handle it until it softens but really, it’s fabric. It should be a garment. A sample can be a jacket or a shirt, and I think that’s what this will be once I overcome my fear of making garments. Why spin and weave? To make a garment from cloth you cannot buy, where one warp makes three different patterns for different parts of the garment. Eventually!

Slow Cloth update: The Triumph of Persistence Over Stupidity

Consider this the digital equivalent of a huge sigh of relief.

As you can see, the Slow Indigo Cotton warp has a new less flattering but educational name. I’ll explain that once it’s off the loom and finished, at which point I daresay more of my stupidity and – to be fair – ignorance will be revealed. In the interim, I am pleased to say my plan for it is working and we’re into the endgame.

fullsizeoutput_380

Why weave by hand? Why not just buy fabric?

Because as a hand weaver, even a new and somewhat ignorant hand weaver, I can make fabric you can’t buy. I threaded this warp for an 8-shaft point twill, then wove 3.5m of plain weave with cotton weft to get to this point, where I switch to a twill tie-up and indigo-dyed handspun silk weft. The patterned cloth will be used to accent parts of the garment made from the plain cloth. I don’t know what it will look like yet, that will depend on what the cloth looks and feels like after finishing. I’ve planned and am hoping for a hard-wearing heavy shirting/light jacket fabric, stiff to start with but softening with wear. Fingers crossed!*

* When I’m not using them to throw the shuttle.

Slow cloth, well-travelled

My last post was written in May 2017 sitting at the desk my husband made for me, beside a window looking out on my English garden in an English village (true, but much less quaint than it sounds).

This post is written from what was our kitchen table, repurposed as my temporary work desk, with a window looking out on our new garden on Vancouver Island, Canada. I’ve come home. Almost. ‘Home’ would be Alberta in the 1970s, but southern Vancouver Island is nonetheless a good place to be. Immigrants ourselves, in the summer of 2017 we fled Brexit Britain for our native land, arriving in time to celebrate Canada’s 150th. For nearly 12 months the logistics of our move – selling the house, selling everything we didn’t think worth shipping, packing – and fulfilling my spinning teaching commitments consumed all my time and energy. Only now am I starting to think and plan future textile projects.

But first I have to finish what I started.

Stephenie Gaustad taught me to spin cotton at SOAR in 2009. I fell in love with the banjo charkha, but couldn’t hide it under my sweater to bring it home when class finished so I’ve had to settle for tahklis and bead-whorl spindles, a T-frame charkha, Majacraft Suzie Pro and a Rose. I spun cotton on all of them and my bag of singles skeins grew larger. I learned to weave. One of my first projects on the Baby Wolf was a tiny warp of handspun cotton singles. Success! (Mostly.) Now I knew why I hadn’t plied those skeins, but increasingly I wondered what sort of cloth they’d make. In fact I needed to know, because there’s no point in spinning more cotton for weaving if what I’m spinning won’t make a cloth I like. There was only one way to find out: weave what I had. I’d spun natural shades of cotton from cream, brown and green through to white. I put the whole lot through an indigo vat because I like blue. Plus some handspun silk singles because I had A Plan.

IMG_3109
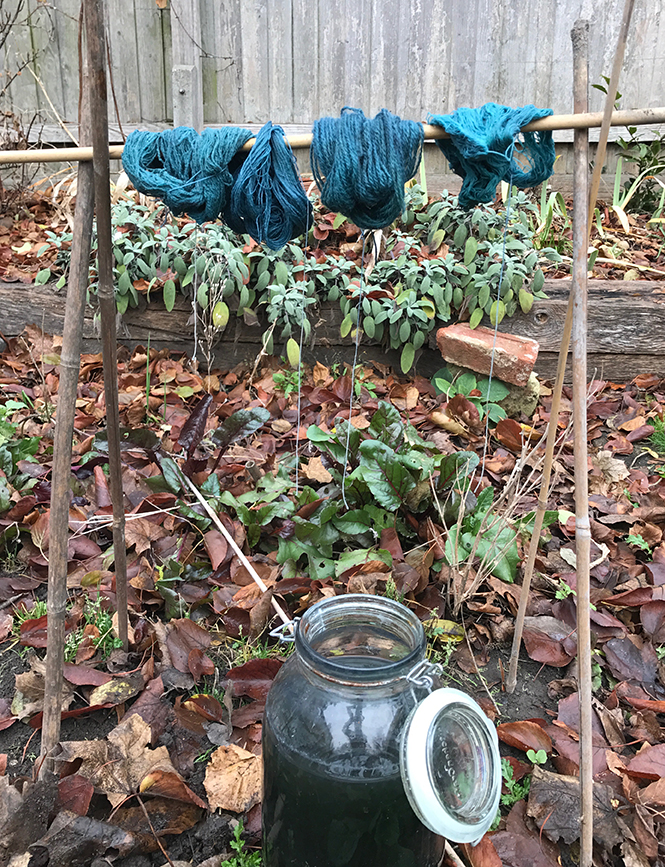
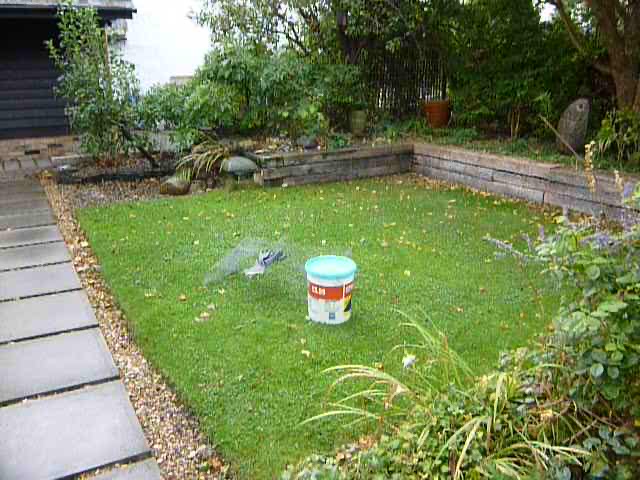
Indigo-dyed handspun cotton singles drying on the rosemary bush by the kitchen door. I miss that bush, and our North Ronaldsay sky-blue doors.

IMG_3111
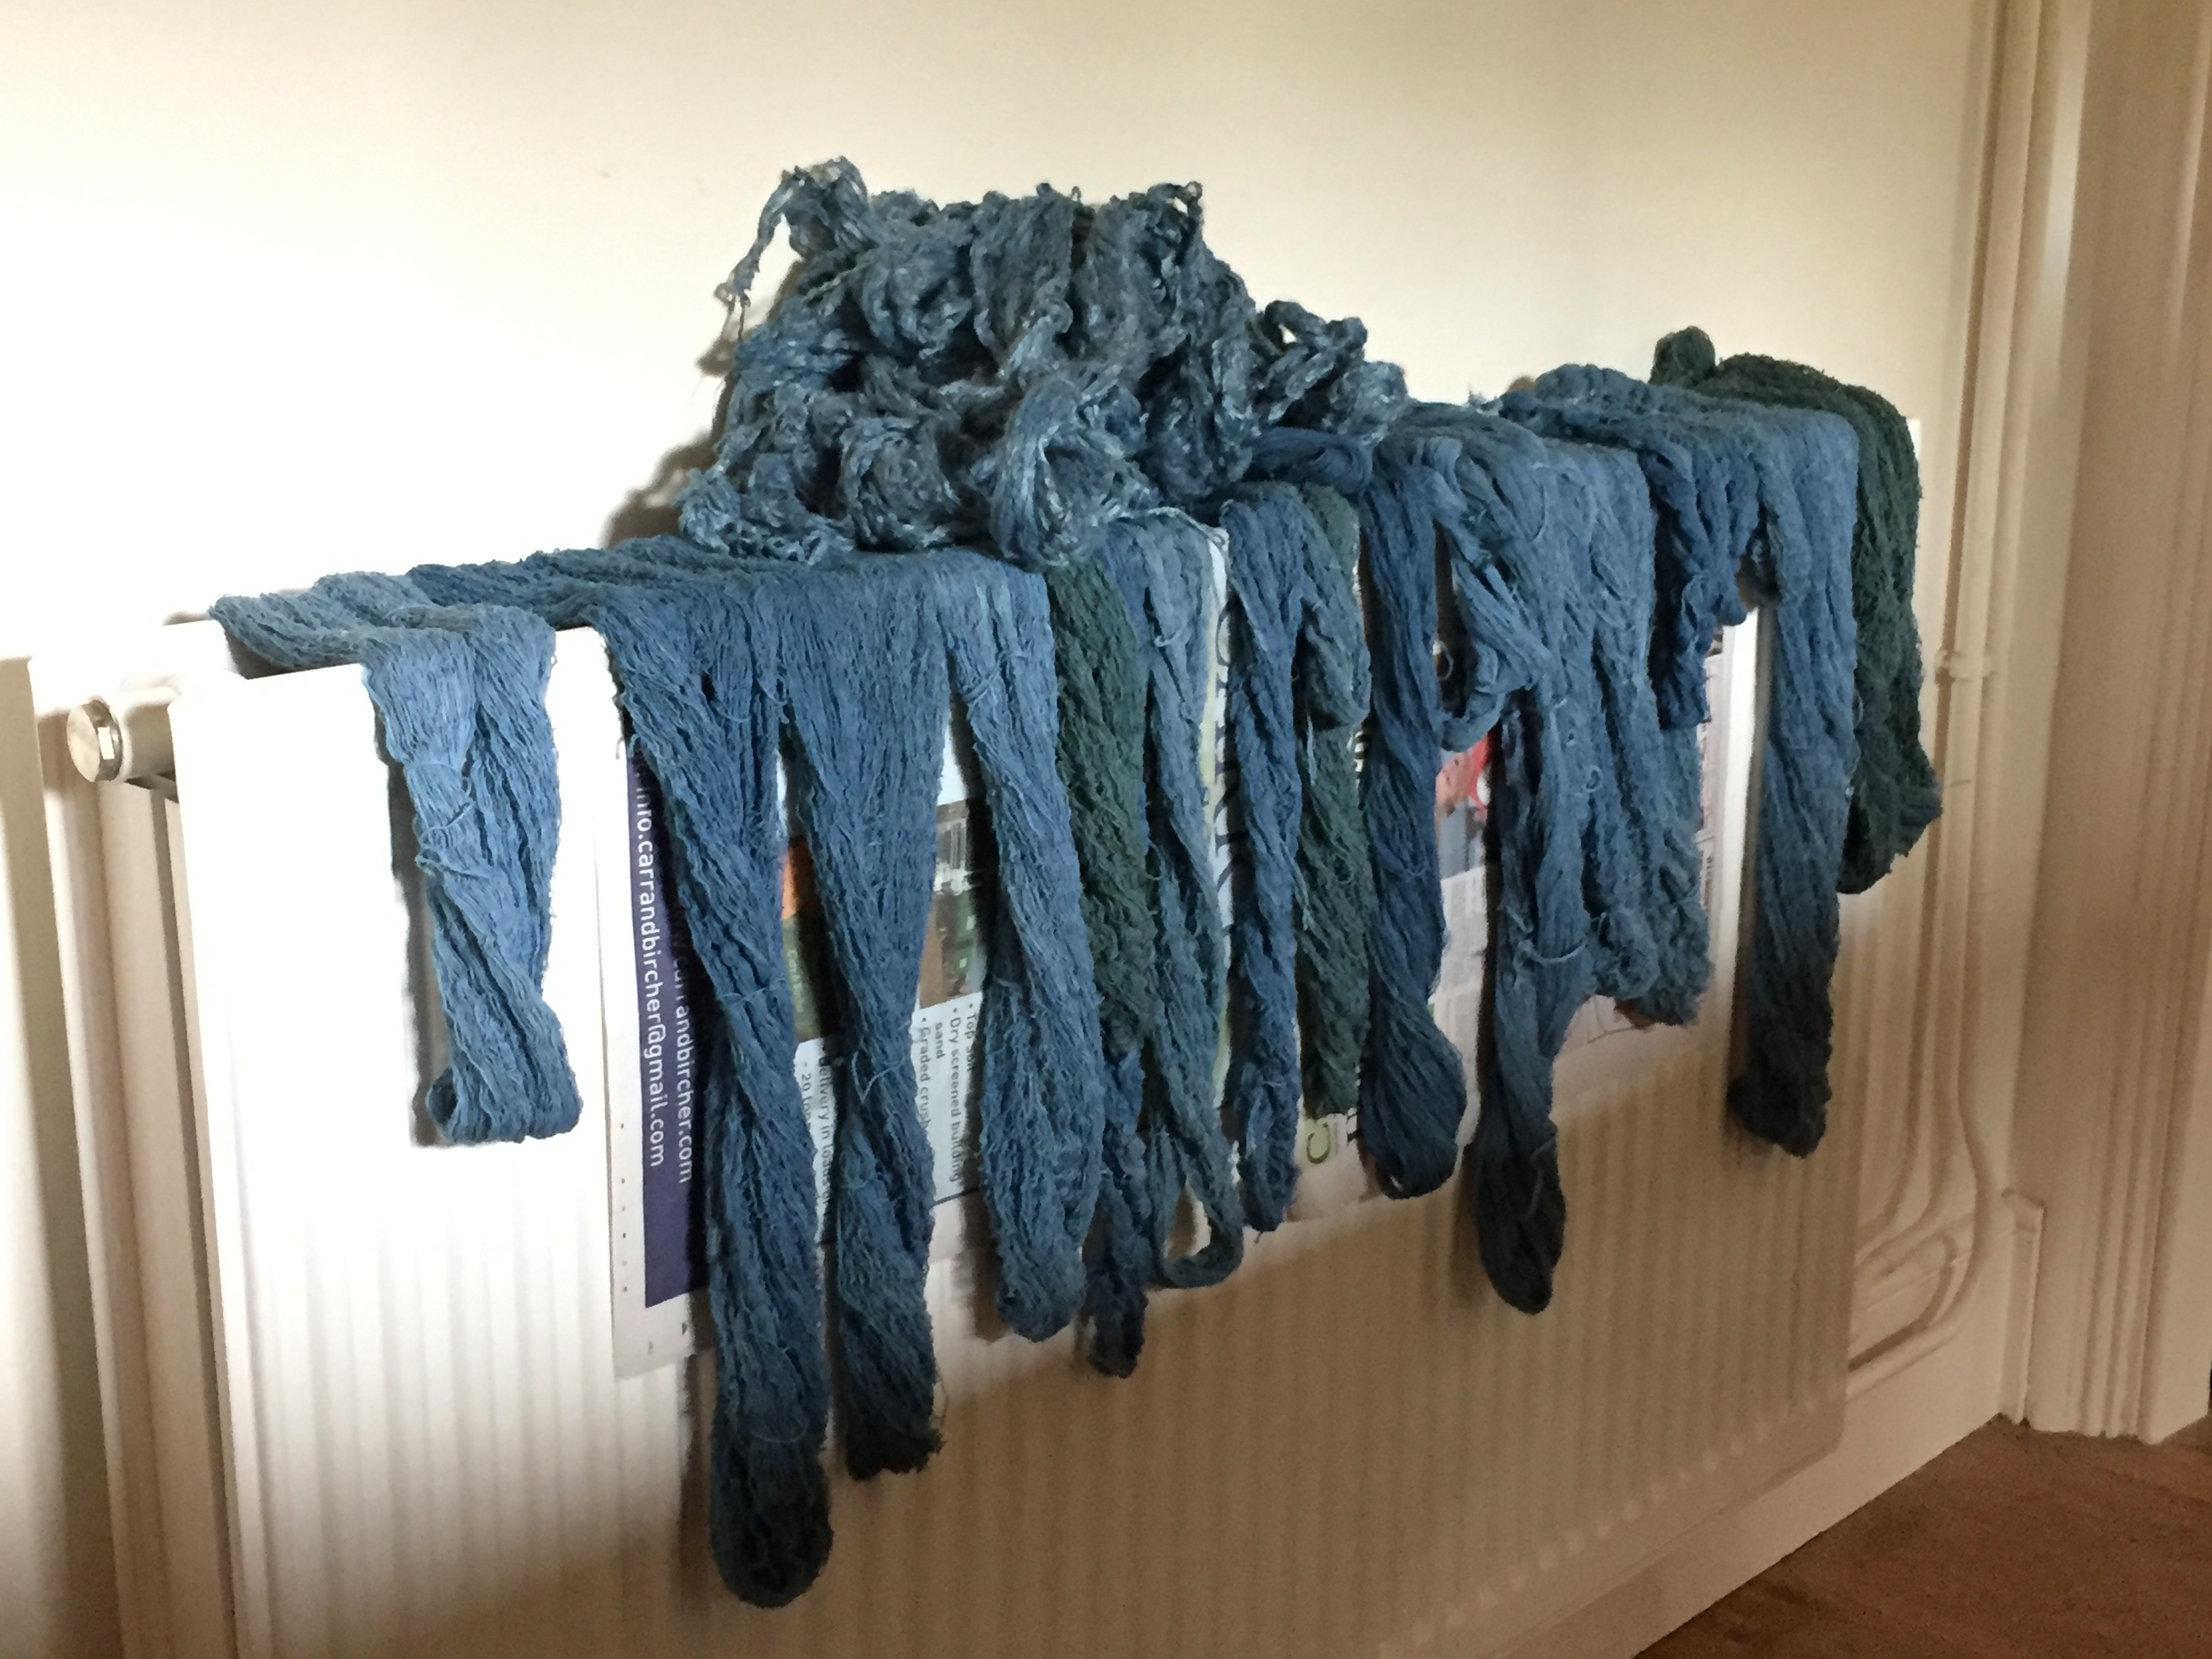
I had to finish drying the yarns on the radiator. Hmm. Clearly I dyed silk fibre, too. I wonder where that is? In one of the many boxes, of course.

IMG_3117The gelatin-sized yarns drying under light tension – those water bottles are not full! – suspended between the hoe and an old rake handle wrapped in clingfilm aka Saran wrap on the clothes tree. The old grey lunchbag contains clothes pegs.

The shorter skeins were hard-spun ( which means with lots of twist) on the tahkli; I put them to one side for use as sewing thread, calculated the remaining yardage and wound a warp. I estimated the set, the number of warp threads per inch from wpi, wraps per inch around a ruler, then beamed the warp and wove a bit.

A digression dealing with the value of my time and the lifespan of the cloth I want to make. Modern fabric is generally soft when you buy it, even before you use it. The yarns are relatively softly spun, the cloth is woven and finished to be soft. Soft yarn, soft cloth doesn’t stand up to wear. It stretches out of shape, fibres pill and pull out of the fabric. This suits our ‘I want it soft and I want it right now’ society and, even better, it makes money for the manufacturers of clothing that will wear out as well as go out of style in under a year. But I invested a lot of time in spinning the yarn for this. Pre-Industrial fabrics, handspun, handwoven and hand-sewn, expensive as reflected the time needed to make them, wore well enough that clothing and bedlinens are often included in wills. I want to make cloth that reflects the time it took to make, that serves me well for years, that wears well. It will be hard to the touch to begin with but soften with wear and age.

Deciding the set for handspun yarn is tricky unless you’ve spun yarn to replicate an existing fabric. Standard set charts may be misleading: you can set your yarn like a commercial yarn of similar grist, but if your handspun is a different fibre and/or more or less tightly twisted, it will behave differently from the commercial yarn when finished and you’ll end up with a different fabric. With handspun I start with wpi, tweak it according to what I think of the cloth on the loom, and keep samples for future reference.

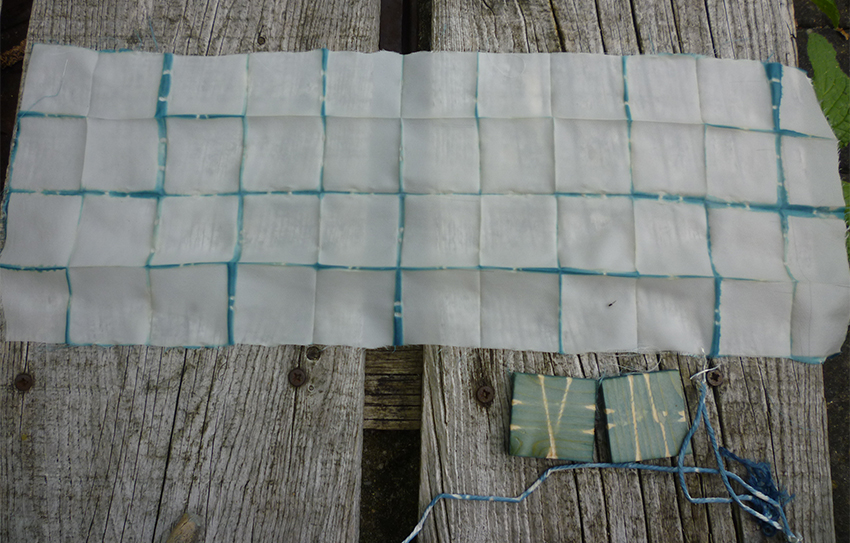
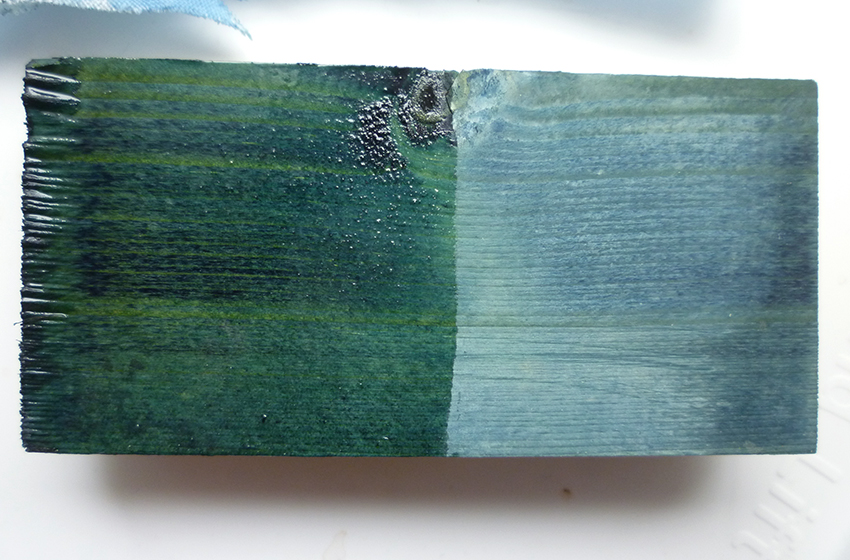
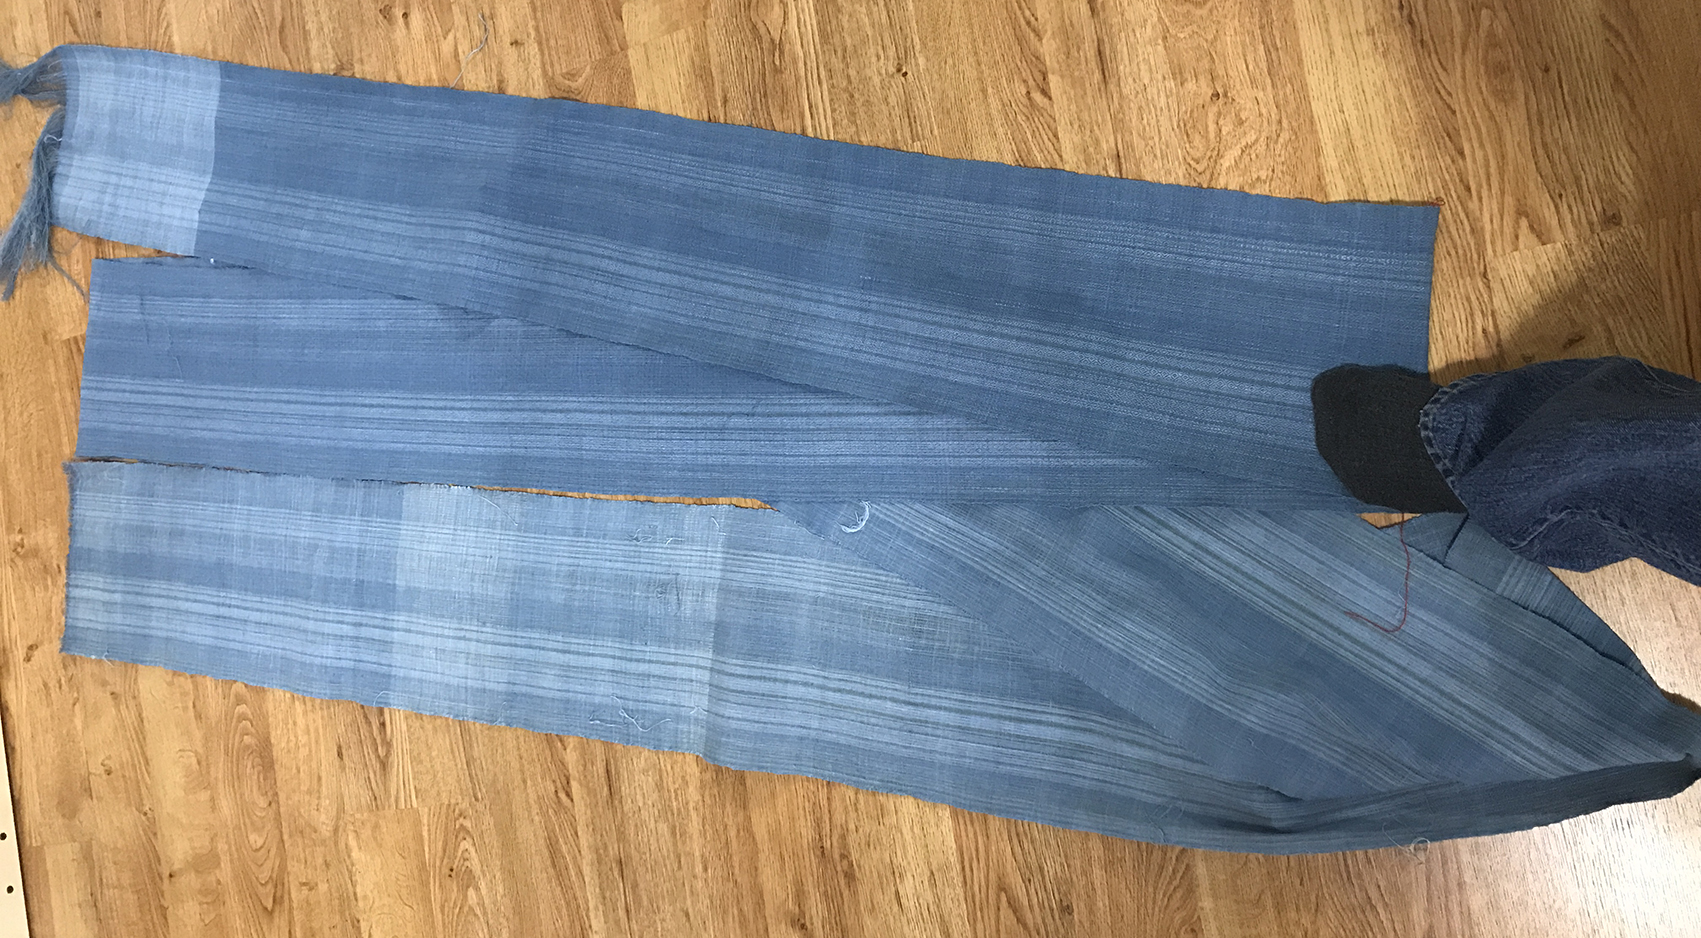
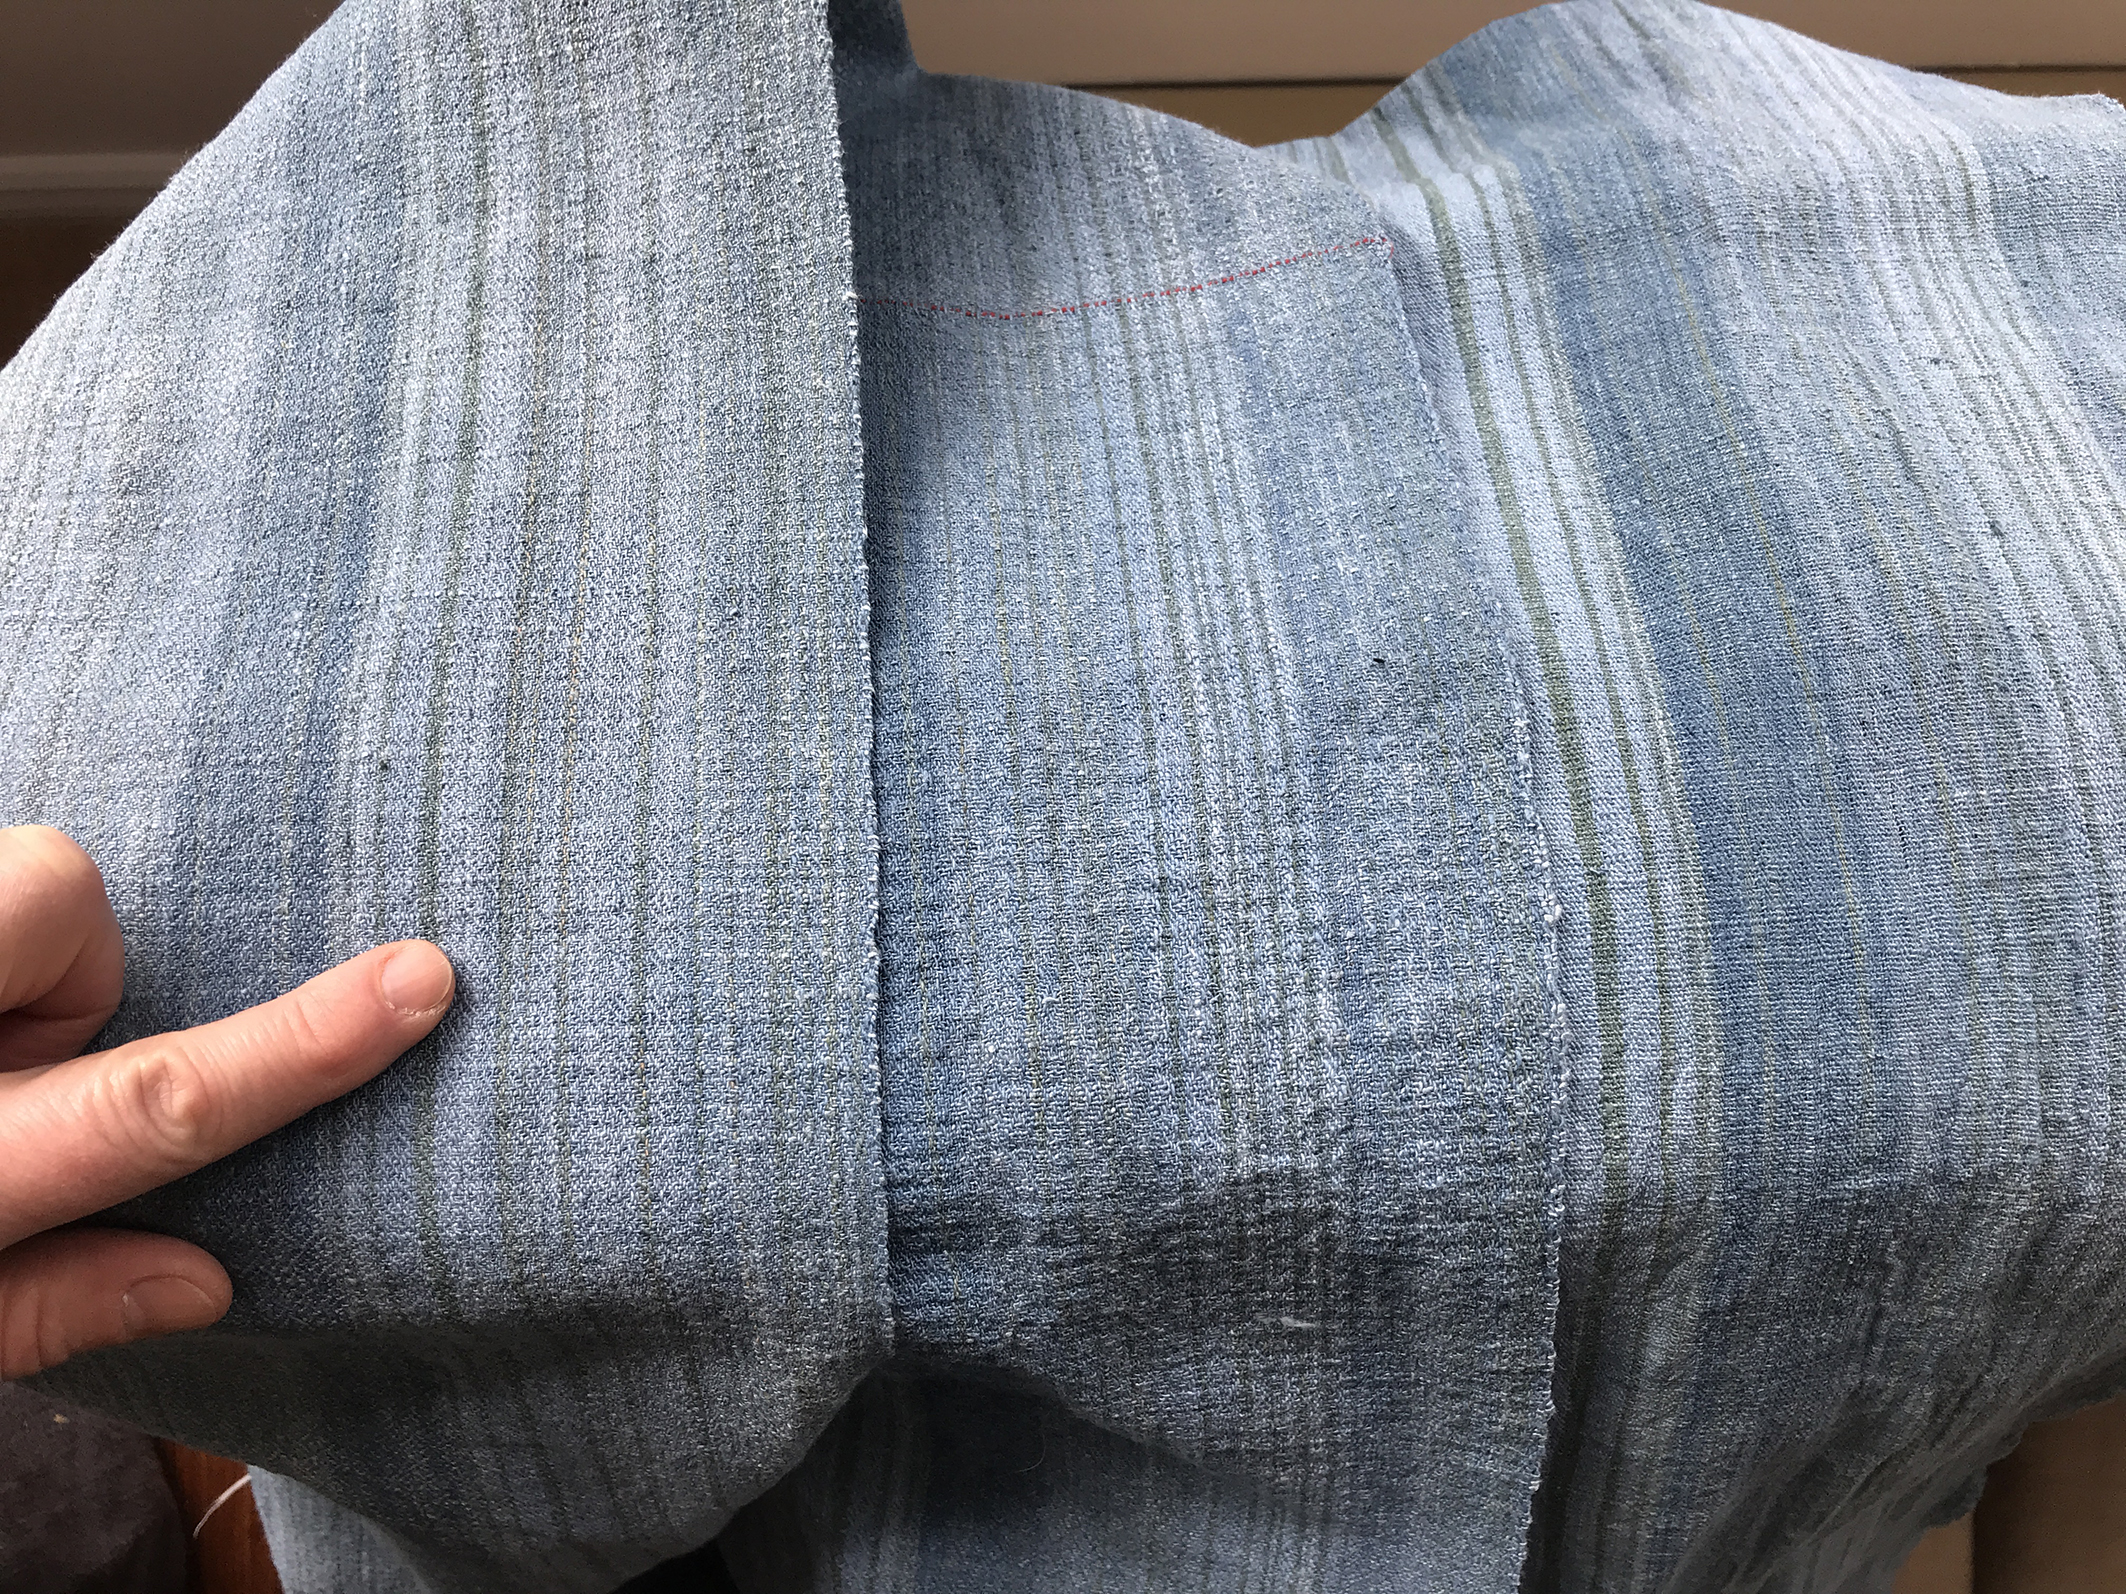
I looked at what I’d woven at 40epi, decided it was sleazy, unwove the inch, re-sleyed, wove a bit. Looked at it, decided it was still too open, unwove the inch, re-sleyed, wove a bit. I may have done this a third time, but kindly time blurs painful memories. Eventually what I’d woven looked enough like the fabric I wanted, warp-dominant to emphasize the stripes, that I cut the woven strip off to see what it looked like after hand washing. The small block shows the set and picks per inch off the loom, the long strip has been washed. The brown and tan cottons have dyed greenish. Other stripes are variations in the cream and white cottons, perhaps the result of variations in twist or in the fibres themselves.

IMG_3578

That doesn’t show how washing affected the density although you can clearly see the that the warp has shrunk (the unwashed sample is taller). With the light behind it the overall shrinkage is more obvious, as are the reed marks, the open lines between the groups of ends (threads) that run in each dent of the reed. They’re almost inevitable given that I had no finer reed, but I’m trying to think of them as a design feature – they can be – and they’re less obvious in the washed strip anyway. Notice also that the warp threads have moved in the washed fabric: hot water revives the twist, but the weave structure locks the threads into position. I may see some tracking in the final fabric.

img_3581-e1515077975775.jpg

On balance that sample was acceptable. It’s 50 epi set in an 8-shaft twill currently woven plain weave according to my Plan. It’s 9″ wide on the loom and I think the warp is about 5m long (the one thing I forgot to write in the book). The washed sample shrank roughly 10% in both warp and weft.

I’d hoped to have this woven and off the loom before we left the UK, but I had no time. When the movers arrived I simply folded the Baby Wolf, roughly wrapped paper around the beams, and left them to pack it. Unlike our more fragile ceramics (yes, I am bitter), the loom arrived undamaged. The warp had shifted somewhat, but less than I feared, and as it wasn’t well-wound or beamed in the first place that’s the lesser problem. I’m getting better at warping, but I need a lot of practice.

IMG_4622
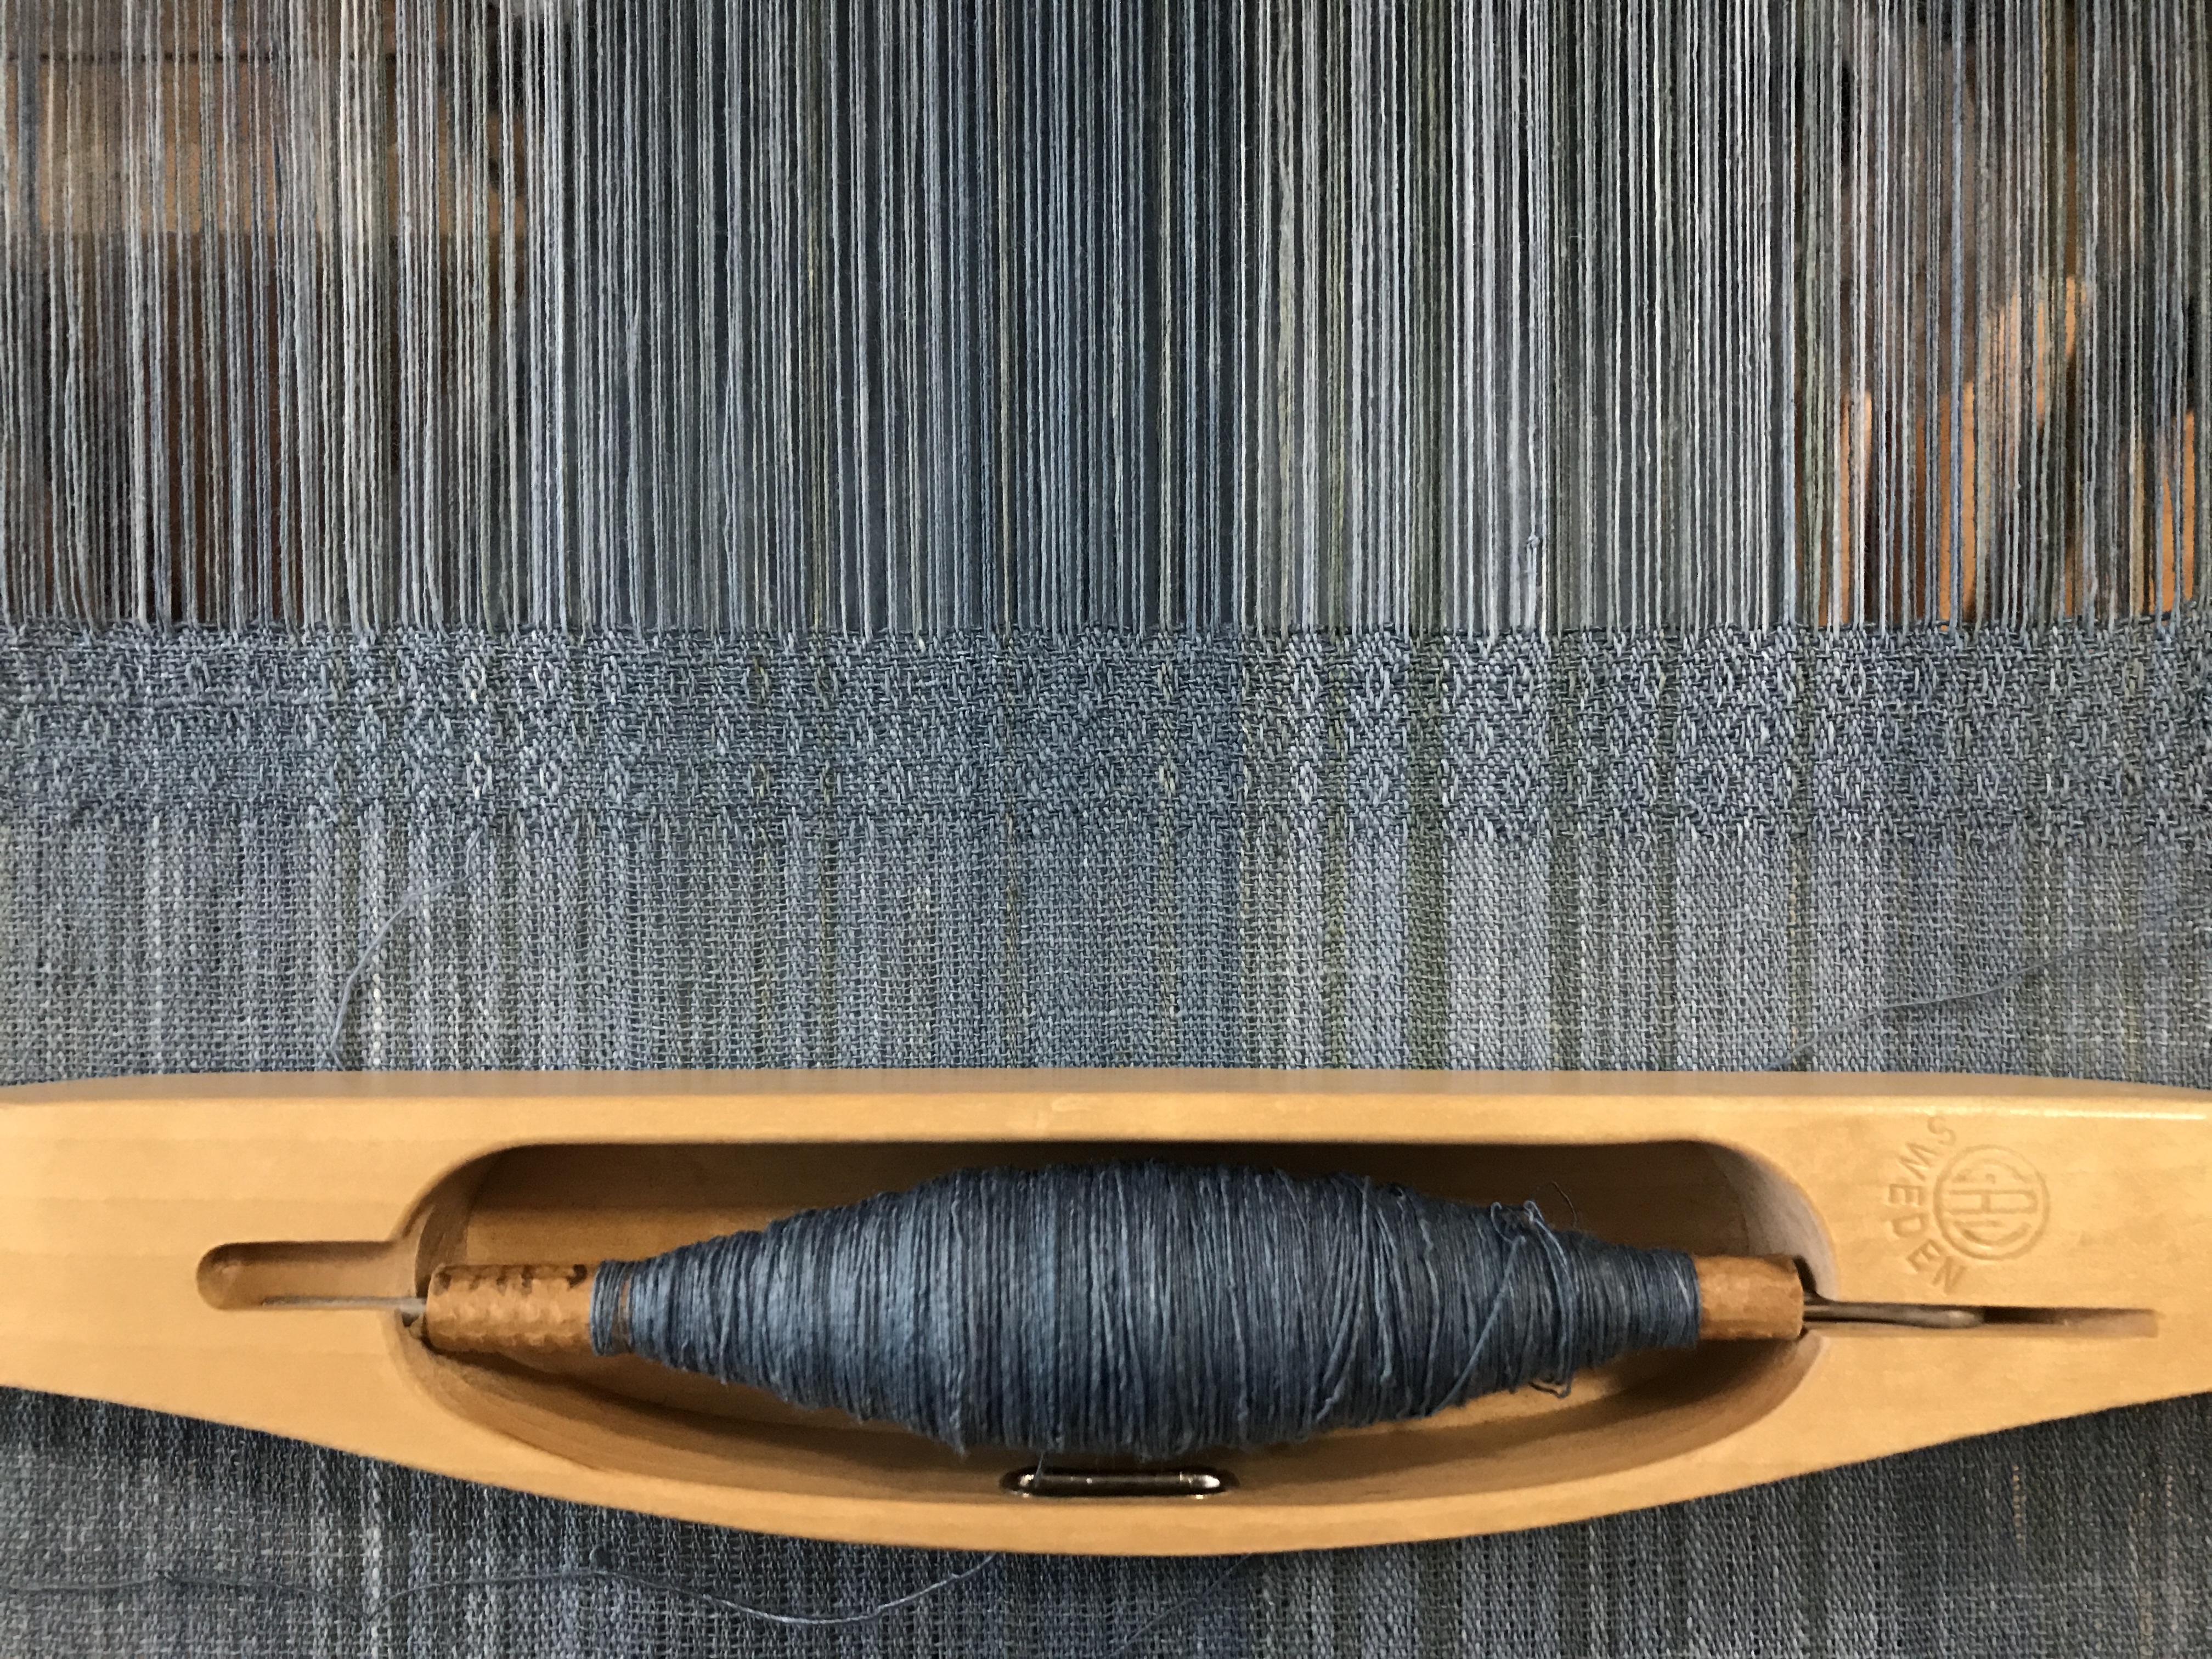
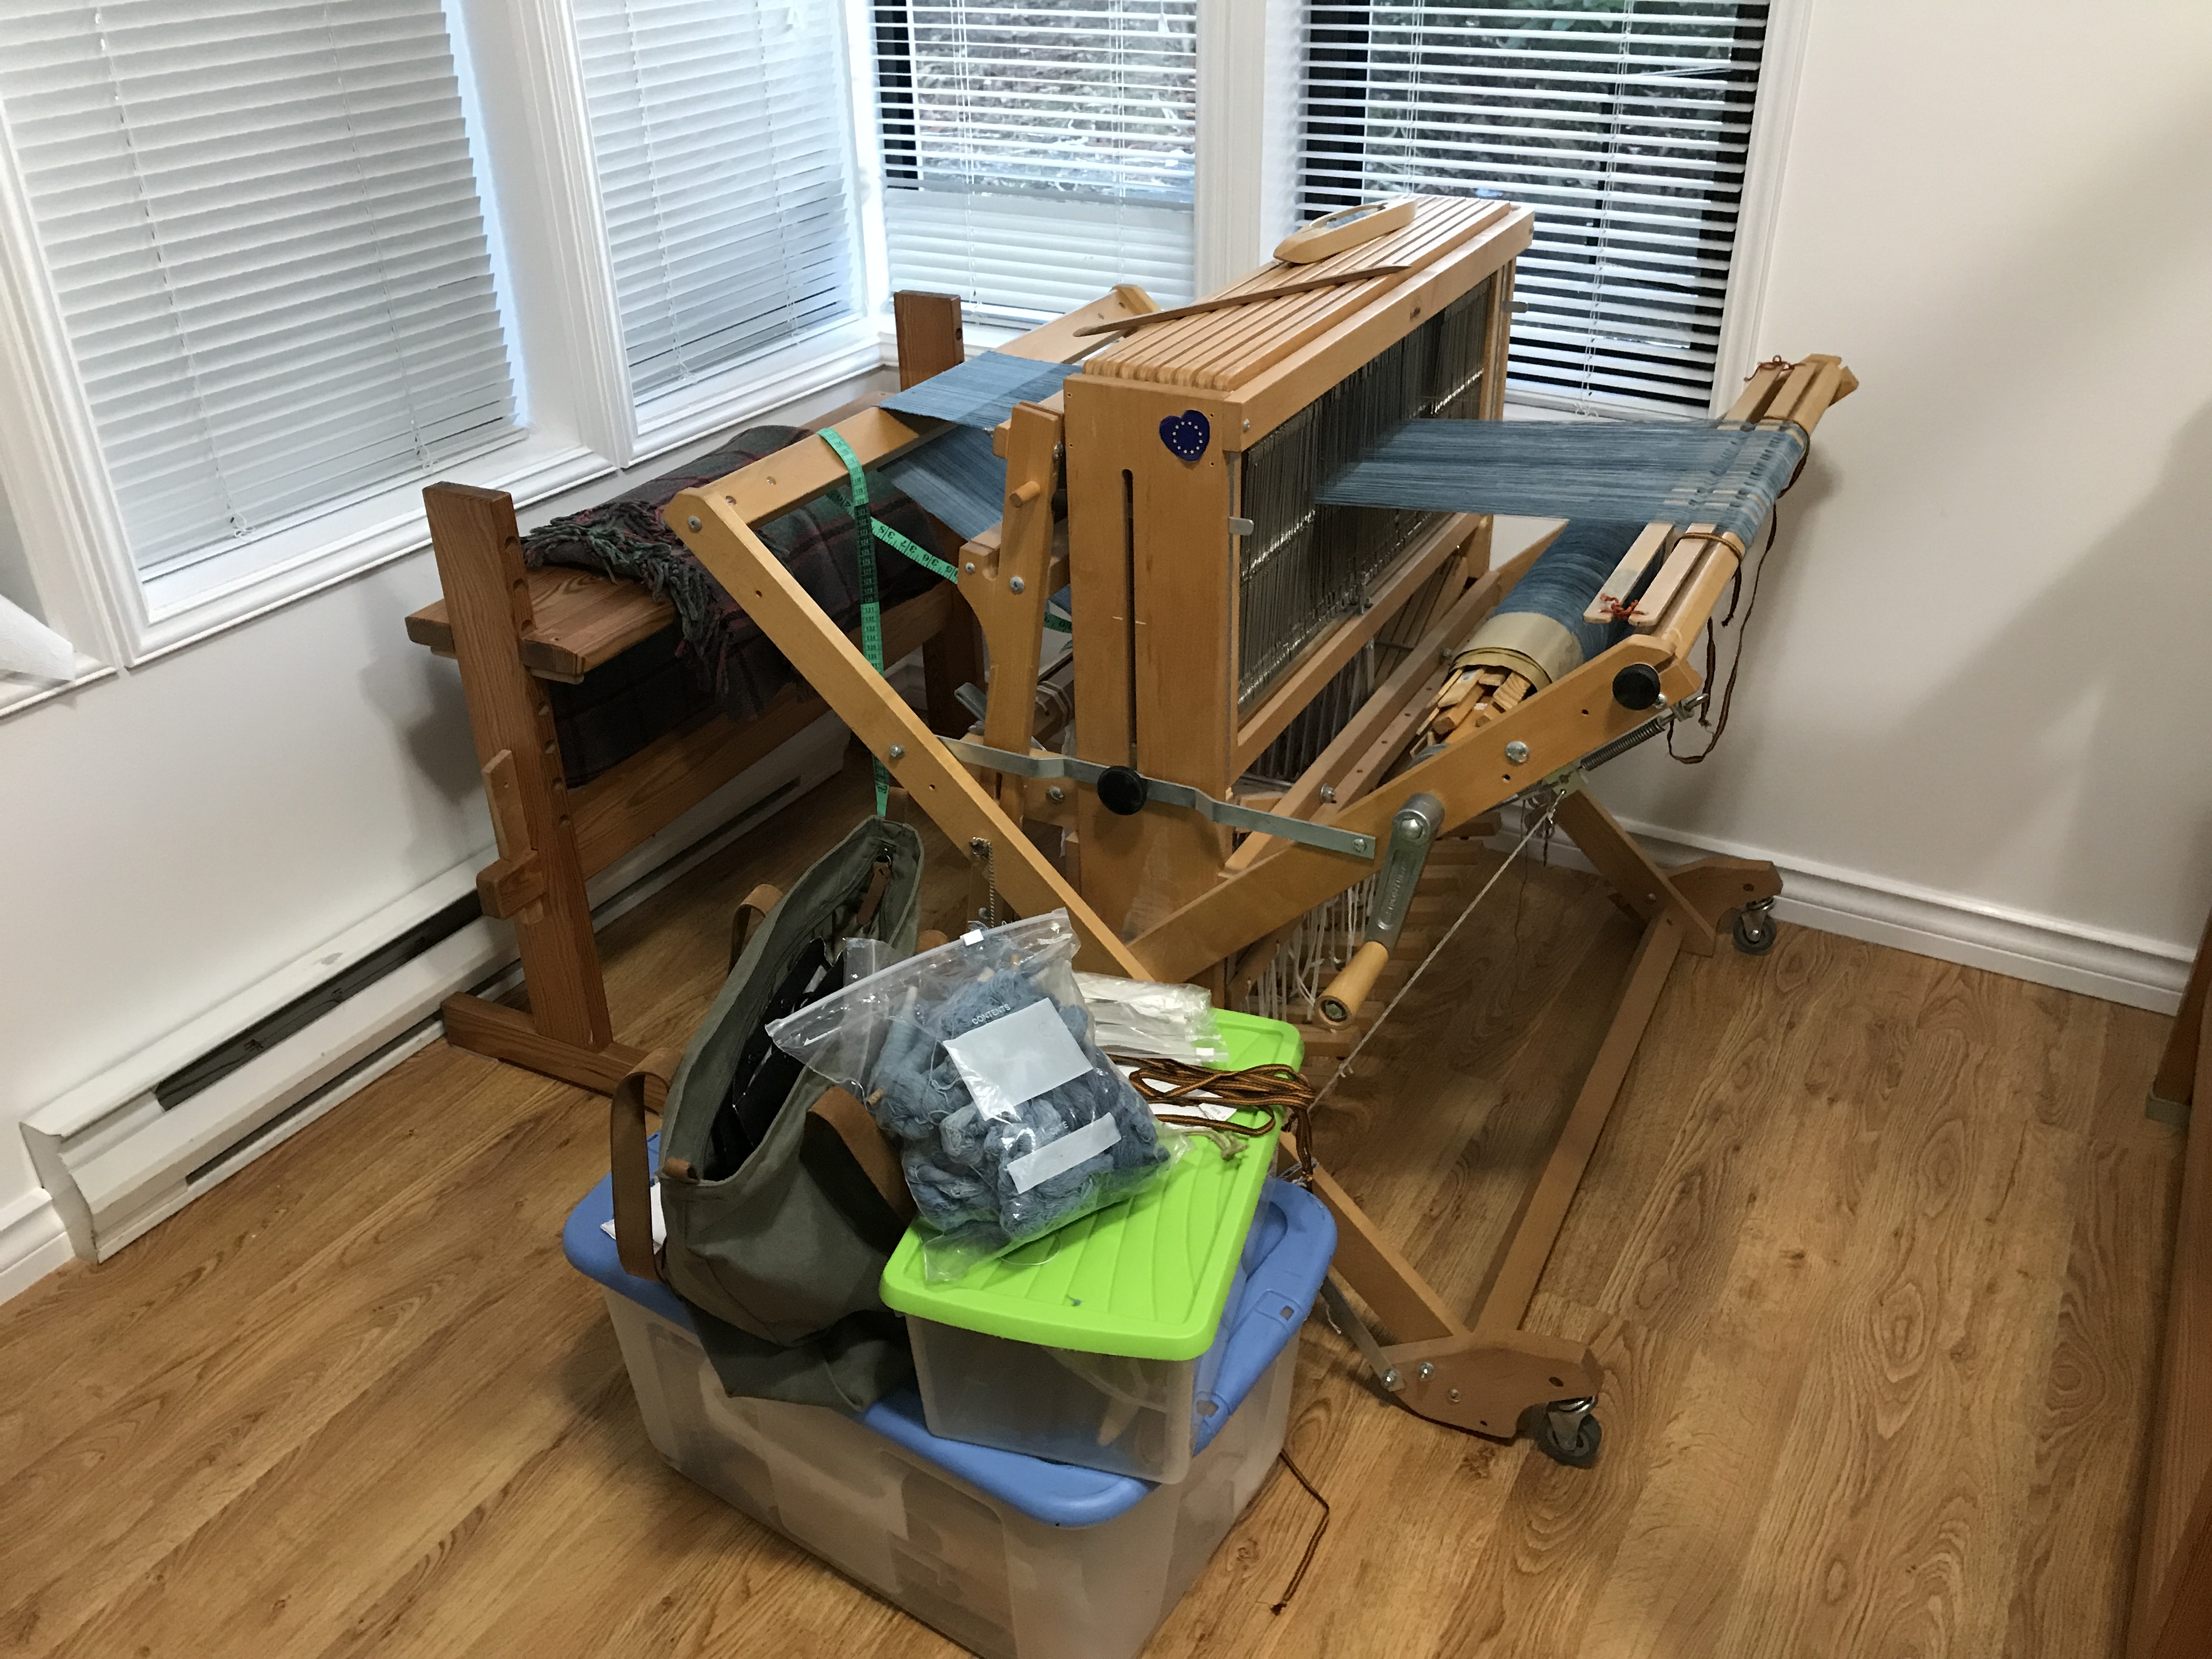
I have started weaving some fine yarns with the lease sticks in place. Like back-to-front or front-to-back warping, lease sticks in or out is something weavers seem to choose as habit early in their careers. I didn’t like the lease sticks in when weaving thicker, fuzzy yarns: my impression was that the sticks were encouraging fuzziness and binding of threads in the warp. But feeding firmly sized, finer yarns through the even tension of the lease sticks seems to correct some of my warping issues. 

img_4607.jpg

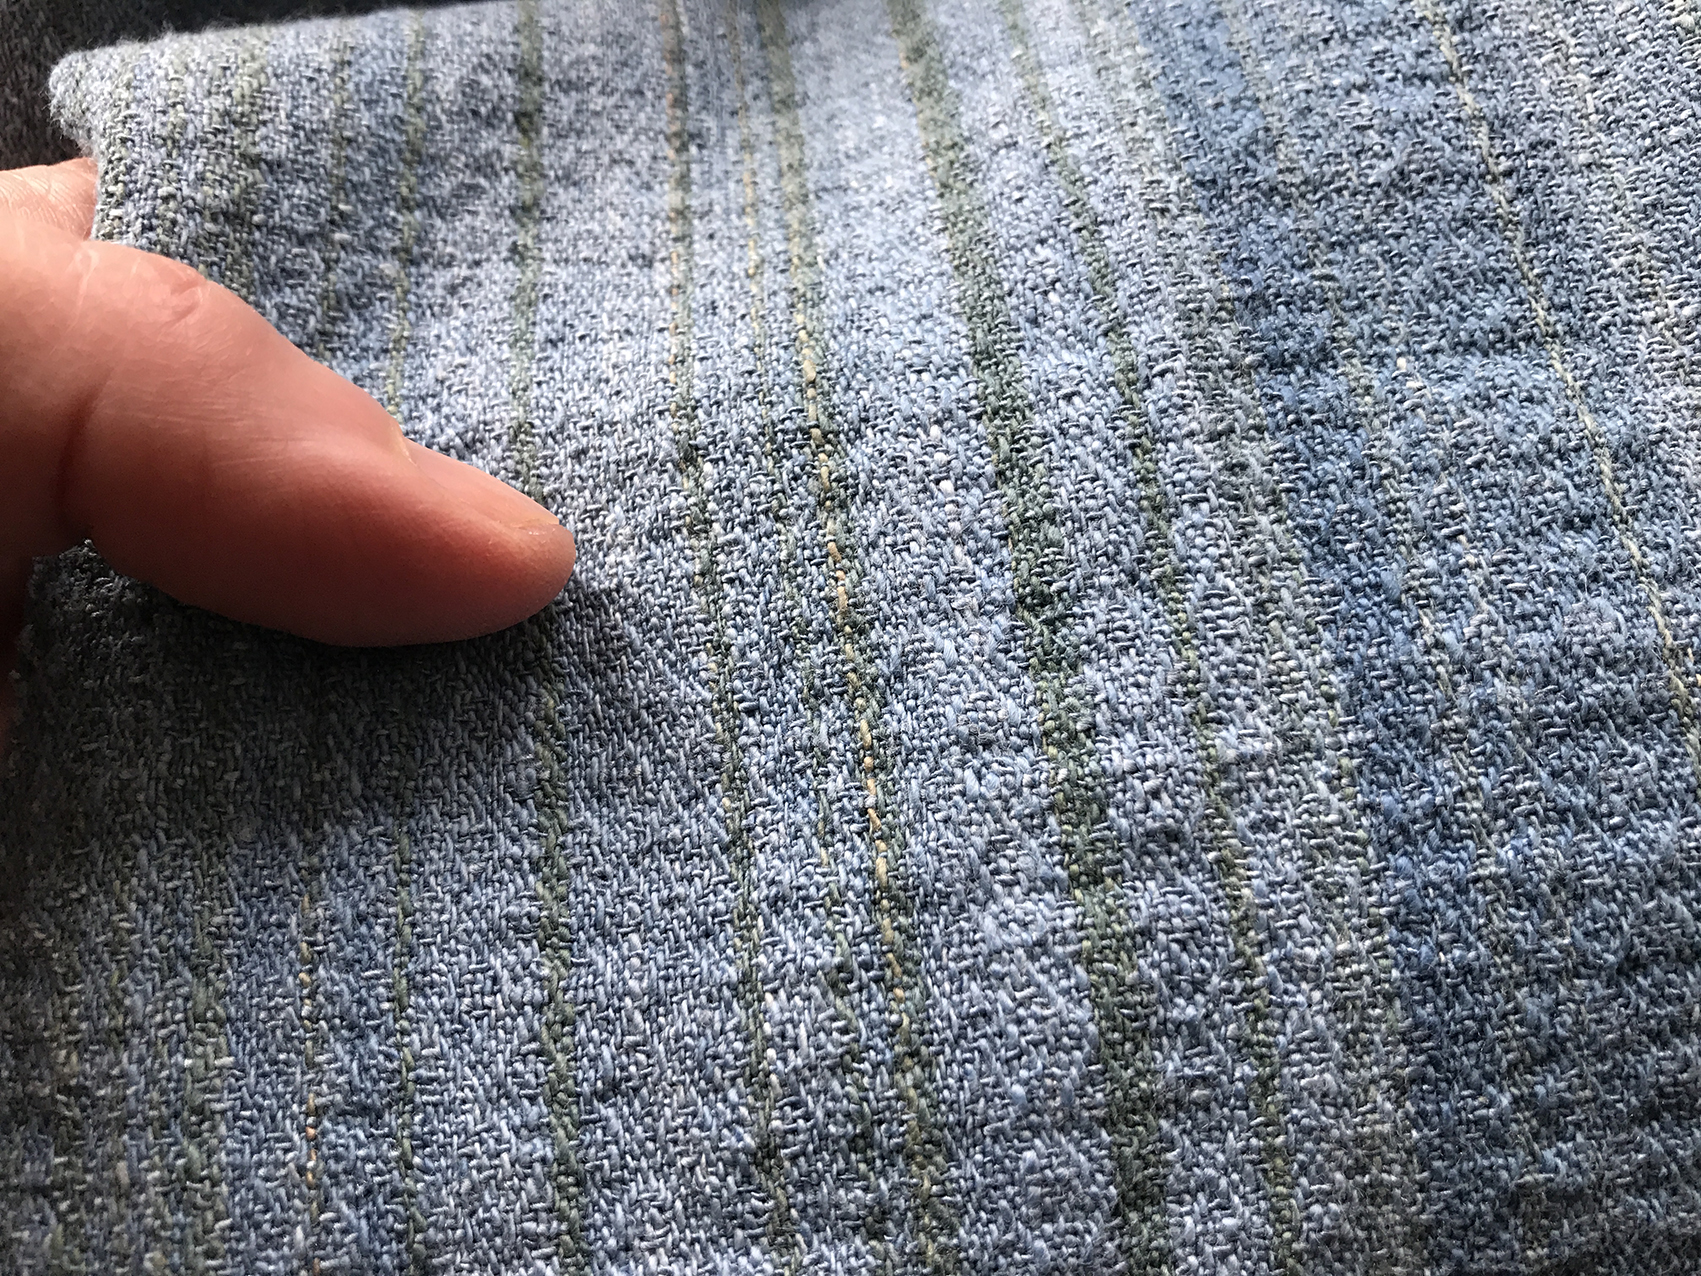
The colour is more accurate above. Below, a closer view of the fabric on the loom. The slightly more open weave below my thumb is where I started weaving again in Canada. Below that you can see some annoying imperfections, places where slightly thicker areas of the sized warp threads are stiffer and refuse to conform around the weft when beaten. They become much less obvious after washing and one could argue imperfections are part of the charm of khadi fabric, handspun and handwoven, but I’d prefer perfection. I see no reason to pursue anything less. To me the imperfections in this are a reminder that some of this is my earliest cotton spinning and weaving, because they’re less obvious now after I greatly increased the tension on the warp to pull them straight.

img_4608.jpg

At any rate my handspun singles stand up to the test. They are weavable, and they are teaching me more about weaving. Time to start spinning more cotton!

Ethel Mairet’s natural dyeing II: Extract of Indigo

As I described in part I, Highland Blue, the Ditchling Museum of Art & Craft is celebrating the centenary of the publication of Ethel Mairet’s A Book On Vegetable Dyes by asking dyers to replicate the recipes. Because I have a thing for blue I volunteered for two of the indigo recipes; this is the second.

p66. 2). To MAKE EXTRACT OF INDIGO.
4 oz. sulphuric acid, 1 oz. finely ground Indigo. Mix like mustard,  and leave to stand over-night. Prepare the wool  by mordanting with 5 oz. alum to 1 Ib. wool. Boil for 1 hour and dye without drying.

This is the dye also known as Saxon Blue, Chemie, Indigo Carmine, sulfonated indigo, indigo sulphonate, and indigo sulphate, which according to JN Liles in The Art and Craft of Natural Dyeing, was discovered in 1740 not long after concentrated sulphuric acid was first made. In my mind’s eye I see a chemistry lab with in which people in lab coats pour this new acid on everything they can think of, just to see what happens, but I suspect it was much more directed. New colours and methods of dyeing textiles were much in demand, so perhaps it was logical to experiment on indigo. It’s completely different from the ‘Saxon Vat’ of the peasants of Saxony in which the fermentation of matter in unscoured fleece drives an indigo fermentation vat.  Although indigo sulphonate is said to have first been used in Saxony. Clearly a hotbed of inventive dyeing, Saxony.

Anyway. In short: the addition of sulphuric acid to indigo converts the indigo into an acid dye, with the sulphuric acid content of the dye bath acting as the acid to fix it to the dyestuffs.

I’d been wondering about trying a sulphuric acid indigo blue long before the Ditchling Mairet project. Blue and smelly is good, blue and DANGEROUS is just as attractive to my inner 5-year-old. But as with ‘ordinary’ indigo, I needed to understand the process before I started. There’s a lot of information on the internet. I was charmed by p255 of ‘The Practical Mechanic and Engineer’s Magazine’ for 1843

p243

An excerpt from this delightful publication.

which explains quite simply the basic problem I faced: as a private individual in 2016 I can’t buy strong enough acid. 98% as sold on Amazon *sounds* strong, but it’s not: ‘fuming acid of Nordhausen’ is in fact 102% by volume. I will not take you down the by-ways and cul-de-sacs I explored online investigating the solubility of indigo (it’s remarkably recalcitrant stuff) or the phone calls and plaintive emails sent to various chemical suppliers begging them to send me the good stuff. I offered to come and collect it so they could assess my harmless middle-agedness themselves. The answer was always No, Sorry, We’re not allowed to. So I ordered what I could get (which is sold as drain cleaner),  an assortment of lab glassware, and some safety kit.

CAUTION: DO NOT even think about trying this unless you have experience working with strong acid and are fully aware of the hazards and precautions necessary. 98% Sulphuric Acid might be weak for my purposes, but it’s strong enough for the fumes to damage your lungs and eyes. The liquid will burn holes in most things including human flesh.

sulfindigostart

I faffed a bit about the quantities because clearly, given I had 98% acid, this would be as much art as science. In the end I used 15g of my most expensive indigo powder to 113 ml sulphuric acid. Mixing the Extract of Indigo was quite straightforward. It does mix ‘like mustard’ – it takes a lot of stirring to thoroughly wet the indigo powder. Better to start with a very little acid and work into a paste before adding the full volume. There was no visible reaction when I added acid to the indigo powder but the reagent flask gradually became gently warm to the touch so heat evolved.

Some recipes for Saxon Blue suggest adding chalk to the mix; Mairet doesn’t, and Liles says there’s no need, so I didn’t.

‘leave to stand over-night’
It’s clear from much that I’ve read (including Liles) that this extract in fact benefits from a longer reaction time – if it is well-sealed so the acid can’t absorb water from the atmosphere – so I wasn’t concerned when I couldn’t use it exactly 24 hours after mixing.

The books agree that Saxon Blue is a dye for wool and silk, which makes sense because acid dyes require an acid (low) pH. Acid conditions render cellulose fibres (cotton, linen, ramie) less able to absorb dye; a friend familiar with the chemistry of paper (also cellulose) says “Higher pH on cotton produces very strong covalent bonds. Less pH value, weaker, if any, bonding.” (thanks, Terry!) So the dye particles simply don’t stick to cotton and linen under acid conditions. I had samples of wool, silk, cotton and linen to test this. I mordanted the wool and silk with alum and cream of tartar, one skein each of cotton and linen with alum and washing soda, and left the spare pair of cotton and silk unmordanted out of curiosity.

Mairet instructs readers on the use of the extract in various other recipes.
3) To Dye Wool With Indigo Extract: For 4-6lb of wool. Stir 2 to 3 oz of Indigo extract into the water of the dye bath. The amount is determined by the depth of shade required. When warm, enter the wool, and bring slowly to the boiling point (about 1/2 hour) and continue boiling for another 1/2 hour. By keeping it below boiling point while dyeing, better colours are got, but it is apt to be uneven. Boiling levels the colour but makes the shade greener…

Given that this is basically ‘add what you think looks right’ I worked from Liles’ recipe, reducing the quantity of extract for my 3litre pan.

saxonbluevat

The colours are not quite right in this, thanks to weird light from both cooker and room lights. It was a little more turquoise than it looks, visibly different from ‘ordinary’ indigo blue. Also, as the dye heated, it developed the chemical odour I associate with rooms full of weaving yarns: not wool, nothing to do with wool or lanolin, a rather sharp indeed acid chemical smell. Very interesting. I opted for a gentle simmer rather than a boil as I wanted ‘better colours’. After 1/2 hour at about 85°C I put the yarns in the sink to cool and ran the dye bath to waste with copious water. And then kicked myself, almost literally, because I forgot to check the dye bath pH at any point. Next time.

yarns-in-sink-steaming

On my machine those colours are about right. The pale yarns are the cotton and linen, as might be expected; note there’s no obvious difference between mordanted and unmordanted. The dark are one wool and two silk. Again, no difference in shade between mordanted and unmordanted silk. Once they’d cooled, I began rinsing, and things became interesting because the silk lost a lot of dye. A LOT of dye. I tried to hurry it along by washing a second time with dishwashing liquid rather than gentle soap, but I left it in the water to soak out the detergent and the water turned dark blue again. I put the yarns in clean water and left them overnight: in the morning the water was dark blue. Something interestingly chemical was happening to strip the dye, I think. But I’m not a chemist-dyer, I’m fermenting organic smelly sludge dyer so I need to do some reading.

saxonskeins
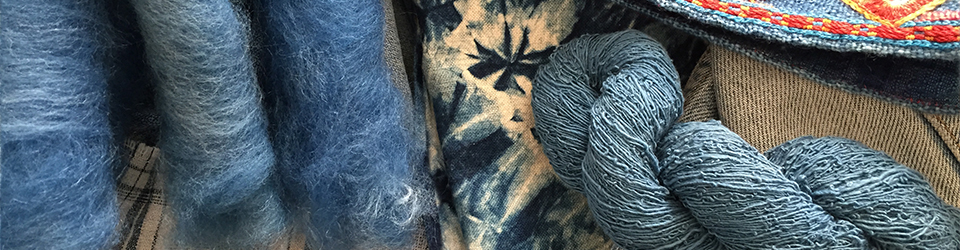
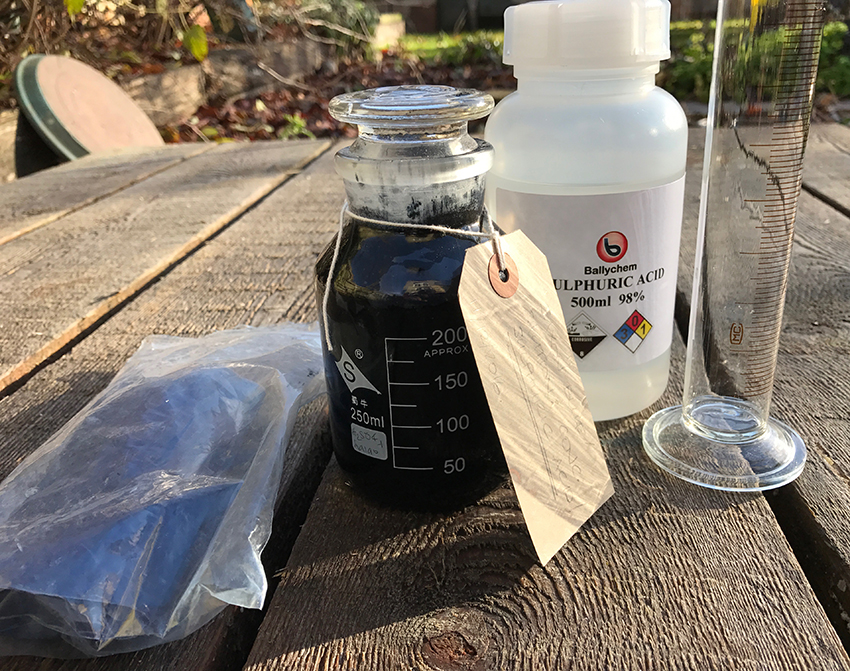
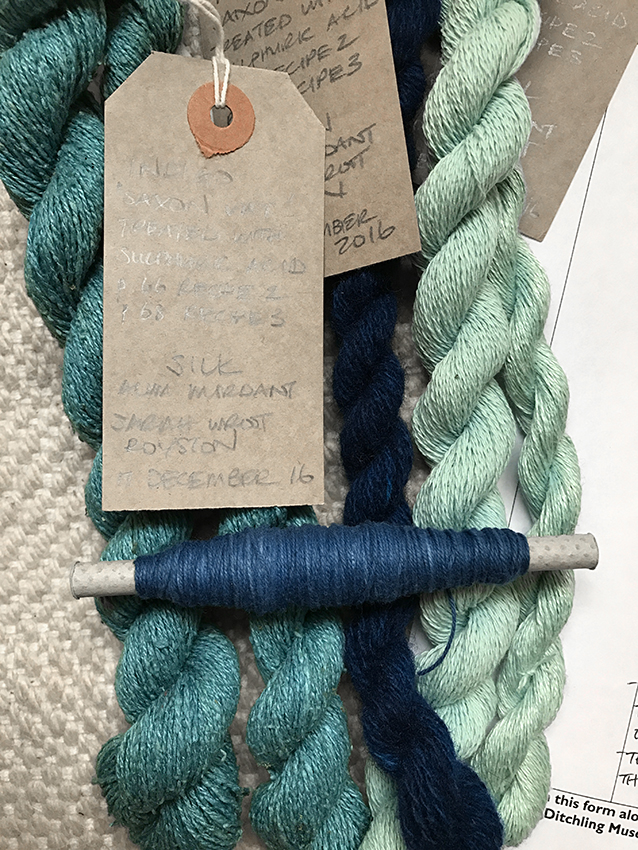
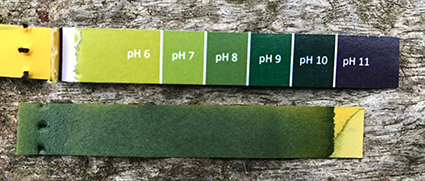
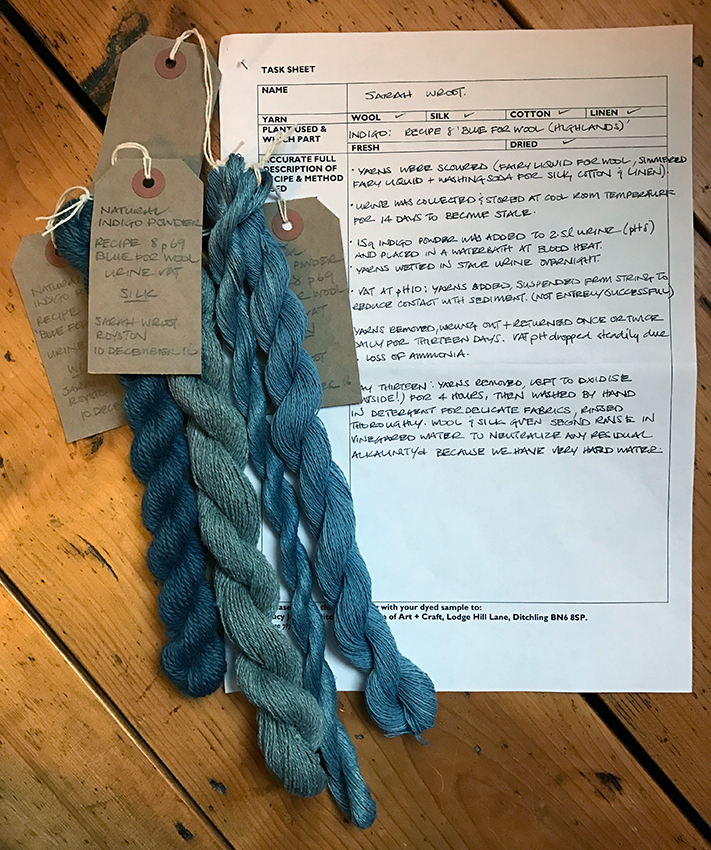
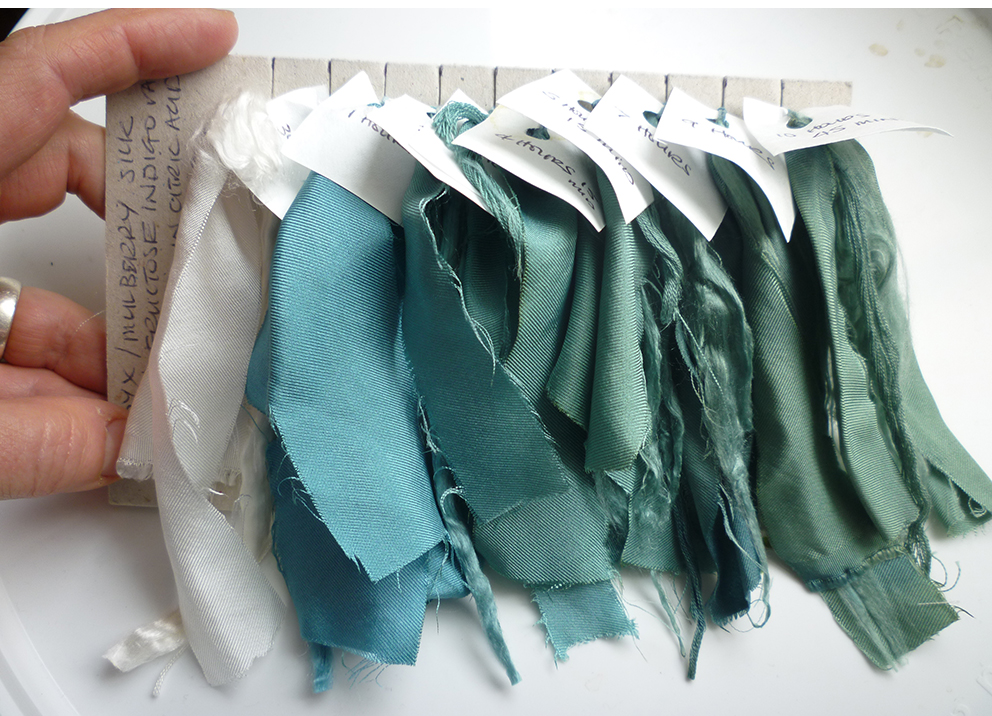
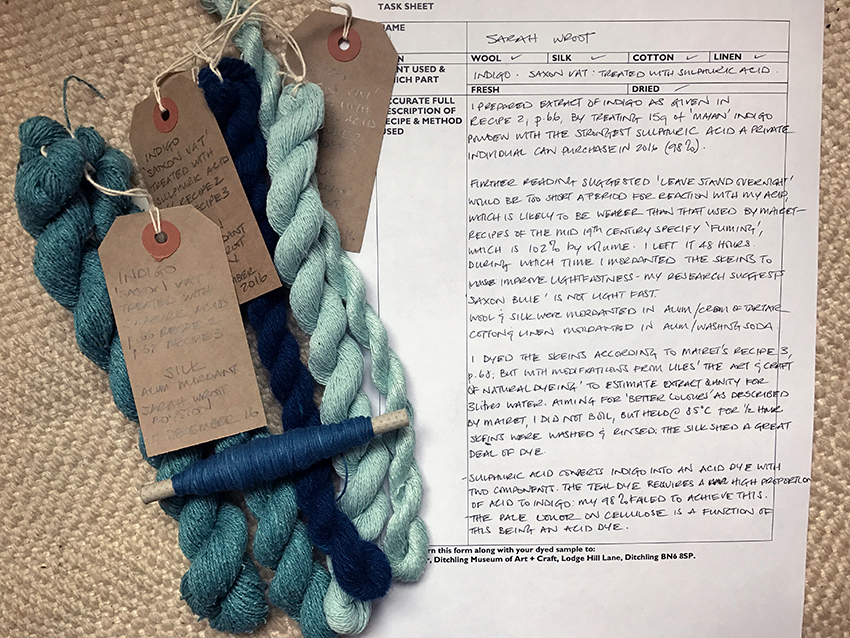
And here is the result, reskeined with the Ditchling Museum Project Record. I’ve added a bobbin of cotton dyed with with an ‘ordinary’ indigo vat for comparison: it’s clear to my eyes at least that the Saxon Blue is more teal, somewhat greener than the ordinary. But sadly not nearly as green as the example I saw produced by a friend with access to Fuming Sulphuric: the stronger the acid, the higher the proportion of green ‘sulph-indylic’ dye formed by the reaction. But still, it is very pretty.

saxonskeinsdet

Now I’m thinking of offering an Indigo Dye workshop next summer, working with fresh leaf indigo and/or woad, plus at least two vats. If I do I’ll happily accept 100ml lab grade fuming sulphuric acid as part payment from one attendee!

Ethel Mairet’s natural dyeing I: Highland Blue

The hand weaver and dyer Ethel Mairet was a significant member of the British Arts and Crafts movement in the early 20th century. Wikipedia has a summary of her life and work here. (“Ethel went away alone and built a house near Barnstaple complete with studios for textile dyeing and weaving” seems such a bald summary of what must have been a terribly difficult time.)

Ethel Mairet is one of my weaving ‘ancestors’, in that my mentors were taught by people who were themselves taught or inspired by Mairet’s work. I had the pleasure of seeing some of her weaving in the flesh at the National Portrait Galleries ‘Anarchy & Beauty’ exhibition, including a jacket woven from handspun eri silk dyed with natural dyes, here shown in A Weaver’s Life: Ethel Mairet, 1872–1952.

image_medium

Mairet moved to Ditchling, Sussex, in 1916 to join a group of crafts persons including Eric Gill. In the same year (Wikipedia is wrong) she published A Book On Vegetable Dyes (free download from archive.org at that link). Now, a century later, Ditchling Museum of Art & Craft is celebrating Mairet’s work, asking dyers to recreate her recipes for display today.

How could I resist?

I volunteered to work with two of her recipes*, the first being Recipe 8, p69: BLUE FOR WOOL (Highlands), which begins
‘Take a sufficiency of Indigo. (For medium shade about 1 oz. to every pound of wool).  Dissolve it in about as much stale urine (about a fortnight old) as will make a bath for the wool …’
At heart I am about 5 years old: I cannot resist making blue using a smelly technique that other people find revolting. But more importantly, the indigo urine vat is one of the oldest methods of dyeing. I wrote about its history and chemistry here as part of my Summer of Blue. That vat suffered as a result of my inability to keep it warm, but I’ve since found a way to maintain the necessary temperature.

I put the ‘donations accepted’ container in the bathroom and a couple of weeks later the experiment began.

sigstart

All natural indigo powder contains some non-indigo vegetable matter, the proportion of which is reflected in the cost per gram. The vegetable matter is undesirable not only because it isn’t indigo (and hence doesn’t dye), but also because it adds to sediment at the bottom of the vat that can stain things that contact it. I know from experience that bacterial breakdown of the urine creates sediment anyway, so I used a cheaper grade for this vat, adding about 15g of powder to the 2.5l of the stale urine in a 3litre jar on the 27 November. At this point – having been stored at cold room temperature – the urine was at pH8 and smelled largely of stale urine with very little ammonia.

‘Make it lukewarm.’ 
The first time I made a sig vat, I tried everything I could think of to keep it warm, from black plastic bins in full sun (or what passes for full sun in a British summer) to an insulated box and a hot water bottle and finally a heating pad. Nothing worked consistently: slow/occasional fermentation would bring the vat into condition, I could dye a small quantity of fibre – and then it would stubbornly remain blue and miserable for days. That failure – when the instructions seemed so straightforward! – drove me to find out how and why indigo vats work. Now I know temperature was probably only one of several failures, and I have the tools to check and correct the performance of the vat.

Last summer I built a den in the garage for my indigo fermentation vats: a sturdy cardboard box floored with a thick layer of insulation, with a tray acting as lid. The cord running into the box powers a home-brew ‘brew band’ that keeps a vat at blood heat. During the summer I used it to heat a large volume of liquid in that plastic bin, but here the bin is a waterbath for the urine vat in the glass jar. I put the jar in the bath to warm overnight while I wetted the yarns from the Ditchling Museum.

sigden

‘Put in the wool and keep it at the same temperature till the dyeing is done.’
The plastic screw-top bottle hiding shyly to the left of the box is my ‘spare’ urine supply. Fermentation vats rely on the nutrients in the urine, so I soak dyestuffs in urine to wet them: wetting with tap water will only dilute the urine and weaken the fermentation.

On 28 November, after only 24 hours of warmth, the vat was alkaline, at or near pH10 and smelled noticeably of ammonia. HURRAH, bacteria are digesting the urea in the urine, consuming oxygen and creating ammonia to raise the pH: in other words, this vat is working!sig30nov-addfibre

I added the four yarns, each skein suspended by a string to prevent it falling into the sediment that would develop at the bottom of the vat. This wasn’t entirely successful, alas. Better to use a deeper vat with a lot more urine.

‘For a deep navy blue it will take a month, but a pale blue will be done in 3 or 4 days. Every morning and evening the wool must be taken out of the dye bath, wrung out and put back again. The bath must be kept covered and the temperature carefully attended to.’
[I checked the pH as well.]

sig30nov-fibre

Taking photos one-handed with an iPhone when also handling something with a pungent, penetrating and lingering odour proved tricky, so I don’t have many photos of the process. Here you can see the characteristic yellow-green of an active indigo vat turning blue before my eyes.

By 10 December the vat was at pH8-9: regular opening and airing allows ammonia to escape as gas, so the liquid became less alkaline, while moving the yarns about added oxygen. Both of these mean more indigo in the vat was returning to its blue non-soluble form.

sig9decremove

‘Some add a decoction of dock roots the last day, which is said to fix the blue.’
I didn’t, and I wouldn’t say it. All my research suggests indigo isn’t fixed in that way: once the colourless soluble form oxidises, the particles are either wedged firmly in place or they aren’t. I suppose dock root decoction might act like a glue to coat the yarn and hold the particles in place, but that’s only going to last until the glue is washed out.

I called it a day, removed the yarns for the last time and left them to fully oxidise, slightly thankful that the cold weather means the smell is somewhat less all-pervasive than it was in the summer, when my husband claimed the odour was killing birds as they flew past.

sigyarnsoxidising

‘The wool must then be thoroughly washed. This is a fast dye.’
Well, for some meanings of the word ‘fast’. Slow in terms of time, but fast in the sense that it’s generally regarded as wash- and lightfast once any unattached particles of indigo are removed. Jeans and other items dyed with indigo lose colour as the surface of the fabric erodes to reveal undyed material.

I handwashed the skeins in a non-bio detergent for delicate fabrics and rinsed thoroughly in cold water. Given the alkalinity of the vat and our extremely hard water I finished the wool and silk in a final rinse acidified with vinegar.

sigyarnsfinish

The yarns and process summary, about to be packed off to Ditchling. I am pleased to report they not only demonstrate one of Mairet’s dye recipes, but also the classic ‘vat odour’ that once indicated the finest and fastest shades of blue.

*my work on the second recipe, ‘Extract of Indigo’ (treated with sulphuric acid!) can be read here.

Planning another Summer of Blue

I had planned to focus on indigo last summer, but in the event various other things intervened – although I did accomplish more than I posted. I must show you my shoes!

I’m making tentative plans for more blue this summer.

greenhse

I had hoped that the tadeai, the Japanese Indigo Polygonum tinctorium, would survive the mild winter in its house but even though I added fleece and bubblewrap when the nights dropped to -4C, there’s no life in the stems. It may be an obligate annual, or it may simply have flowered itself to death late last autumn without setting any seed, alas.

I admired the few remaining dead leaves somewhat wistfully: look, they’re blue!

DeadindigoGrense

And then cut most of the stems off. I’ve left a few root masses with stubs of stem for the moment, but there was no green in the pith and the roots I pulled up looked brown and dead, so I doubt anything will shoot. But I sowed seed as well; the seed tray is now sitting indoors in the warmth where I am already watching it hopefully.

I took cuttings  – lengths of stems with leaves – from the plants last October when we returned from our holiday and put them in a jar of water. As might be expected from a Polygonum the cuttings formed masses of roots from the submerged leaf nodes, but the rest of the nodes sent out flower shoots.  I pinched them out and more appeared. The cuttings were extremely well-rooted and looked reasonably healthy in late January when I potted them, but just continued to try to flower until they died, leaves slowly shrivelling. A friend who rooted cuttings in August says two are still alive and seem well, so I wonder whether the trick is to catch them before environmental cues set the growth points to ‘flower’ mode. I will try to test that this summer, as cuttings would be the best way to maintain a line that dyes well.

The woad looked reasonably happy. As a biennial this is its year to flower and seed, with leaves that yield little or no blue. I left the plants last year thinking to gather the seed – these were grown from seed I harvested two years ago – but there isn’t really enough space in our tiny garden to keep plants for seed especially when they attract so many Cabbage White butterflies to lay eggs on my salad rocket! The woad is no longer happy: it is composting and I’ll sow more in the Brassica Bed shortly.

Woad

All this plus ‘standard’ indigo vats means there should be more blue this summer. But what shall I do with it? I’m designing stencils to print with fresh indigo leaves, because that was immense fun. But there’s much more fun to be had: a friend sent me two fascinating books.

dyeing

dyeing1

This is the work of Mrs Akiyama, who made a personal study of the natural dye plants of Awa in Tokushima Prefecture, Japan. Awa is famed for its Polygonum tinctorium indigo dyes; there are pages detailing dyeing with fresh and dried indigo (if I’d had more dead leaves I could have dyed with them!) as well as many other plants. And there are notes on working with bast fibres, as well as information on finishing yarns and fabrics after dyeing.

dyeing2

The other book tells me what to do with what I’ve dyed:

Ikat

No more peering at fuzzy videos on YouTube! With luck this will be a summer to remember.

To finish, a reminder of last summer.

shoes

Super-cheap runners, sold as ‘cotton’ (I have my doubts, see below). I washed them thoroughly with dishwashing liquid and rinsed them thoroughly too, then dumped them into a standard thiox indigo vat on the stove.^1 No matter how many times I dipped them, the uppers would not go darker than this; given the depth of blue in the soles. I wonder whether the fabric is in fact polycotton.

The first dyeing attempt was extremely patchy when it dried. Blotches of pale fabric near the heels, more blotches on the toes. I left them outside in the weather for a week or two to think about their sins while I sulked. Then I needed to exhaust the vat, so I reheated it, added reducing agent, and chucked them back (dry, I think), out of curiosity rather than any expectation of success. Imagine my surprise when, after two or three dips, they emerged a relatively solid and respectable pale blue. After washing thoroughly and drying, I considered decoration: stencilling with fresh tadeai was the obvious answer. I cut an assortment of crude paisley stencils and discovered that stencilling on curved surfaces is rather tricky. But the end result is a pleasing variety of blues produced by a variety of indigo techniques, especially when embellished with tablet-woven laces.

It’s a great shame that the shoes are so uncomfortable :-/

^1: A caution. If you try this, be prepared to spend ages scouring melted runner-sole off the sides of the pot. A hint: reheating the pot gently softens the stuff a bit, but it still requires a lot of effort.


A quick post: indigo leaf prints

Just to prove I’m still playing with indigo, although I’ve had less time than I thought I would.

If you’ve only got a few leaves, try leaf prints.

IndigoLeafPrintSilk1

This is Japanese indigo. The technique also works for woad leaves, although the print is fainter than this, at least from my plants; ‘true’ indigo should also work. I am astonished by how much of the leaf structure can be captured by this technique. (The skulls were printed by rubbing fresh leaves through a stencil; I have to post this, too!)

Leaf printing seems to work best on finer fabrics like this silk; I tried it on a heavier cotton/light canvas, and the juice didn’t penetrate far enough to make a good print.
Take a leaf, put it on the fabric, cover it with a piece of clear plastic/heavy cellophane (I used a piece from a packet of oat bran). Take a dessert spoon and hammer the leaf with the bowl of the spoon through the plastic; try to make sure you cover (damage?) the entire leaf area. I think this breaks the cells to release the juice. Then put a dab of washing-up liquid on the plastic to act as a lubricant (don’t get it on the cloth) and ‘polish’ the leaf through the plastic, using lots of pressure. Too much and you can see the leaf squash into mush that obscures the detail; too little and the juice isn’t pressed into the fabric. Practice. Have fun!

IndigoLeafPrintSilk3

pH damages protein fibres: a test.

SilkpHDamage3

“Protein fibres prefer acid conditions; plant fibres prefer alkaline conditions” is a truism that I’ve repeated myself on many occasions. It’s a commonplace when discussing indigo dyeing, as the vats are generally alkaline: indigo is more soluble at high pH. Warmth only makes things worse: hot alkali is said to cause damage faster than cold. Liles and others mention the risk posed by the vat fluid “Indigo vat fluid may be allowed to dry on cellulosic fibres but should never be permitted to do so on protein fibres, since the alkali becomes more concentrated as drying proceeds” ( JN Liles, 1990. The Art and Craft of Natural Dyeing. University of Tennessee Press).

In accordance with this I don’t allow the vat fluid to dry on my silk and wool; indeed, I sometimes put dyed goods into a citric acid rinse as soon as they’re cool, then plunge them into cold, thoroughly oxygenated tap water. The theory behind the cold rinse is that not only does this rinse out alkali not neutralised by the citric acid and oxidise the indigo compounds, it washes out loose indigo particles while they’re still truly loose, not dried onto the yarn or fabric to wear off later onto skin or other garments.

But I’ve been wondering exactly what damage alkali does, and how quickly the damage occurs. Should I be quite so paranoid when working with wool and silk, counting the minutes that the dyestuff is in the vat? I decided to investigate.

Bombyx aka Mulberry Silk seems more fragile than wool and therefore more likely to reveal damage. I took samples of commercial silk fabric, yarn, and Bombyx spinning fibre, tied them into bundles and submerged them in a 1-2-3 Fructose vat. I tested the pH of the vat at the start of the session and every time I removed a sample: it was over pH11 the entire time. The vat was maintained at 50–55°C for the duration of the test save for a brief overheating to something like 65°C  for about 30 minutes between 2 and 3 hours into the test (I forgot to turn the gas off! Oh, for a water bath). The samples were removed from the vat, cooled slightly, then briefly rinsed in a citric acid solution (pH4) before further rinsing in cold tap water and air drying.

SilkpHDamage1

And this is the result of the test. From left to right:

Undyed silk; 30 mins; 1 hour; 2 hours; 3 hours; 4 hours 15 mins; 5 hours 15mins; 7 hours; 9 hours;  10 hours 45 mins (I had to go to bed, the next day was a gym day).

I think there’s a visible difference: after nearly 11 hours at 50°C or higher at >pH11, the silk on the end is less lustrous. As the photo suggests, it’s lost some of its drape, its flexibility. The difference is more obvious in the hand: that silk is ‘cottony’, it’s not as smooth as silk. So, that’s likely to be one aspect of pH damage.

To me, the most interesting thing is the time it took for the damage to be noticeable. (Note: the temperature peak 2–3 hours in is likely to have had some effect, but I don’t think it’s terribly significant – there’s no perceptible jump in the degradation at that point.) I can’t detect a difference between the undyed silk and that which was in the vat for an hour. I’m not even certain there’s a significant difference between the 1 hour and 3 hour samples; beyond that, the fibre does seem to be more cottony. The depth of the blue colour doesn’t change from 30 minutes, so there’s no benefit to leaving it in longer. It seems likely to me that the damage is cumulative, so caution is indicated when dipping repeatedly for darker colour, but still there’s far more leeway than I feared. I’m no longer going to count minutes and seconds when silk or wool is in a chemical vat for 15 or 20 minutes.

The colour change intrigues me. Again, the blue had a greenish tinge at 1 hour, so it’s not attributable solely to the temperature change. Is the alkali causing the silk to yellow? I need to try this again with washing soda and plain white silk.

SilkpHDamage2

What to do with indigo, part I

So what am I doing with the vats? At this point I’m primarily interested in seeing how easy they are to assemble and run, and what the pH is, information that will help me to choose vat methods for dyeing projects in the future. Mostly I will be dyeing wool for spinning and spun yarn for weaving, but it’s a shame not to investigate other possibilities.

Fabric is an obvious choice; it would be impossible to dye garment lengths in my relatively small jars, but I can play with techniques I haven’t used before, such as shibori. Well, used seriously. Like anyone growing up in the 1960s and 70s I did my fair share of mad tie-dyeing, but there are many other, more disciplined techniques. I have a thing about grids, regular patterning, so itajime (shibori patterning created by pressure) with squares of wood caught my eye. Two 1.5″ squares of board, some string and a strip of silk were easy to assemble… on reflection, for my first attempt, I should have tried larger squares and cotton, because ironing the slippery silk into the necessary neat square packet was exceedingly difficult. Tightly tied between the squares, the folded silk was thoroughly soaked in tap water with a drop of detergent as wetting agent before spending about 10 minutes in the fructose vat, reheated to 50°C and revived with 5g indigo, 10g, calcium hydroxide and 15g fructose.

SilkSq.Itajime

Opening it was my reward for doing the ironing; an hour later and a rinse in vinegar later, I had this:

SilkSq.Itajime2

Lots of room for improvement, but proof of principle nonetheless!

Note the rather pretty patterns on the wood squares. Indigo will dye anything that has roughness to trap the particles. Tokushima Prefecture in Japan is trying to find new products for its traditional indigo vats, including wood for speaker cabinets and mug mats as well as fabulous flooring. I moved the fructose vat into a jar in the greenhouse after dyeing the silk in it last weekend; although it was not heated, I noticed there was a thin flor on the surface, so I dropped a scrap of wood into it for a day, removed it for a couple of hours to dry, then put it back for another day.

Fresh from the vat it was a beautiful green blue. Note that the dense wood associated with the knot has absorbed less of the indigo.

WoodTwodips2 days

Almost dry and it’s definitely blue.

WoodTwodipsDryish

Three days later, fully dry, I’ve given half of it a single coat of yacht varnish, the only glossy thing I have to hand. Sadly it’s slightly yellowing, whereas I think those floors are protected by a thick layer of perfectly clear polyurethane.

WoodTwodipsVarnish

But still, pretty. Worth a few more coats, I think.

The Fructose 1-2-3 vat: an indigo vat for the 21st century?

Using only urine (ammonia) and natural indigo, the sig vat is perhaps the least polluting, most environmentally-sound of all the indigo vat recipes, but the need to collect and store urine, the smell, and the need for multiple dips to obtain darker blues meant the dyeing industry welcomed development of new methods of dyeing with indigo. By the late 20th century the (extremely convenient) sodium dithionite/hydrosulphite vat (the zinc-lime vat developed in 1845 is a type of hydrosulphite vat) was responsible for the bulk of indigo blue on textiles, but concerns about pollution associated with the process – toxic sulphites, sulphates, and sulphides are produced as degradation products – was increasing. In the late 1970s thiourea dioxide (effective at only 10–12% the usual concentration of sodium hydrosulphite), was being proposed as a more environmentally-sound reducing agent. Now, reducing sugars are under investigation.

Reducing sugars contain or generate aldehyde groups that, activated by alkalinity and heat, will absorb oxygen from a solution. Fructose and glucose found in ripe fruit are reducing sugars; ordinary sugar – sucrose – is not a reducing sugar. So it’s possible to create an vat from indigo, lime (calcium hydroxide) and over-ripe fruit such as bananas, or dates that relies on the chemistry of the sugars rather than fermentation of the fruit. (There’s a blog post about a banana vat here.) But it’s easier to prove the principle using fructose from the supermarket shelf in Michel Garcia’s 1-2-3 recipe. It’s very simple: One Part indigo to Two Parts lime to Three Parts fructose, plus warmth.

I warmed roughly 1 litre tap water (for the record our tap water is alkaline, roughly pH8.4) to 50–60°C in a saucepan. I dissolved 15g indigo – for this I used Tamil Nadu indigo – in warm water, added it to the saucepan, then did the same to 30g lime, then gently stirred in 45g fructose. The Tamil Nadu indigo is markedly ‘blue-er’ in solution than the ordinary indigo I’ve used up to now; the solution was a vivid deep blue.

Start

I left this to work for about an hour, at the end of which it showed all the signs that indigo had been reduced and the vat was ready.

ReadyFlor

Vat ready for use. Note the flor, the metallic copper/purple/blue skin of indigo that forms where the reduced indigo oxidised on contact with air. In this vat there were metallic bubbles, too. Beautiful! Scrape the flor to one side with a spoon before adding materials to the vat, or remove it altogether and replace when you’ve finished.

Beautiful, but the strong reduction is an indication of high pH and indeed, the pH paper read 11 or higher. I added a skein of handspun silk, DRY, because I wanted to see what happened if I did so. The silk instantly went blue, as did the vat; wearing rubber gloves I squeezed air out of the silk until it sank, then reheated the vat to 50°C and left it to work, theorising that there was sufficent fructose to re-reduce the solution.

45 minutes later I removed the silk. Beautiful!

Silk45minsFructose

I thought about a second dip, but worried about the effect of longer exposure to high pH and decided to wait to see what colour this became. After all, I have all summer to make things blue.

IndigoThreeShades

Three silks for comparison: on the left, 45 mins in the fructose vat; in the middle, about 12 hours (two dips) in the sig vat; on the right, 90 minutes in the sig vat. Interesting!