Tag Archives: mending

My new scarf

In March 2020, just before COVID, he and I went to New York, sharing one carry-on bag (we travel light and fast). I’ve just checked my calendar to see how long we were there; in my memory it’s both forever and no time at all, but in fact it was an intense fun- and food-filled ten days. One was spent walking from our hotel in The Bowery to see Japanese textiles at Sri Threads, with lunch at a Polish restaurant that we still remember for fabulous food and our first Żywiec beer. I’d been following Stephen @Sri for years and his collection did not disappoint. The wisteria bast fabric, the museum-grade boro were beyond my means, but I brought home some wonderful and meaningful textiles including a worn but very beautiful sakiori obi. My plan was to cut it and make a series of small bags to showcase the fabric, but I found I just could not put the scissors to it. Not just because it’s a wonderful long beautiful thing, but because it was still a thing. It wasn’t so worn that it couldn’t be used in its entirety. And also because this was made by someone’s hands as that single thing. Someone dismantled the garments for fabric, cut strips, wound that warp, warped the loom, chose or simply took strips to weave as weft. There is no repeat. When I’ve woven random yarns like this I’d sometimes pause to admire some unexpectedly beautiful progression: did the person who wove this pause, and for which colours?

Packing my workroom for the move made clear to me how many unfinished projects require my attention. They weigh me down: i am finishing some and disposing of others. This beautiful thing could become a striking if somewhat long scarf to be loved and admired into the future if I repaired it to withstand light use. 

Obi?
An obi is a Japanese belt, traditionally a woven fabric but modern obi may be made of many materials. There are obi (several types) for women and for men; men’s obi are narrower, longer (men wrap three times around the waist, women two) and usually more sombre in colour than those worn by women.

Left, an 1890s photo of one woman tying a complex obi knot. Right, a modern man’s kaku obi (my reading suggests this would be more stylish with the knot worn a little to the left).

My obi is roughly 15cm/6″ wide and 3m/9.8′ long, the standard dimensions of a hanhaba or ‘half width’ everyday casual woman’s obi. If that’s what it is, given the age of the obi, it would have been wound unfolded twice around the waist then tied with a simple over-and-under knot.

Sakiori: an examplar of mottanai
Meaning something like ‘what a waste/shame’ in the sense of ‘don’t be wasteful’, mottanai is a Japanese philosophy born of poverty and respect for crafts and materials. There is no need (it is inappropriate and disrespectful) to buy new if the old can be repaired, re-used or recycled. Garments can be repaired and remade for further use and when repair is not possible the fabric itself still has value: it can be cut into strips for use as weft in a new woven fabric (sakiori) or even unravelled, sound weft thread by weft thread to be re-used as weft in a new zanshi (‘leftover thread’) fabric.

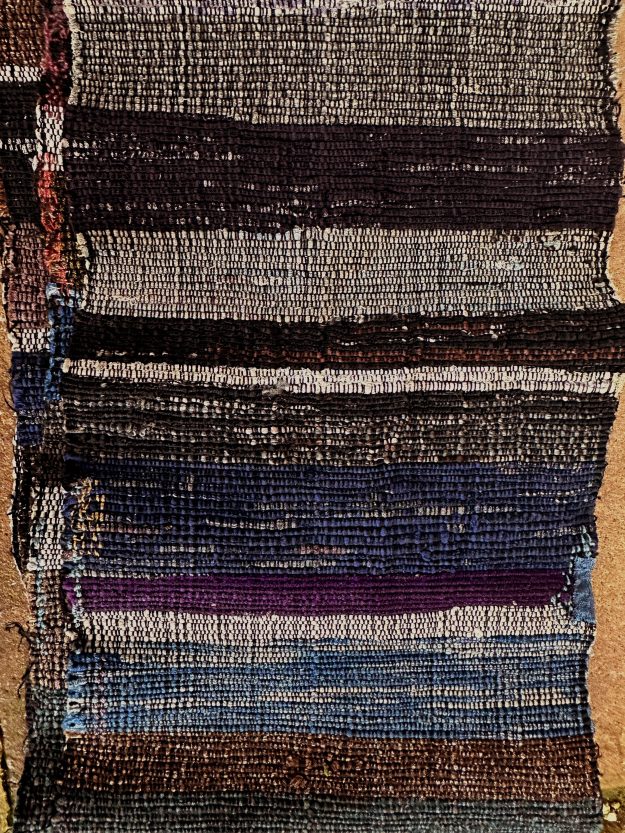
A burn test suggests the black warp is silk; it burned briefly and sullenly with the scent of burnt hair. The wefts are strips of at least 23 different silks ranging in colour from palest grey to various blacks with grey patterning. The narrowest weft stripe is 3 passes of a pale grey similar to that in the middle of the image above (but the strip is thinner); the widest is 26 passes of a blue and white silk similar to that near the bottom of the image. A true vivid deep purple is the least common colour, only 5 stripes. Most of the silks are rich shades of brown combined with greys and blacks.

Think for a minute about the possible age of these fabrics. Folk textiles are difficult to date, but sakiori fabric is no longer widely woven. The obi is worn beyond use, from long use. As were, probably, the garments dismantled and woven into it. If it was woven at the beginning of the 20th century, the fabrics may date from the 19th century. All those years, all those people making and wearing the garments.

The photo above shows some of the damage. The worst is the selvedges, in many areas eroded to nothing but worn ends of weft strips. Within the body of the obi the warp is worn or has disappeared entirely over bumps in the weft, creating weak points where the weft strips part. There is no central wear line, so it was not folded in use. At one end there are large open holes several cm wide. It might be that this is the result of wear due to knotting, or it could simply be moth or beetle damage.

I tried various blanket and buttonhole stitches on the damaged selvedges, then unpicked most of them leaving only two small areas to remind me that they don’t work, the pattern and texture is inappropriate. In the end I repaired the edges as I did the weak areas in the fabric, re-weaving the warp over-and-under. I worked as close to the edge of the obi as I dared before locking every second or third stitch back into previous stitches. Where the weft fabrics were too badly damaged to hold the new warp I stitched patches of vintage silk, indigo blue or zanshi multicolour and gold. I used 60/2 grey silk where I did not want my stitching to show and Sajou Fil au Chinois where I wanted the repairs to glow like kintsugi gold.

I like the end result enough that I thought of signing it but that seems disrespectful to the person or people who made the obi. Instead I stitched a yatagarasu, the three-legged lucky crow-guide that may be sent by the gods, on the largest patch. Everyone can do with luck and guidance these days.

Denim jacket yoke leads to a new obsession

I mentioned last June that I’d bought a vintage denim jacket that proved to be in worse condition than I’d thought, so it became an excuse for my first sashiko stitching project. As Wikipedia says, this is traditionally done using white thread on blue fabric, although the truly daring use red thread for decorative effect. I thought it would be interesting to go beyond daring into eccentricity and use the stitch grid as a basis for changing colours. Of course there had to be a skull somewhere too.

This is what it looked like when I showed it to you in June.JeansJacket1

This is what it looks like now.

jjfinished1

I am rather pleased with this. The stitching is far from geometric perfection – the old denim has stretched and as a twill fabric it moves – but it has life. I extended the stitching onto the front left shoulder (see the photo at the end of this post) when I realised how thin that fabric was; this wear, taken with the visible wear on the seams on the left side leads me to think that someone who owned this jacket carried a shoulder bag on their left shoulder.

purplecornerThis shows the details but the colours are dark and lifeless thanks to the dim British winter light.

I didn’t plan the colour changes before I began work, just decided I’d move from a relatively pale blue on the left shoulder to purple/red on the top of the right shoulder, and picked colours on the spur of the moment to effect the changes as I stitched from left to right.

skull2

I laid out a grid of stitches for the skull. Each grid square contains 6×6 fabric threads and is true to the grain of the fabric. The skull is counted cross-stitch calculated to fit on the area of the internal label, 4 stitches per grid square, worked with a single strand of embroidery floss. I don’t know whether to be flattered or annoyed that most people who see it, even local Guild members, assume it’s painted with fabric paint until they look very, very closely. I intended to leave the grid in place as background to the skull – I like organic shapes set in visible opposition to geometry – but the more I looked at it the more the ‘busy-ness’ of the grid+twill lines detracted from the skull. So I cut the threads and pulled the grid out, thread by thread. skullfinished

I confess I find this sadly exciting. I can paint with thread! In January I attended an Opus Anglicanum workshop at Hand & Lock in London. Working from 10am until 4pm with 30 minutes for lunch I managed to cover about 2cm^2 with stitches… but what stitches! The tiny patch of underside couching at bottom left was a revelation (I can live without pearls). opusang

We started with embroidery floss to establish the technique and finished with gold. I loved it. Tiny stitches requiring precision (and magnifying glasses), exactly what I love. Then Helen McCook (the hare, look at the hare in her header!), the tutor, mentioned Or Nue: tiny stitches requiring precision, painting with colour on gold so the density of stitches influences both colour and shine…  I MUST TRY THIS. LOOK AT IT!
I have acquired an Elbesee ‘sit on it’ hoop stand and hoop (that I have to wrap), I’m stitching a cotton square to mask the areas of embroidery I’m not working on. I’ve ordered gold thread for a trial design, a pack each of gold and silver thread for my first real projects. I know what I want to do but I’ve learned patience: I will start by working something very simple to test my understanding of the technique. And before that I must get some paying work done.

If anyone reading this knows what type of transfer paper might have been used to copy what looks like a laser printer image onto the fabric, I’d really like to know. It’s slightly stiffer than the fabric around it, but there’s no thick layer of plastic as I’ve seen on other transfers.

And of course I get to wear my jacket. First rock concert of the year is in May. I will practice using a wallet so my backpack/purse does not obscure and eventually damage it.

jjfinished

The less time I have, the more I want to do

When work is busy, I find myself dreaming up more projects for what little leisure time remains. The less time I have, the more I want to read, make, travel, buy. I’ve begun to suspect that some of this is a form of promising myself that I WILL be able to do these things at some unspecified time in the future, when I am at leisure to devote my leisure to the things I want to do. [Mostly. I don’t want to clean the bathroom, but I’ll still have to do it or risk our early deaths from disgust, embarrassment or horrible diseases.] There was a time when I could not resist a nice handspinning fleece – and didn’t bother trying. I just promised myself that there would be a time when I had time to spend sorting, washing, drying, combing or carding, spinning and then using that fleece. Fortunately a summer spent washing and drying and starting to comb some of the hoard taught me a lesson: I already have a lifetime’s supply of wool to spin. Not to mention cotton, silk and flax.

More productive and more fun than buying promises to myself is devoting some of my precious spare time to artistic mending. A couple of years ago I found an umpteenth-hand denim jacket in a flea market. It had a peculiar odour and was covered with a fine red-brown dust, but it fitted me: I bought it. I wore it a couple of times before washing it, which was just as well because I had time to start to love it before the washing machine revealed patches of incipient disintegration.

The yoke is in the worst condition, possibly due to exposure to the sun. I decided to learn sashiko [not sashimi, stupid computer] stitching by using it to attach a lining to the yoke, with embroidery thread shading from blue to red because colour can be fun. I tacked the lining to the yoke with a grid of white sewing cotton and began stitching. When I reached the first badly damaged area where only the white weft of the denim remains, I realised that sashiko alone would not be enough to take the strain, so decided to further reinforce those areas. I duplicate-stitched the twill furrows in various shades of blue; the more I did, the more my technique improved. I really like the finished effect (it’s better from a distance when you can’t see all the imperfections as below).

JeansJacket3

The rectangular area marking the position of the label on the inside of the yoke posed a problem. I could try to stitch through or skim the label and continue the sashiko across it, or I could use it to define a feature, which is what I did. I designed a motif suitable for cross-stitch, picked 6 shades from my ancient hoard of embroidery thread, donned my most powerful magnifying glasses, laid out a 6×6 thread grid, and started counting and stitching. Then stopped, counted, ripped out, and counted again before stitching again. Clearly I need practice at both counting AND stitching.

At this point I reserve judgement as to whether a motif was the right decision. Looking at the back of the jacket in its entirety, I think I’d have done better to continue the sashiko. But, with more work on the motif than in the photo above, it’s working and I like it. Even if variations in the thread thickness of the soft, worn denim mean that the stitching lacks precision: to paraphrase Tara, it loses precision but it gains life.

JeansJacket4JeansJacket1

I could rip out the motif and the grid, re-do it elsewhere on the jacket, and continue the sashiko to cover the yoke. And I think I want to expand the sashiko beyond the yoke, too. After all, it’s only time. I should use the time I have to do my best. Who knows, this jacket may long outlive me. I do sometimes imagine people decades or centuries from now looking at something I made and wondering about me and my life, as I wonder about those who made  the antique textiles I look at today.

Speaking of which, who wants to see some antique lace?


Fridays are for fixing.

Some time ago someone started a ‘Fridays are for Fixing’ thread in one of my Ravelry hangouts. It seemed a good idea – I have lots of fibre-ish things that need repairing – but I couldn’t bring myself to commit to the work. Last Friday evening found me sitting on the couch happily fixing something I love; I’d had a tiny lightbulb moment I’d like to share.

tabiOn

These are my tabi. Japanese sock/slippers, with a gap between the big toe and the rest so the owner can comfortably wear zori, which resemble UK flip-flops or what I called thongs in my Canadian childhood. It’s perfectly possible to ram feet wearing ordinary socks into a pair of flip-flops, but it’s very unkind to the socks. I like tabi. They’re comfortable.

tabiSide

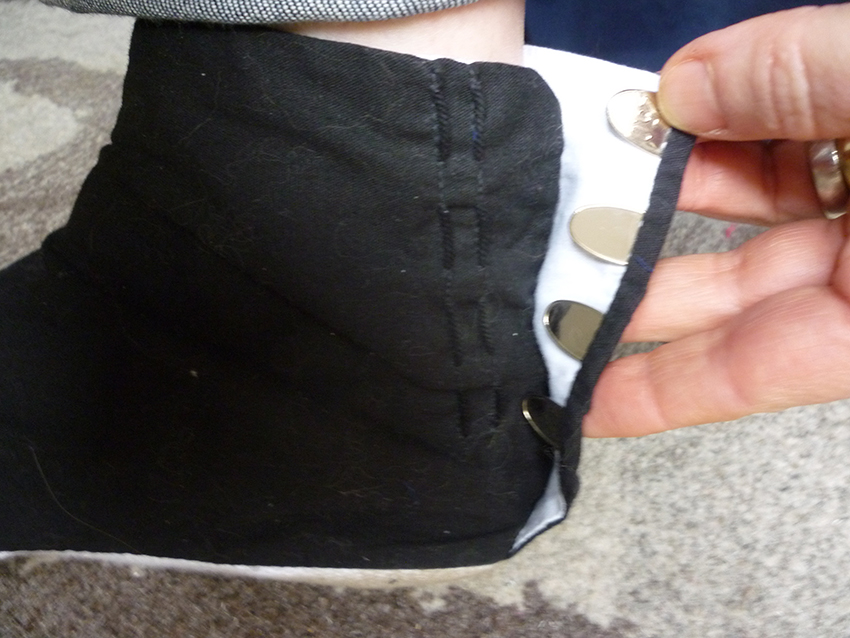
The ankle opening is closed by interesting fasteners, faster than buttons: metal tabs that neatly slide over and behind threads, like hooks and eyes, but larger and very much more … Japanese. Elegant.

tabiFasten

Sadly I haven’t been wearing my tabi because they’re broken: they weren’t very well made and the snug fit that makes them comfortable and safe to wear has pulled the material of the sole out of its seam in several places on both.

tabiDamge

They’ve been sitting in the bag of things to do for almost a year because I was intimidated by the damage. I felt it should be repaired to be ‘as good as new’, and I couldn’t think of a good way to do that; there’s simply not enough fabric to mend that seam. I could handstitch entirely new soles, but for the work involved I might as well buy a new pair. Or make my own, which is on my short list of projects, but I’m waiting until I have some special fabric for that. Last week the solution became instantly obvious as I cut up an old pair of my husband’s trousers for scrap fabric to test slipper patterns, stacking the pieces next to my sashiko project bag. Sashiko is the Japanese art – it IS art – of repairing, reinforcing and embellishing fabric with simple stitches. I’m fascinated by it, and by boro, the textiles (usually indigo-dyed ‘country cloths’) that have been patched and mended using these stitches. Personal revelation: I didn’t have to make my tabi as good as new. I just had to make them function as they should. I didn’t have to use indigo cotton and white thread, I could use whatever I had, which is true to the tradition of clothing repair. What I have is pieces of trouser leg and a box of embroidery threads, some of which are over 40 years old.

EmbThread

RepairDet

I tested the patches before I started and no, I can’t feel that overlap. The repair might not last a long time – the embroidery thread is probably a bit too fragile – but it should last long enough for me to make my own slippers.

I’m not a seamstress. I’ve done my best to avoid sewing for most of my life. But I’m beginning to enjoy it as part of the process of bringing real things into existence. I hope I’ll get better at it. I think I will.

RepairInSide

After all, practice makes perfect and I’ll get more practice now that I know perfection is not the goal. Fridays are indeed for fixing.