Category Archives: making things

Why a blue horse?

The blue horse is finished. It had been taking shape in my head for several months while we sold the house and a lot of other things in Canada, packing to move back to the UK. Ever since September 2022, when I found the blue horse in my mother’s house.

My mother was a hoarder and had slowly slipped deeper into dementia over decades. It’s not a good combination. Now she was in hospital, unlikely to leave. I flew to Edmonton to help my brother with the initial clearance of the food and other perishables; five full days of emptying cupboards of decades-old food, filling bags with decades of recycling, sorting waist-high stacks of paper, clothing, stained or disintegrating, into ‘keep’ or ‘dispose’ to wait until he had authority to remove things other than rotting food.
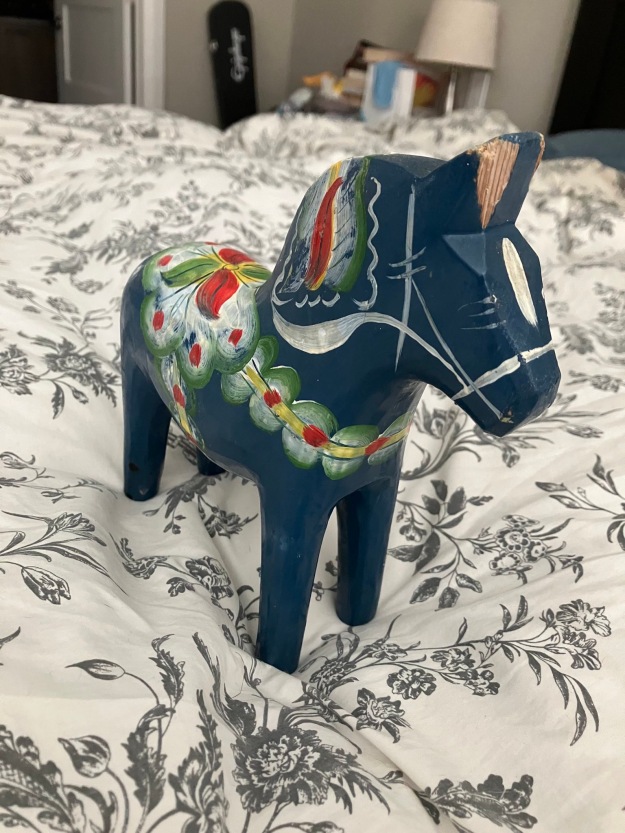
I will never forget the smell, the mundane horrors in every room, the repeated shocks as long-forgotten finds brought long-buried memories to the surface. Three bottles of the awful purple liqueur she bought for teenage me, now leaking crystallised sugar into Chinese lacquer cabinets. The Ernestine Tahedl that hung above the couch in St Albert, then on the stairs in the next house. A glass like the one she threw at my stepfather, scotch running down the wall. And in a kitchen drawer, battered but still familiar, the precious blue Dala horse that had lived out of reach on top of the refrigerator in St Albert. I remembered the shape so clearly, the bright colours, the blue. I wanted it so much but at the same time I wanted to possess nothing from that house, nothing to tie me to the present horror. I cleaned the horse and left it.


@@@


I thought about how to make a blue horse. It would be fabric, because that’s what I’ve taught myself to shape. What sort of fabric, how to cut the pattern pieces to make the right shape. While we hunted for a house in the UK, moving from holiday let to holiday let, I concluded it should be some sort of wool and bought a metre of remaindered blue boiled wool coating from a fabric warehouse. It’s not the blue I was looking for, but it was blue enough. I drew the shape I wanted as a side view, then imagined the pieces needed to make it three-dimensional and drew those. I cut the main pieces to start, the body sides and the back, adding a seam allowance as I cut.
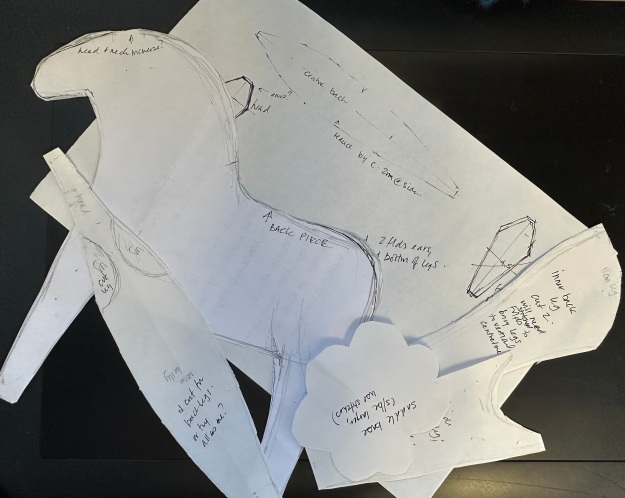
The pattern pieces for the horse, drawn on notebook pages and scrap paper.

Sample stitching made clear that a ‘normal’ seam stitched along the figure outline with seam allowances turned inward was far too bulky for this, so I carefully trimmed off the seam allowance and looked for alternative stitches to secure the pieces held edge-to-edge. The one I chose from Pinterest may be a variant of ‘Open Cretan’. I had a small selection of embroidery floss brought for a different project; I chose a slightly variegated blue that mostly matches the fabric. The stitches show; it’s a slightly Frankenstein horse, but it’s honest. And it came alive in my hands as I worked. Not the stolid wooden real horse but a lively softer horse, its head tilted as it looks at something interesting.
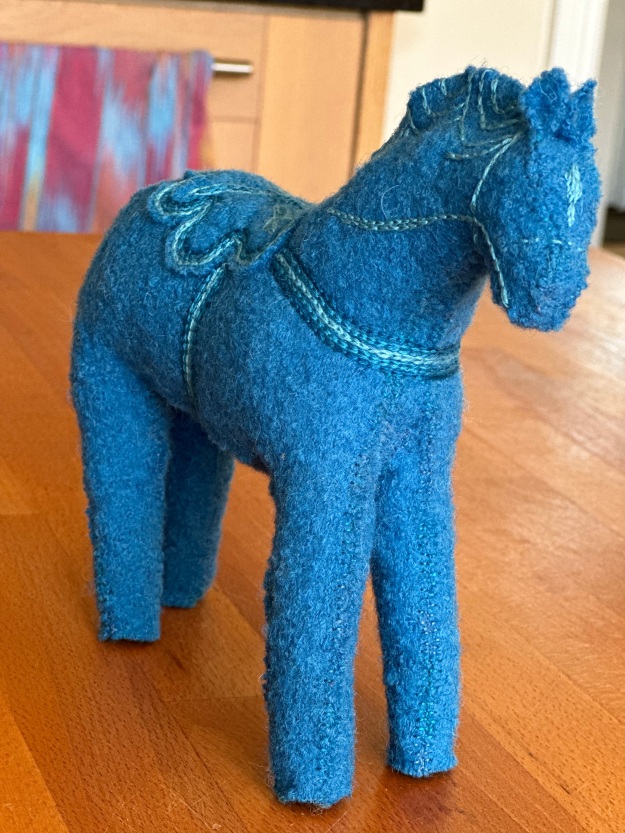
Not the right blue, but blue enough.

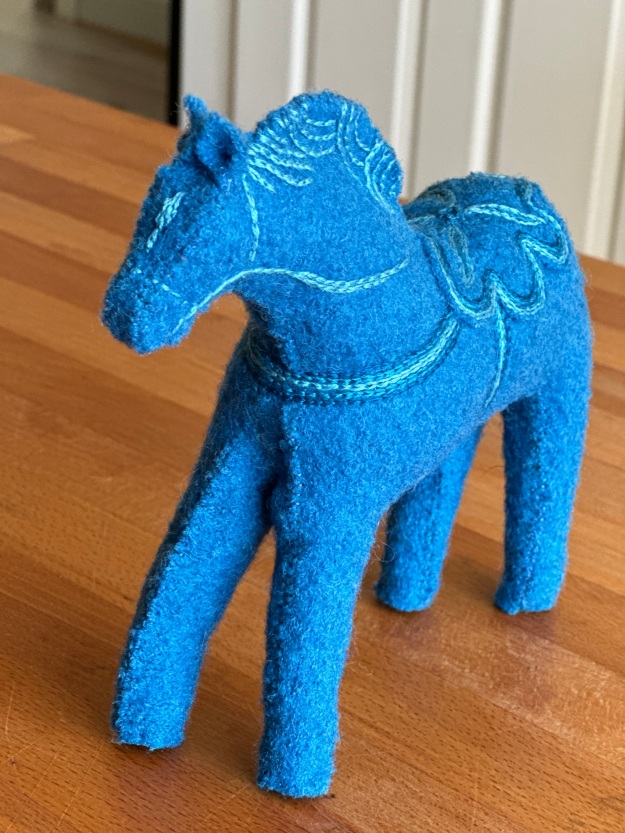
Dala horses are folk art from Sweden (there are similar horses from other Scandinavian countries). The 20th-century versions are glossy, brightly-coloured with swirling painted decoration in white, green, yellow, red and blue. I tried to replicate the paintwork on mine; it was wrong, too bright, too much a bad copy. I tried some artistic primitive decoration, copper silk spirals; it might work well for another horse, another time but was insufficiently Dala. I thought again. This isn’t a REAL Dala horse, it’s a memory made real. A ghost, of sorts. So I stitched hints of the Dala decoration in shades of blue suitable for a memory. Chain stitch is easy to work on felt and is extremely effective. On the neck of the horse the curves not only flatten the area that is the mane, but make the fabric wave as if it were moving.
My much younger sister sent me a text when she saw one of the progress photos, unembellished, on Facebook. “That looks like the blue horse!” she said, “I found it in the kitchen of mum’s house and brought it home, I remember it in the kitchen when I was little”. She sent me pictures of the battered and worn blue horse, a memory of her childhood as it is of mine. Now there are two blue horses.

I thought perhaps the blue horse should have a rider, but once the rider was shaped (felted merino, no armature) enough to offer up it was clear the horse carries only memories. So now the rider waits for me to think of something else to do.

I have a lot of blue boiled wool left. Something else is bound to want to become real.

The Queen of the Night and an Upstart Cat in Puffling Pants

This story started a couple of years ago when a friend posted pictures of a custom doll, a dog made in memory of a much-loved pet, from one of Jenny Barnett’s kits.<https://www.etsy.com/ca/shop/JennyBarnettFelt>
I had thought of dollmaking as ‘interesting, no idea how it is done’, but when I saw that dog An Idea sprang full-fledged from my forehead. As they do. I wanted to make a cat, a beautiful blue cat to remember all the cats I loved. Jenny was only too happy to help and in due course sent pics of two blue cat kits, asking which one I wanted. I wanted both. I couldn’t choose. So both kits arrived. And sat on the shelf, because I wanted to make something of my own, not follow the pattern supplied. and I didn’t know how. I bought patterns for small stuffed toys — a bird, a cat, a rabbit –– and made them, revised patterns and re-made them, drafted my own patterns and made my own creatures. I made a teddy bear, I made another teddy bear. I made a hare.

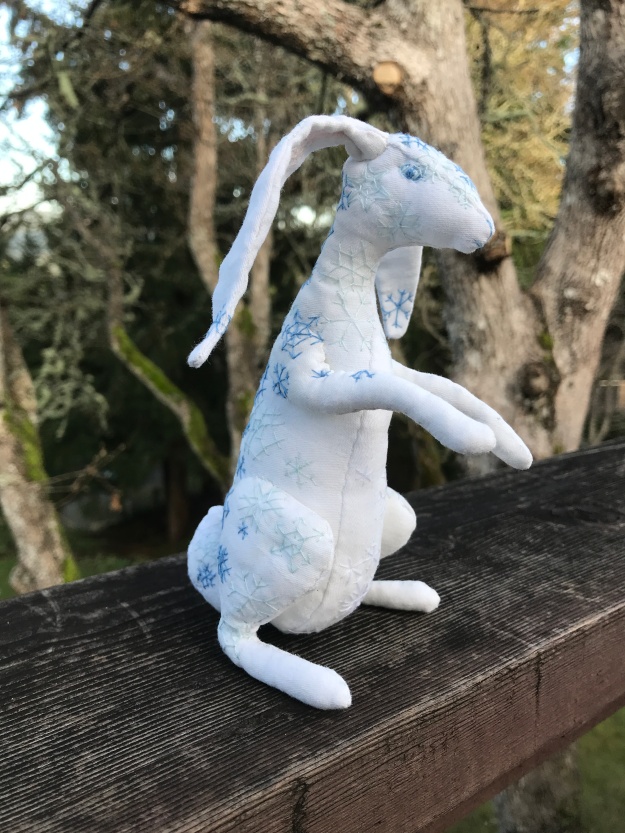
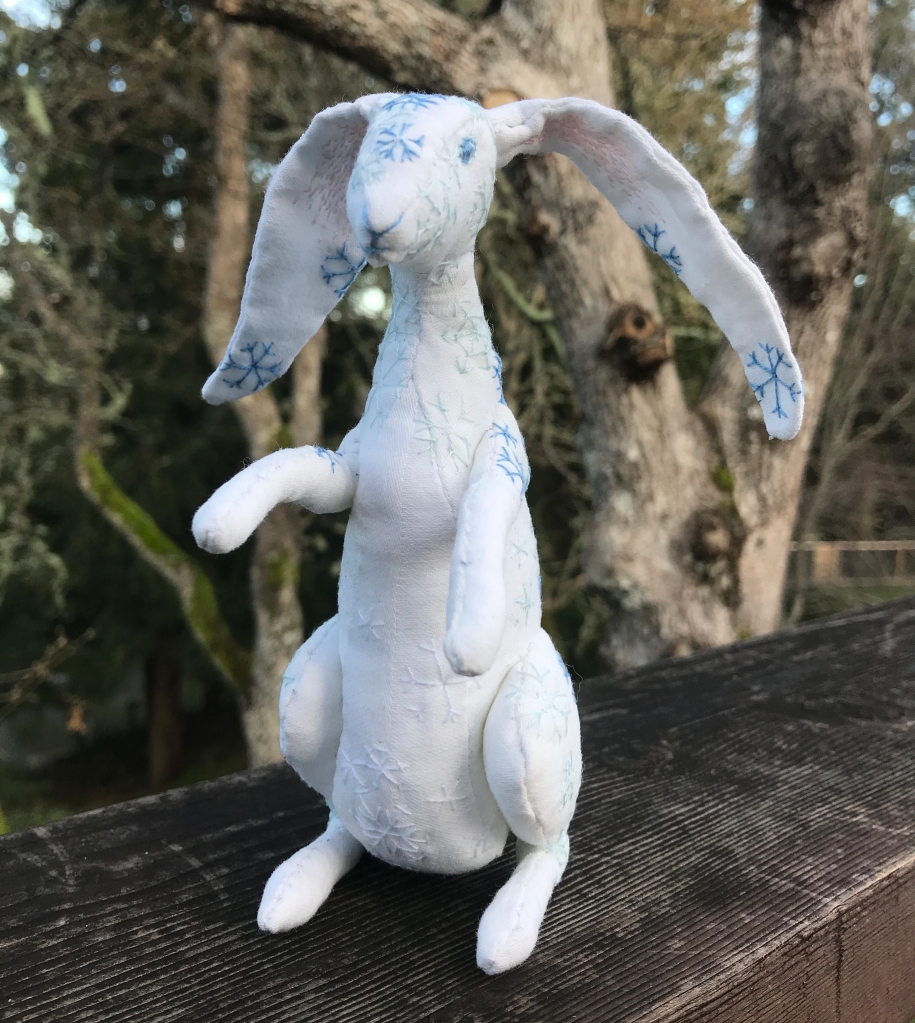
Handstitched and embroidered white cotton hare
Winter Hare, my own pattern cut from an old pillowcase.

The Queen of the Night
I chose the darkest of the two cats. I drafted a pattern for a female body (for some reason the cat spirit was female) and stitched a draft. Modified the draft. Found the fine cotton lawn I’d dyed with indigo last summer, cut the pattern, and stitched.

The body is offered to the head.

I tested the fit and when I was satisfied, I stitched more, in indigo-dyed embroidery floss and fine reeled silks, and the hand of the lawn changed, became stiffer, the figure became more real, more characterful . I spent days thinking about how to attach the arms and legs, whether or not she should have a tail (I decided not, but I’m slowly changing my mind). I thought about jointing, I tested indigo-dyed wooden beads, but in the end I opted for tiny mother-of-pearl buttons and spent hours online to find them. Every thought, every decision, every stitch added weight to her presence until she became more than simply ‘the blue cat’. Welcome the Queen of the Night.

The Queen of the Night

The Queen of the Night should have a cloak to conceal her glory. I found a fragment of blue silk velvet I bought because it was beautiful, spent hours online looking at cloaks and capes, thought and sketched and stitched more. The cloak has a high collar so the Queen’s head is crowned by silver moonlight.

An Upstart Cat in Puffling Pants? Or the Prince of London in Darkness?*
But wait, I hear you say, ‘What happened to the other kit?’
My original cunning plan was to make both cats and send one to tell M that I miss her, but it took so long to make the first cat that I wasn’t sure I’d live long enough to make the second, and it would have to be done exceptionally well because she’s not only a special person, she’s an accomplished sewing person. And a cat person. I cheated and asked if she’d like a doll kit to play with, no strings. She said yes! And that was, I thought, the end of it. I was curious about what she might make of it, but I’d given it to her so it was no longer my concern. I did once say that if by chance it was sitting on a shelf nagging at her, she should send it back; she said she had an Idea but had to work out how to accomplish it.

Time passes. Imagine the fluttering calendar pages.

And then a box arrived. The customs declaration said ‘doll’, and I discovered that adult anticipation is far more complex than that of a child. I remember desperately wanting to know what was in the parcels under the Christmas tree but, holding that box, my anticipation was different. I knew what must be in the box, but … I didn’t know what was in the box. The uncertainty balanced against the certainty that whatever it was would be *wonderful*.

I opened it and collapsed the possibilities. And caught my breath with delight.

An Upstart Cat in Puffling Pants. Or the Prince of London in Darkness.

I posed him with some of the books containing imaginary London. Because, holding him for the first time, I imagined him stalking, cat-arrogant, along the Thames beside The Globe as sunset fades to darkness. He would be acquainted with the Marquis de Carabas, he would emerge from the shadows to assist the Midnight Mayor (should the Mayor require assistance; he often does). He is part of *my* much-loved London made real in my hands, possibly the most thoughtful gift I’ve ever received, and he is one of the few things I would pack in my go bag because that night, after opening the parcel and meeting him, I dreamed of him stolen and I was desolate.

He’s wearing an Elizabethan costume made entirely of glove leather, stitched with copper thread. His doublet is trimmed and ruffed (is that a word?) with black lace stitched with copper. He has more weight, more presence, than the Queen of the Night, and my friend who made him real is Awesome.

* The card had two names for him. ‘An Upstart Cat in Puffling Pants’ refers to ‘Upstart Crow’, a UK sitcom and (with added ‘The’, a play) about the life of Shakespeare. ‘Puffling pants’ is one of the jokes; it refers to the trunk hose, with lining visible between the slashe
https://peterviney.com/stage/the-upstart-crow/

He might (also?) be a? the? Prince of London in Darkness. I wouldn’t speculate, he might take offence.

Making things real (and the value of amuletic stitchery)

I have fallen down a rabbit hole or, more accurately, am sitting in a hare’s form looking up at the stars and sewing. As someone who has believed they hate sewing and are not good at sewing for far more than half their probable lifespan I’m doing a lot of sewing. I have a theory about the reason, but first, some of the results.

Hares. The European Brown Hare is a focus for folklore (for an overview, read Terri Windling’s ‘Following the Hare‘). For 29 years we lived in one of the last areas of the UK where hares are still relatively frequent. From late February on I’d see them in the fields, always at a distance because they are so incredibly alert to danger. Females ‘boxing’ unwanted males, single adults sitting quietly in the sun. Occasionally the mangled bloody remains left by illegal hare-coursers who set sight-hounds (lurchers and greyhounds) on them and bet huge sums of money on the dog most likely to kill.
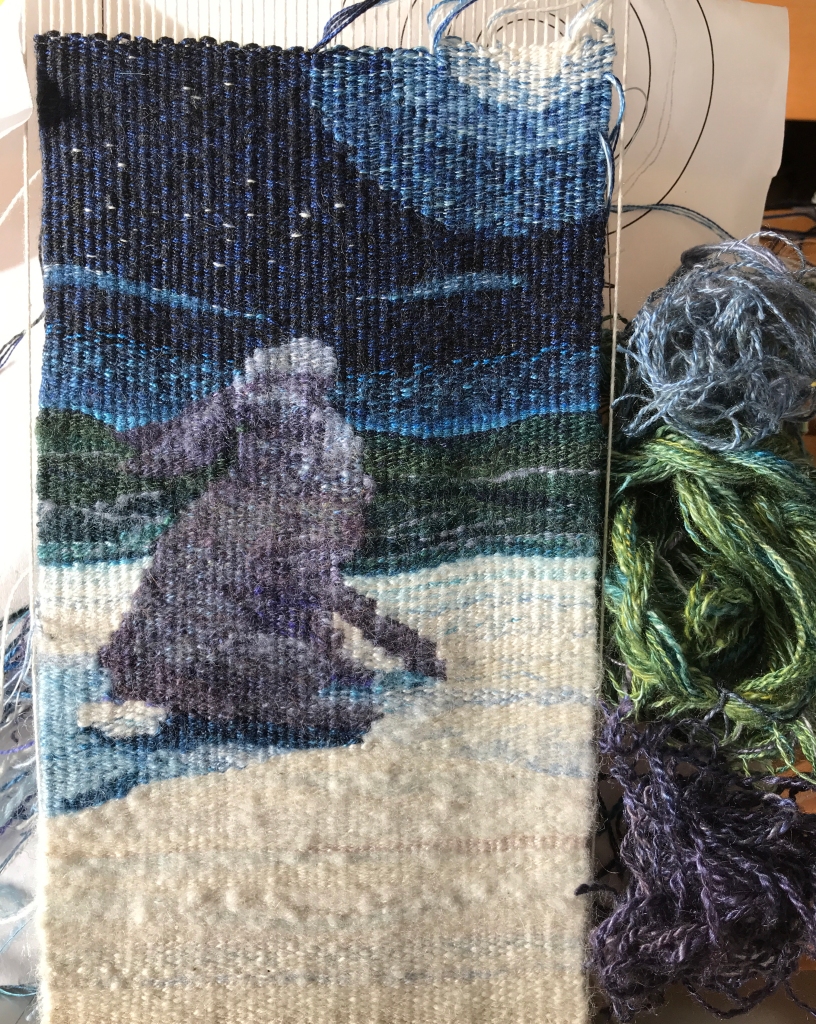
I love hares. I miss them most in late winter, when for nearly 30 years I’ve been looking forward to seeing them again. I have stitched hares and moons in handspun silk and indigo (the tattoo that completes my sleeve will be a hare-in-the-moon). My first serious attempt at tapestry last year was a tiny hare waiting in the snow for something, worked in remnants of handspun knitting and weaving yarns.

Remnants of lace yarns and handspun silk snow, the hare sits on the snowfield at midnight, waiting.

That was before I made the bears, and before I encountered the works of Mr. Finch. I had seen fabric dolls before, most painfully cute. These are not cute toys. Johanna Flanagan’s dolls (The Pale Rook) are not cute toys. How are such things made?
‘First, catch your hare’… I bought a bird pattern from Ann Wood Handmade and made a Bluebird of Happiness for a friend.

A Bluebird of Happiness worked with affection and silk threads in indigo cotton, random Indian silks.

That was tricky but satisfying. I bought another Ann Wood pattern (in my defence it was on sale) and this time modified the pattern pieces slightly even before making the first Bunny.

An Ann Wood bunny, slightly modified, in cashmere sweater and Liberty Tana Lawn blouse scraps. Very cute, very cuddly.

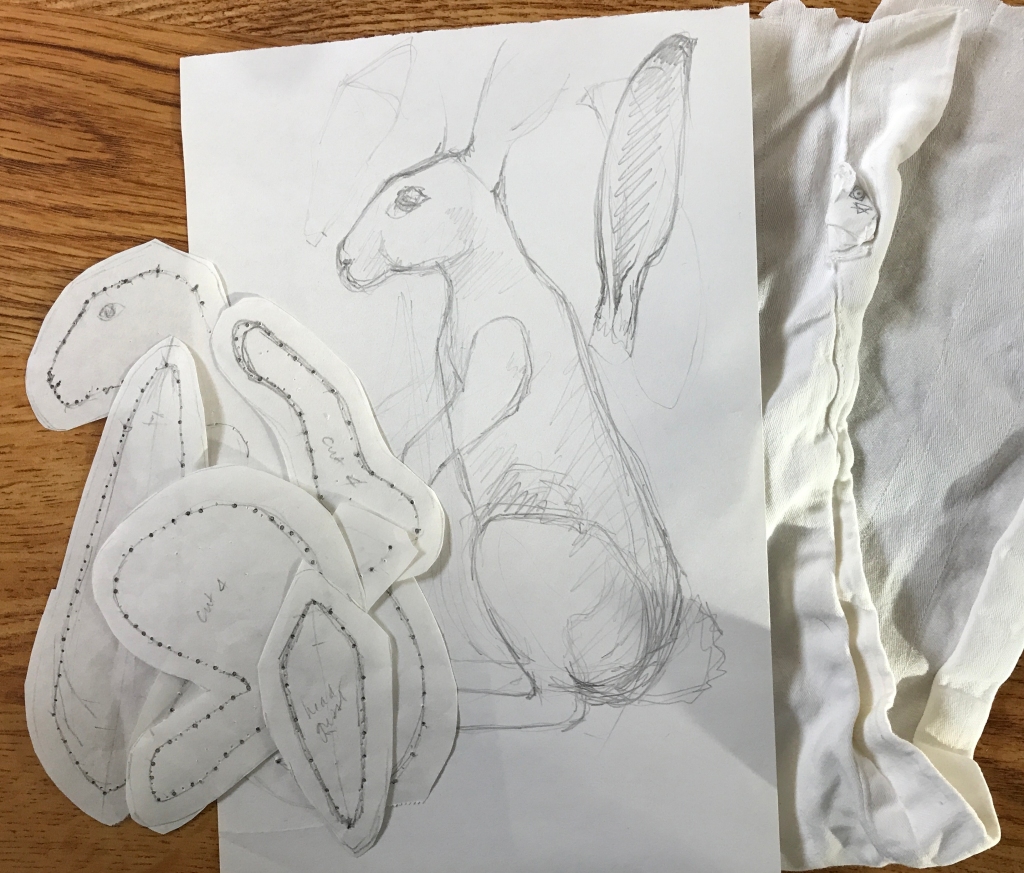
Now I thought I knew how to do this. I drew a hare, not the best hare ever, and used that shape as the basis for pattern pieces sketched directly on freezer paper (I’d read that being thicker it is better for patterns). The bears and the bird had taught me that finer and closely-woven fabrics in not-slippery material (silk is slippery) are easiest to work with, so I used an old cotton pillowcase from my ‘Indigo THIS’ cupboard.

My original bad hare sketch (no room for the ear on the page), the pattern pieces, and some of the pillowcase I used.

I am pleased. The result is not quite the shape I imagined but, having made it, I know how to change the pattern pieces to make what i see in my mind’s eye. My Winter Hare. 15cm (about 6 inches) high, entirely hand sewn, no armature. It works. I made a HARE. With an enigmatic expression.
I love it.

The tail was a nuisance. Everyone’s first thought — including mine — is a pompom or other soft fluffy thing. Total fail, or at least I thought so.
The Hare is not quite complete as it stands. Eventually it will stand on its own tiny piece of snow, a handspun handwoven tapestry, but I have to finish another tapestry to free the loom to weave that.

I had only the Winter Hare in my head when I started this. Now this is the December Hare, the first of a Calendar of Hares, each a hand-stitched tiny sculpture. I know what the January Hare will look like if I can work out how to cut the pattern pieces. And some of the others are taking shape in my head, too.

Why am I sewing? I have asked myself that question many times, sitting in my chair in the evening making tiny stitches (I wear +3.5 magnifying glasses for some of this work), unpicking those in the wrong place, trying again. I look at my book collection: the Japanese semamori stitches at the back neck of a child’s jacket lacking the line of stitches down the centre of an adult jacket needing two lengths of fabric for the width of adult shoulders, and I think of Sheila Paine’s books charting the meaning of stitch across different cultures. Amuletic stitches, each a tiny wish and hope from the maker for the well-being of the person for whom the item is made. And I know that this is why I am stitching so much: 2020 has been a very bad year. Worse, for myself and my friends in the UK it is the culmination of a series of bad years each of which has been worse and offered less hope than those before it. I feel powerless to help myself, let alone my friends. All I can do is stitch. Tiny precise stitches, each a hope and a wish for better times for those I care for. It’s a very strange and very moving experience to realise that my fingers, my mind and my heart are working together as the fingers and minds and hearts of women have worked together for as long as we’ve had needles and thread to make things for those we love.

With every stitch I wish to mend the world.

Cloth characters

‘Boro’ and visible mending is fundamentally about the repair and re-use of functional items, but I believe it’s important to remember that there are many possible functions for the things we make by hand. It’s as important to feel loved as it is to feel warm.

A doll made for a Roman child in Egypt AD100–500. Roughly-stitched linen stuffed with papyrus and rags with fragments of wool suggesting hair and a blue bead that might have been a hair ornament.
https://www.britishmuseum.org/collection/object/G_1905-1021-13


I try to give my students some idea of the variety of things they can make with scraps of fabric and thread, slow stitching by hand. Bags are good, in fact bags are excellent. Patch your clothes, make new clothes from assemblages of patches. Scarves! Pincushions! Needlebooks! All so very practical. I wanted something more off-the-wall. That Roman doll made from a twisted scrap of cloth made me think about how much we want to give children something tangible to say “I love you” every time they hold it.
Stuffed toys.

Wandering idly around the Internet when I should have been working, I found Ann Wood‘s pattern for a tiny cat figure. I made one from tiny scraps of Japanese quilting cotton and discovered I need more practice making tiny stitches let alone choosing an appropriate fabric for tiny stitches. But the result was cute.

My first attempt at a sewn cat figure

So I tried again, re-drafting some of the pattern pieces for a more complex but more cat-like shape. Despite an even more disastrous fabric choice (scrap damask linen napkins that frayed as soon as I cut the pieces due to linen being SO SLIPPERY) the result was so cute I made it clothing. A Japanese jacket and trousers, because I could. Note that the jacket has a centre back seam because Japanese adult clothing has a centre back seam. And it is lined. And has a gore for the cat’s tail. The trews open at the back and are tied with a drawstring that leaves a gap for the cat’s tail. Both Jacket and trews have genuine patched repairs. I’d say ‘How sad am I?’, but in truth I am not sad: it doesn’t look much like a cat but I smile every time I see it.

Pinterest found Kapital Kountry’s limited edition Teddy Bear that seems to have been sold for USD350 in 2018. Not a child’s toy, more an accessory or collectible, I think.

But… teddy bear. Hmm.

I searched for patterns. So many are ‘Disney bears’ of very little brain and less character. I found ‘Barbara Ann Bears’ selling patterns for much older bears on Etsy and chose ‘Fosdyke’.^1 I have almost no experience making garments, let alone stuffed toys, and I wanted a button-jointed bear rather than the internally-jointed one in the pattern, but managed to muddle through. I stitched ‘boro’ patchwork compositions onto the pattern pieces before assembling them, and experimented with some interesting but philosophically-dubious^2 techniques for distressing fabrics to make them look ‘older’. Note that the result is very definitely NOT child-safe. There are buttons, and beads, and loose fibres. You could certainly make a child-safe bear in this way, but it would be more honest to make the bear properly so the child or children can love it to pieces properly in the traditional manner.

Two quarters of the body sewn together.

As I stitched the pieces together I realised that the pattern really was designed for a mohair fabric, where the pile of the mohair conceals some things and accentuates others. Stitched flat cloth shapes quite differently.

I was able to overcome some of this by using internal stitches to re-shape things to my liking. Bear 1.0, aka Berwick is the result. I did not expect him to be so lovely. Fudging the neck join in lieu of a rotating joint left his head wonky, giving him a wistful air of hopeful affection. He hopes to be liked. I know how he feels.

He even stands upright although this may be short-lived as the soles of his feet round out.

I thought he needed a friend so gave him a pocket mouse and a pocket to keep him safe.

After some time spent admiring Berwick I drew a new pattern to create the shapes I prefer, and to better account for the difference between mohair and flat fabric. I was about to cut it from the same (old hand-dyed Thai pants) fabric when a box of ‘cabbage’ aka scrap costume fabric arrived from my friend in the UK. It included a wonderful burgundy brocade velvet.
Once again i have made a disastrous fabric choice for a novice sewer: it unravels, you can’t mark the velvet side, the velvet *creeps* as the pile moves as I sew, and I sort of forgot/did not realise that velvet is directional and it matters. I have made 2.5 heads in order to get one worth stuffing. But still, glorious. If he comes together as I hope I may make him a waistcoat of velvet embroidered with gold, an antique lace cravat, and name him ‘Liberace’.

A burgundy velvet leg.

^1: Because Fosdyke was a Tonkinese of brief acquaintance and extreme character fulness, ‘the ugliest kitten ever seen’ who so over-flowed with character and self-interest that we had to re-home him after 6 months, before his bullying was the death of our aged Siamese.

^2: ‘boromono’ and mottanai are concepts based on respect for the intrinsic value of fabric, to preserve its functionality as long as possible. Artistically distressing a perfectly decent and useful piece of fabric by cutting holes in it or staining it to make it look ‘used’ is not in accord with the spirit of ‘boro’. But it’s art, so that’s alright. Right?

Reconstructing fabric from Norse Greenland: Tiny Wadmal!

Or, in Old Norse, vaðmál. 
From vað (stuff/cloth) mál, (a measure), because this fabric was a household standard and trade staple in Scandinavia, Iceland and Greenland where wool from local sheep was the primary textile fibre. Know to have been in production from at least the 11th century to the 17th century, pieces of vaðmál meeting strict standards for length, width and quality were legal currency in Iceland and sometimes elsewhere. The definition of the Icelandic ell, the unit of measure, changed over time, possibly as a result of increasing trade with England where vaðmál imports supplied coarse cloths. Elsewhere in northern Europe the definition of ‘watmal‘ or ‘wadmal‘ was broader: a coarse cloth worn only by those who could not afford better. Textiles found in the graves of 14th-century Herjolfsnaes in southern Greenland by Poul Norlund’s 1921 expedition provide a wealth of information about local production of vaðmál and how the garments of that time were constructed.

The finds from Herjolfsnaes and other sites in Greenland are beautifully documented in two modern volumes, Else Østergård’s Woven into the Earth, which includes a detailed description of the vaðmál fabrics, and Medieval Garments Reconstructed with even more information about how to spin the yarn to weave vaðmál fabric to make copies of the garments. I’ve had vaðmál on my mind for a long time so, when Kate Larson of Long Thread Media asked me to write an article for Piecework magazine about stitches from Norse Greenland (published in the Summer 2020 issue of Piecework) and how I’d adapted one of them to solve a problem I created for myself, I spent only one evening playing with wool and modern fabric before concluding that I needed to know how these stitches worked on the original vaðmál. 

Oveja_islandesa,_Grábrók,_Vesturland,_Islandia,_2014-08-15,_DD_097

Icelandic sheep in Iceland, Diego Delso on Wikimedia Commons

Vaðmál is the best example I know of people making the best use of the fibre produced by their local sheep, which from raw wool found in Greenland resembled the modern Icelandic breed. These hardy sheep are double-coated, with an outer coat (the tog) of long hair protecting the inner wool (the thel) from harsh weather. The hairs were removed from the fleece with wool combs, then further processed by combing to be spun for warp. The softer wool was opened up loosely into a cloud of fibre and spun for weft. The Norse women would probably have plucked the wool from sheep rooing (shedding their fleece naturally) as primitive breeds do; few modern shepherds can do that, so my fleece was shorn. Many shepherds in North American shear twice a year and discard the winter fleece, full of straw and hay, but I was lucky enough to find a ram fleece with a full year’s growth.

IcelandicLock

Washed Icelandic fleece, 12 months growth. The long outer hair is darker than the softer wool.

I pulled the long hairs out of each lock (I find this easier) and lashed them onto my wool combs.

hairlashedon

One of the pair of combs with locks lashed on, ready for combing, plus a handful of the wool remaining once the hair has been removed. Note the difference in colour.

Two transfers removed most of the unwanted short fibres, skin flakes and vegetation.

combed

The combed hair ready to be pulled off the combs. The comb is held down; the loose end of the ‘pony tail’ is pulled gently through a small hole in a diz. Done carefully, friction ensures that all the fibres flow through the hole to become a long loose rope of fibre ready for spinning.

The end result was a lovely length of top, but rather coarse and stiff by comparison with the Wensleydale and Cotswold long wools I usually comb.

top+waste

Bottom: the long combed hair ready for spinning. Above: the short waste fibre and other material removed by the combing process.

I decided to lightly card the thel and spin from rolags because time was short. This wasn’t the focus of the article, after all!

Vadmal Weff

The warp yarn was a z-twist singles (unplied yarn), hardspun (twist angle of 40°–50°), roughly 1mm thick. The Norse settlers would have spun it on spindles; wheels are faster by the hour, I have wheels and I know how to use them. The coarse fibres created a characterful yarn, somewhat prickly and reluctant to flex. The weft included both down (very short soft fibres from the base of the fleece) and slightly longer wool; spun long draw this blend of lengths tends to create a textured yarn as the longer wool fibres can twist-lock either side of a slub that as a result has to be persuaded to draft down to the desired grist. 

I used a strong gelatine size on the warp but the gelatine did not stick as tightly to the coarse, shiny hairs as I had hoped. It did little to lock the stiff ends of the hairs into the yarn, which meant more friction between the yarn and the heddles and reed. Which in turn emphasized any unevenness in the yarn. The cassimere merino yarn was much easier to weave, 

onloom

As I wove I was able to feel the fabric developing, understand how the softer weft beats down to almost cover the coarse, hairy warp. The fleece from THIS sheep would never have been dress fabric — it is too coarse — but it could easily have been outerwear, still a garment, when I’d thought that warp would have been best made into rope.

fabricdetailembarrass

Not my best weaving, but proof of principle is all I really needed.

I cut the fabric off the loom and began to test seam and edge finishes sewn with reserved warp thread. Woven into the Earth suggests that the longest and, finest tog was reserved to be spun into thread, and I now understand why: stiff thread with many protruding stiff fibre ends DOES NOT lend itself to easy tidy sewing. Nonetheless I persevered. I singled some cut edges, stabilizing them by binding the weft threads with thread running into and out of the fabric (see the article for more information about this technique). I wanted to demonstrate the way tablet-weaving was used to bind and protect hems and other ‘edges’ subject to heavy wear, so I ran a short warp of the warp threads on my small tablet-weaving loom (with thanks to John Mullarkey for this lovely little loom).

Tablet-woven edge treatment on the loom, showing how the weft is used to sew the band to the fabric as part of the band weaving process.

If you are familiar with tablet-weaving you may be able to understand how this works from the photograph. In short, the tablet warp is held close to what will be the outer/visible surface of the fabric. Shorter lengths of weft are threaded into a needle; after passing through the shed the needle-with-weft is taken to the back of the fabric then — the point where this photo was taken — brought back through the fabric ready for another pass after the tablets are rotated to change the shed. The band is sewn to the surface of the fabric as part of the weaving process. It’s a bit tricky to work out the spacing of the weft passes to make the band lie flat on the fabric, but practice makes perfect.

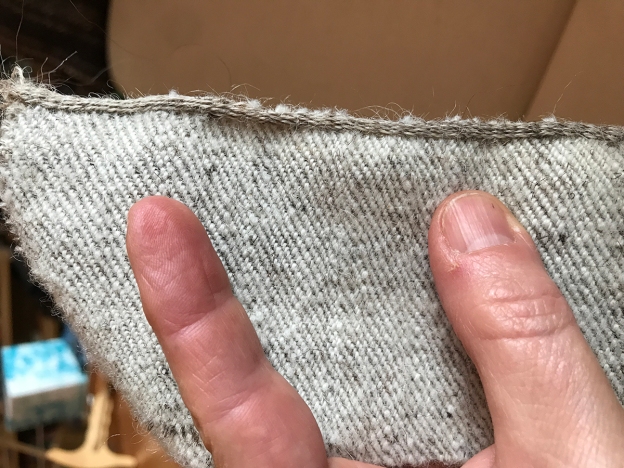
The finished tiny piece of wadmal demonstrating various sewing techniques from the garments found in 14th-century Norse graves.

The end result! Tiny vaðmál!
With Norse seams. The Norse women alive 600 years ago live again as my hands learn from the work of their hands.
Women’s work.

The vaðmál itself is a fascinating fabric and I am slowly processing a much nicer, much softer double-coated Shetland lamb fleece to make a larger sample that might, if I’m lucky, be large enough to be a waistcoat.

A truly lovely double-coated dark brown ‘black’ Shetland lamb fleece from Mctavish Farm Shetlands in Oregon.

This particular Triumph of Perseverance Over Stupidity is complete.

offtheloom

The cotton warp I described in Slow Cloth, well-travelled is woven, off the loom, finished. 6.18m/6.75yds of fabric c. 9″/23mm wide. Cotton singles warp, silk and cotton singles weft, all dyed in a (fructose, from memory) indigo vat. Note that the warp stripes are unplanned and result from differential dyeing by the different colours and types of cotton.

A couple of people have asked for more technical information about the yarn (wpi, tpi). Remember that this was random spinning over the last 5 years or more, not directed spinning for the project. Cottons include pima, supima, organic green and brown, spun from punis, top and directly from the seeds, on tahklis, charkha, Majacraft quill and lace flyer. All were spun clockwise, or z. The yarn(s) vary widely in grist. In the photo below of remnants of the sized warp the 1/2″ wide sample is wrapping at roughly 52-56wpi. In the 1/8″ sample the yarn is wrapping at over 70wpi. (The greenish colour is indigo over natural brown, which together with its thinness tells me this was probably tahkli spun from seeds on my lap in front of the tv. Why weave your handspun? For the memories.)

WPI

Twist per inch is also variable. It is difficult to see the twist in the sized yarn, but examining unsized yarn in the weft bag – the warp was selected randomly from the skeins of dyed yarn, so both are equally variable – with a magnifier I eyeballed twist from roughly 45° to 55–60°, assuming 90° is perpendicular to the length of yarn. So it’s reasonably high twist… and that’s AFTER boiling. The yarn was probably fractionally thicker before boiling, so add something to those twist angles for twist on the singles as they came off the bobbin/shaft. Basically, sample. That’s what this fabric is, a jacket-length sample.

I like it.

washed,ironed

That’s the fabric finished to my current satisfaction. An overnight soak followed by wool/handwash cycle did not remove the gelatine size, so I soaked this in a bucket of the hottest water from the tap plus a couple of kettles of boiling water, washed on permanent press ‘warm’, then ironed on hottest cotton setting. It’s shrunk about 10% in width. I like it a lot. Despite the cursing and frustration, I also appreciate the lessons it has taught me. Some are unlikely to be needed again, such as: Do not expect a warp on the loom to make an international move without shifting somewhat. Others may be useful time and again.

My handspun cotton weaves well, but beware of slubs.
Some of my earliest and most unevenly spun cotton singles are in this warp. Only the very thinnest singles snapped under the quite high weaving tension, and by ‘very thinnest’ I mean places where uneven singles were thinner than fine sewing thread so I confess I’m feeling smug and planning a super-thin cotton fabric. But thick slubs are as bad or even worse than thin spots: the slubs hold more size, so are stiffer and fail to bend around the weft. They stuck up out of the fabric a bit after weaving and some are still visible after finishing. I can live with this.

slub

Most of my stupid mistakes occurred during the weaving; I’m even more proud of my spinning because the singles stood up to such mistreatment.

Wind sized yarns from the skeins onto bobbins before winding the warp.
See the underline? That means this one’s particularly important. Because winding the warp from a skein held on a flexing umbrella swift with occasional pauses to break the yarn free from places where the size has stuck threads together is not exactly conducive to even warp tension, is it?

I am rubbish at winding warps.
Perhaps fractionally less rubbish now because I’ve wound a few since this one, but still. This warp was wound one thread at a time from two different umbrella swifts over the course of three days. Should I be surprised that I had to hang a chiming array of weights from slack threads? No, I should not.

Thoroughly set the weft twist before weaving.
Or be prepared to guard against pigtails forming when you slacken tension to beat it into place. I am told that many traditionally-spun and woven cotton fabrics from South America have these pigtails, so it’s authentic, but still. I prefer my fabric without.

Be open-minded about lease sticks in or out while weaving.
The lease sticks were useful for this warp, seeming to help even out the tension. But on earlier fuzzy warps (cashmere and fine merino handspun lace) the lease sticks seemed to raise the fuzz, encouraging the the ends to stick together.

But enough criticism.

ThreeFabrics

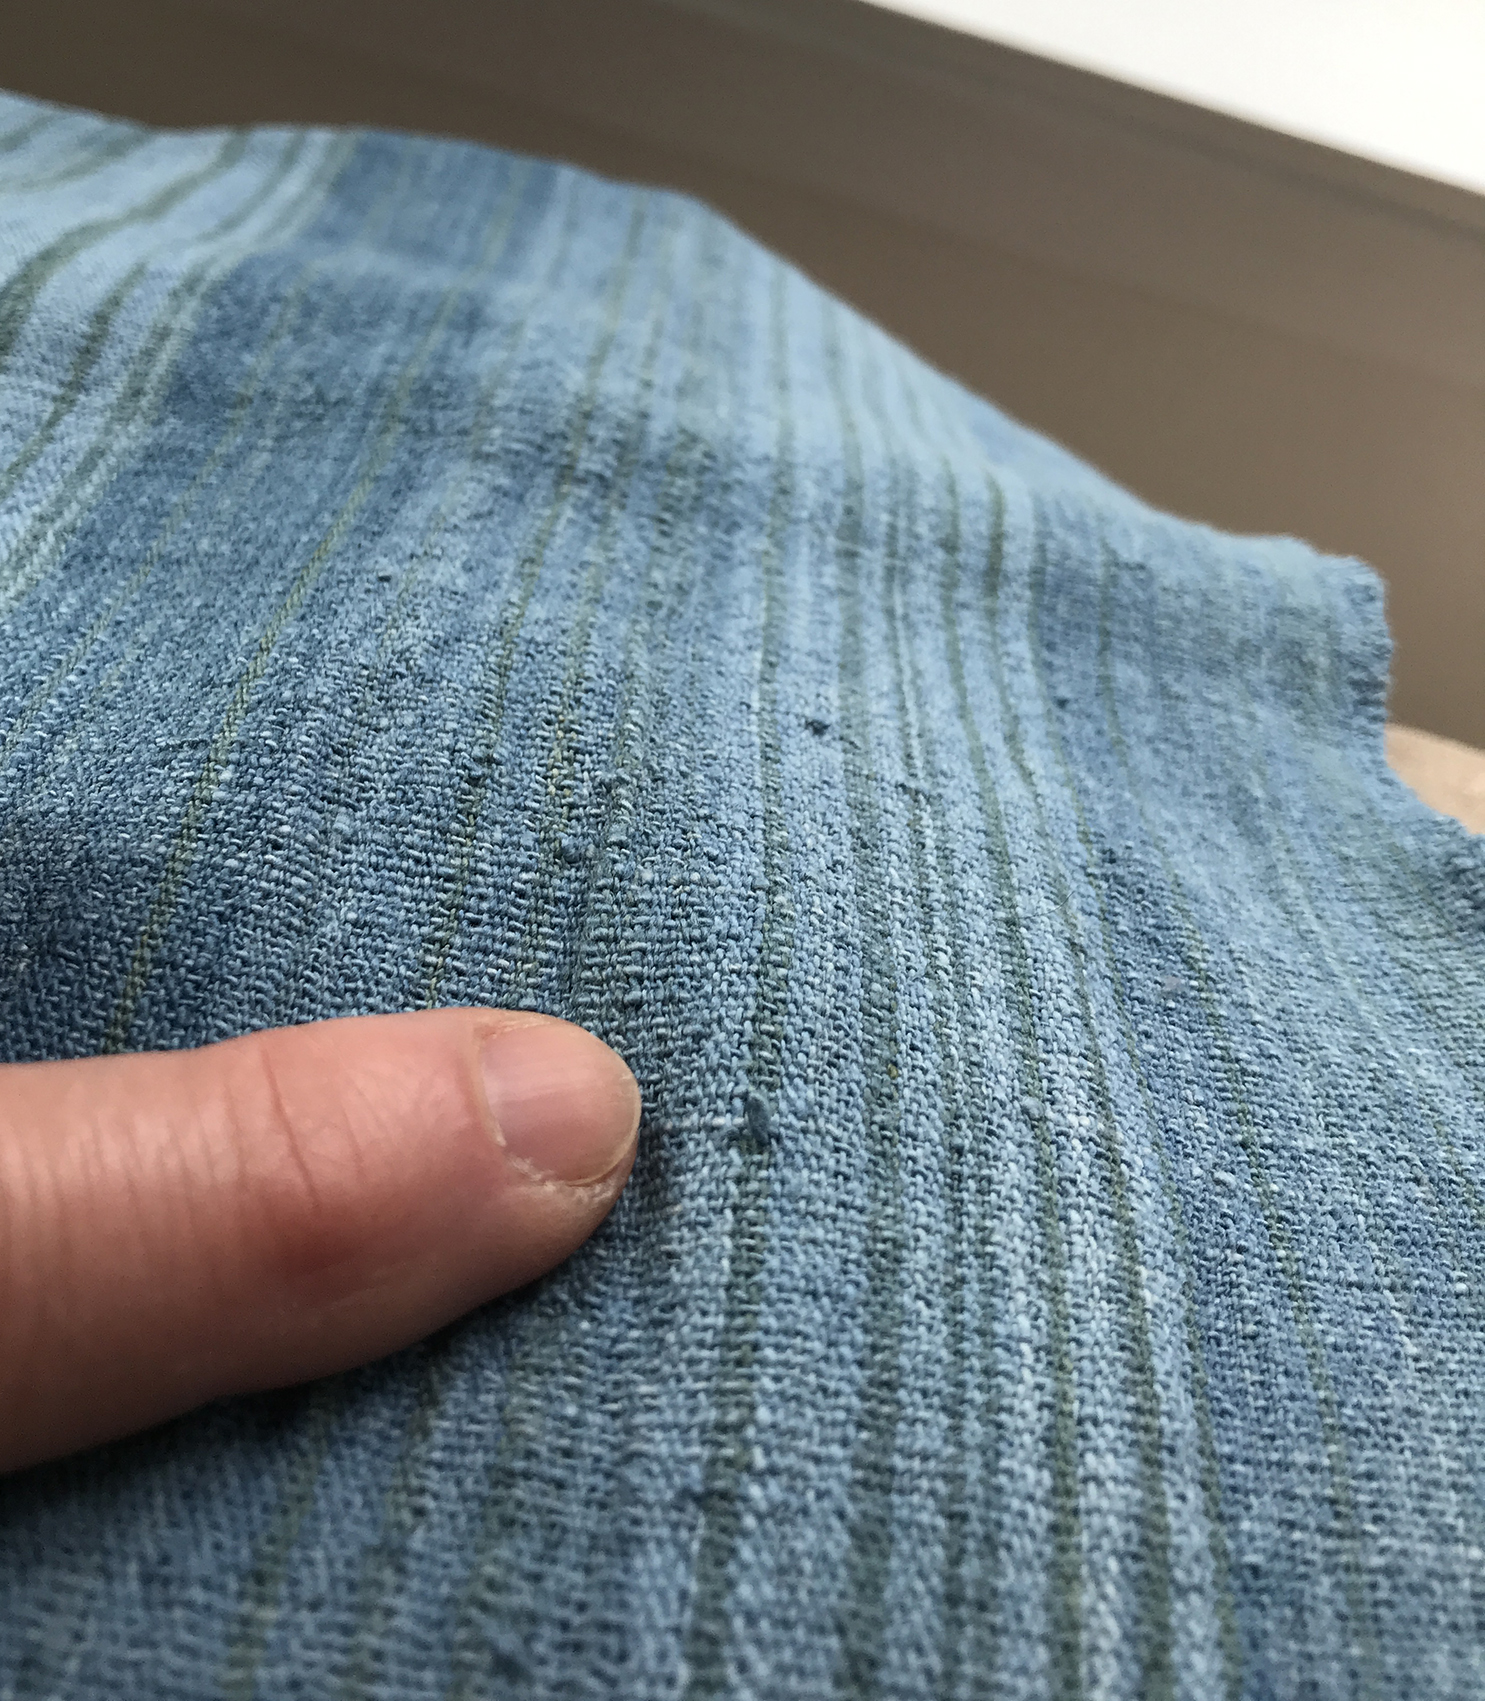
The fabric is slightly stiff even after the size has been washed out, reminiscent of the stiffness of new denim in the days before lycra. Not as stiff as those old new jeans – it’s a much thinner fabric – but similar. I’m guessing I’ve achieved my goal of spinning and weaving a cloth that will soften with wear like the denim of yore.

The warp was threaded for point twill; the fabric shows the three different weaves. To right plainweave/tabby; centre first twill (Strickler p.28 #94, Point twill from A German Weaver’s Pattern Book 1784–1810); left 8-shaft diamond twill. (The red line marks the point where I changed the tie-up from first to second twill.)  The width of the fabric decreased between patterns as the interlacement changed; the first twill (#94) is narrower than plainweave as the twill pattern packs threads more densely. The second twill, 8-shaft diamond, has no band of plainweave so packs even more tightly for a fabric slightly narrower than the first twill. The silk weft and denser packing of the twills makes both heavier fabrics, but not dangerously dissimilar to the plainweave with cotton weft.

The plainweave shows the warp striping most clearly and, like the wool singles fabrics I have woven, it is a little more elastic than a fabric woven from plied yarn. It’s heavy shirting in weight, noticeably lighter in the hand than either twill. To be expected, but it’s interesting to have it confirmed.plainweave

The patterning of twill #94 is less obvious in the fabric than I’d hoped. It’s there if you look closely, though.#94

Once again 8-shaft diamond twill is just right, at least as far as I’m concerned. The fabric has the hand of lightweight denim. It looks good with the silk weft.
diamond

But I think it looks even better with the slightly paler blue cotton I used when I finished the silk (or at least couldn’t find any more).
diamondcotton
The pale blue fades in and out of the warp cottons, the diamonds seeming to shimmer in the fabric. It’s country cloth, but it’s interesting. I should play with the effect, I like it so much. I wish I had more than 24cm.

So. What am I going to do with it? Being a process rather than project person I’d really love to put it away and make the next fabric, but that defeats the purpose somewhat. There is more to be learned from this sample: I need to know how it wears. I could just bundle it into a bag and handle it until it softens but really, it’s fabric. It should be a garment. A sample can be a jacket or a shirt, and I think that’s what this will be once I overcome my fear of making garments. Why spin and weave? To make a garment from cloth you cannot buy, where one warp makes three different patterns for different parts of the garment. Eventually!

Slow Cloth update: The Triumph of Persistence Over Stupidity

Consider this the digital equivalent of a huge sigh of relief.

As you can see, the Slow Indigo Cotton warp has a new less flattering but educational name. I’ll explain that once it’s off the loom and finished, at which point I daresay more of my stupidity and – to be fair – ignorance will be revealed. In the interim, I am pleased to say my plan for it is working and we’re into the endgame.

fullsizeoutput_380

Why weave by hand? Why not just buy fabric?

Because as a hand weaver, even a new and somewhat ignorant hand weaver, I can make fabric you can’t buy. I threaded this warp for an 8-shaft point twill, then wove 3.5m of plain weave with cotton weft to get to this point, where I switch to a twill tie-up and indigo-dyed handspun silk weft. The patterned cloth will be used to accent parts of the garment made from the plain cloth. I don’t know what it will look like yet, that will depend on what the cloth looks and feels like after finishing. I’ve planned and am hoping for a hard-wearing heavy shirting/light jacket fabric, stiff to start with but softening with wear. Fingers crossed!*

* When I’m not using them to throw the shuttle.

Slow cloth, well-travelled

My last post was written in May 2017 sitting at the desk my husband made for me, beside a window looking out on my English garden in an English village (true, but much less quaint than it sounds).

This post is written from what was our kitchen table, repurposed as my temporary work desk, with a window looking out on our new garden on Vancouver Island, Canada. I’ve come home. Almost. ‘Home’ would be Alberta in the 1970s, but southern Vancouver Island is nonetheless a good place to be. Immigrants ourselves, in the summer of 2017 we fled Brexit Britain for our native land, arriving in time to celebrate Canada’s 150th. For nearly 12 months the logistics of our move – selling the house, selling everything we didn’t think worth shipping, packing – and fulfilling my spinning teaching commitments consumed all my time and energy. Only now am I starting to think and plan future textile projects.

But first I have to finish what I started.

Stephenie Gaustad taught me to spin cotton at SOAR in 2009. I fell in love with the banjo charkha, but couldn’t hide it under my sweater to bring it home when class finished so I’ve had to settle for tahklis and bead-whorl spindles, a T-frame charkha, Majacraft Suzie Pro and a Rose. I spun cotton on all of them and my bag of singles skeins grew larger. I learned to weave. One of my first projects on the Baby Wolf was a tiny warp of handspun cotton singles. Success! (Mostly.) Now I knew why I hadn’t plied those skeins, but increasingly I wondered what sort of cloth they’d make. In fact I needed to know, because there’s no point in spinning more cotton for weaving if what I’m spinning won’t make a cloth I like. There was only one way to find out: weave what I had. I’d spun natural shades of cotton from cream, brown and green through to white. I put the whole lot through an indigo vat because I like blue. Plus some handspun silk singles because I had A Plan.

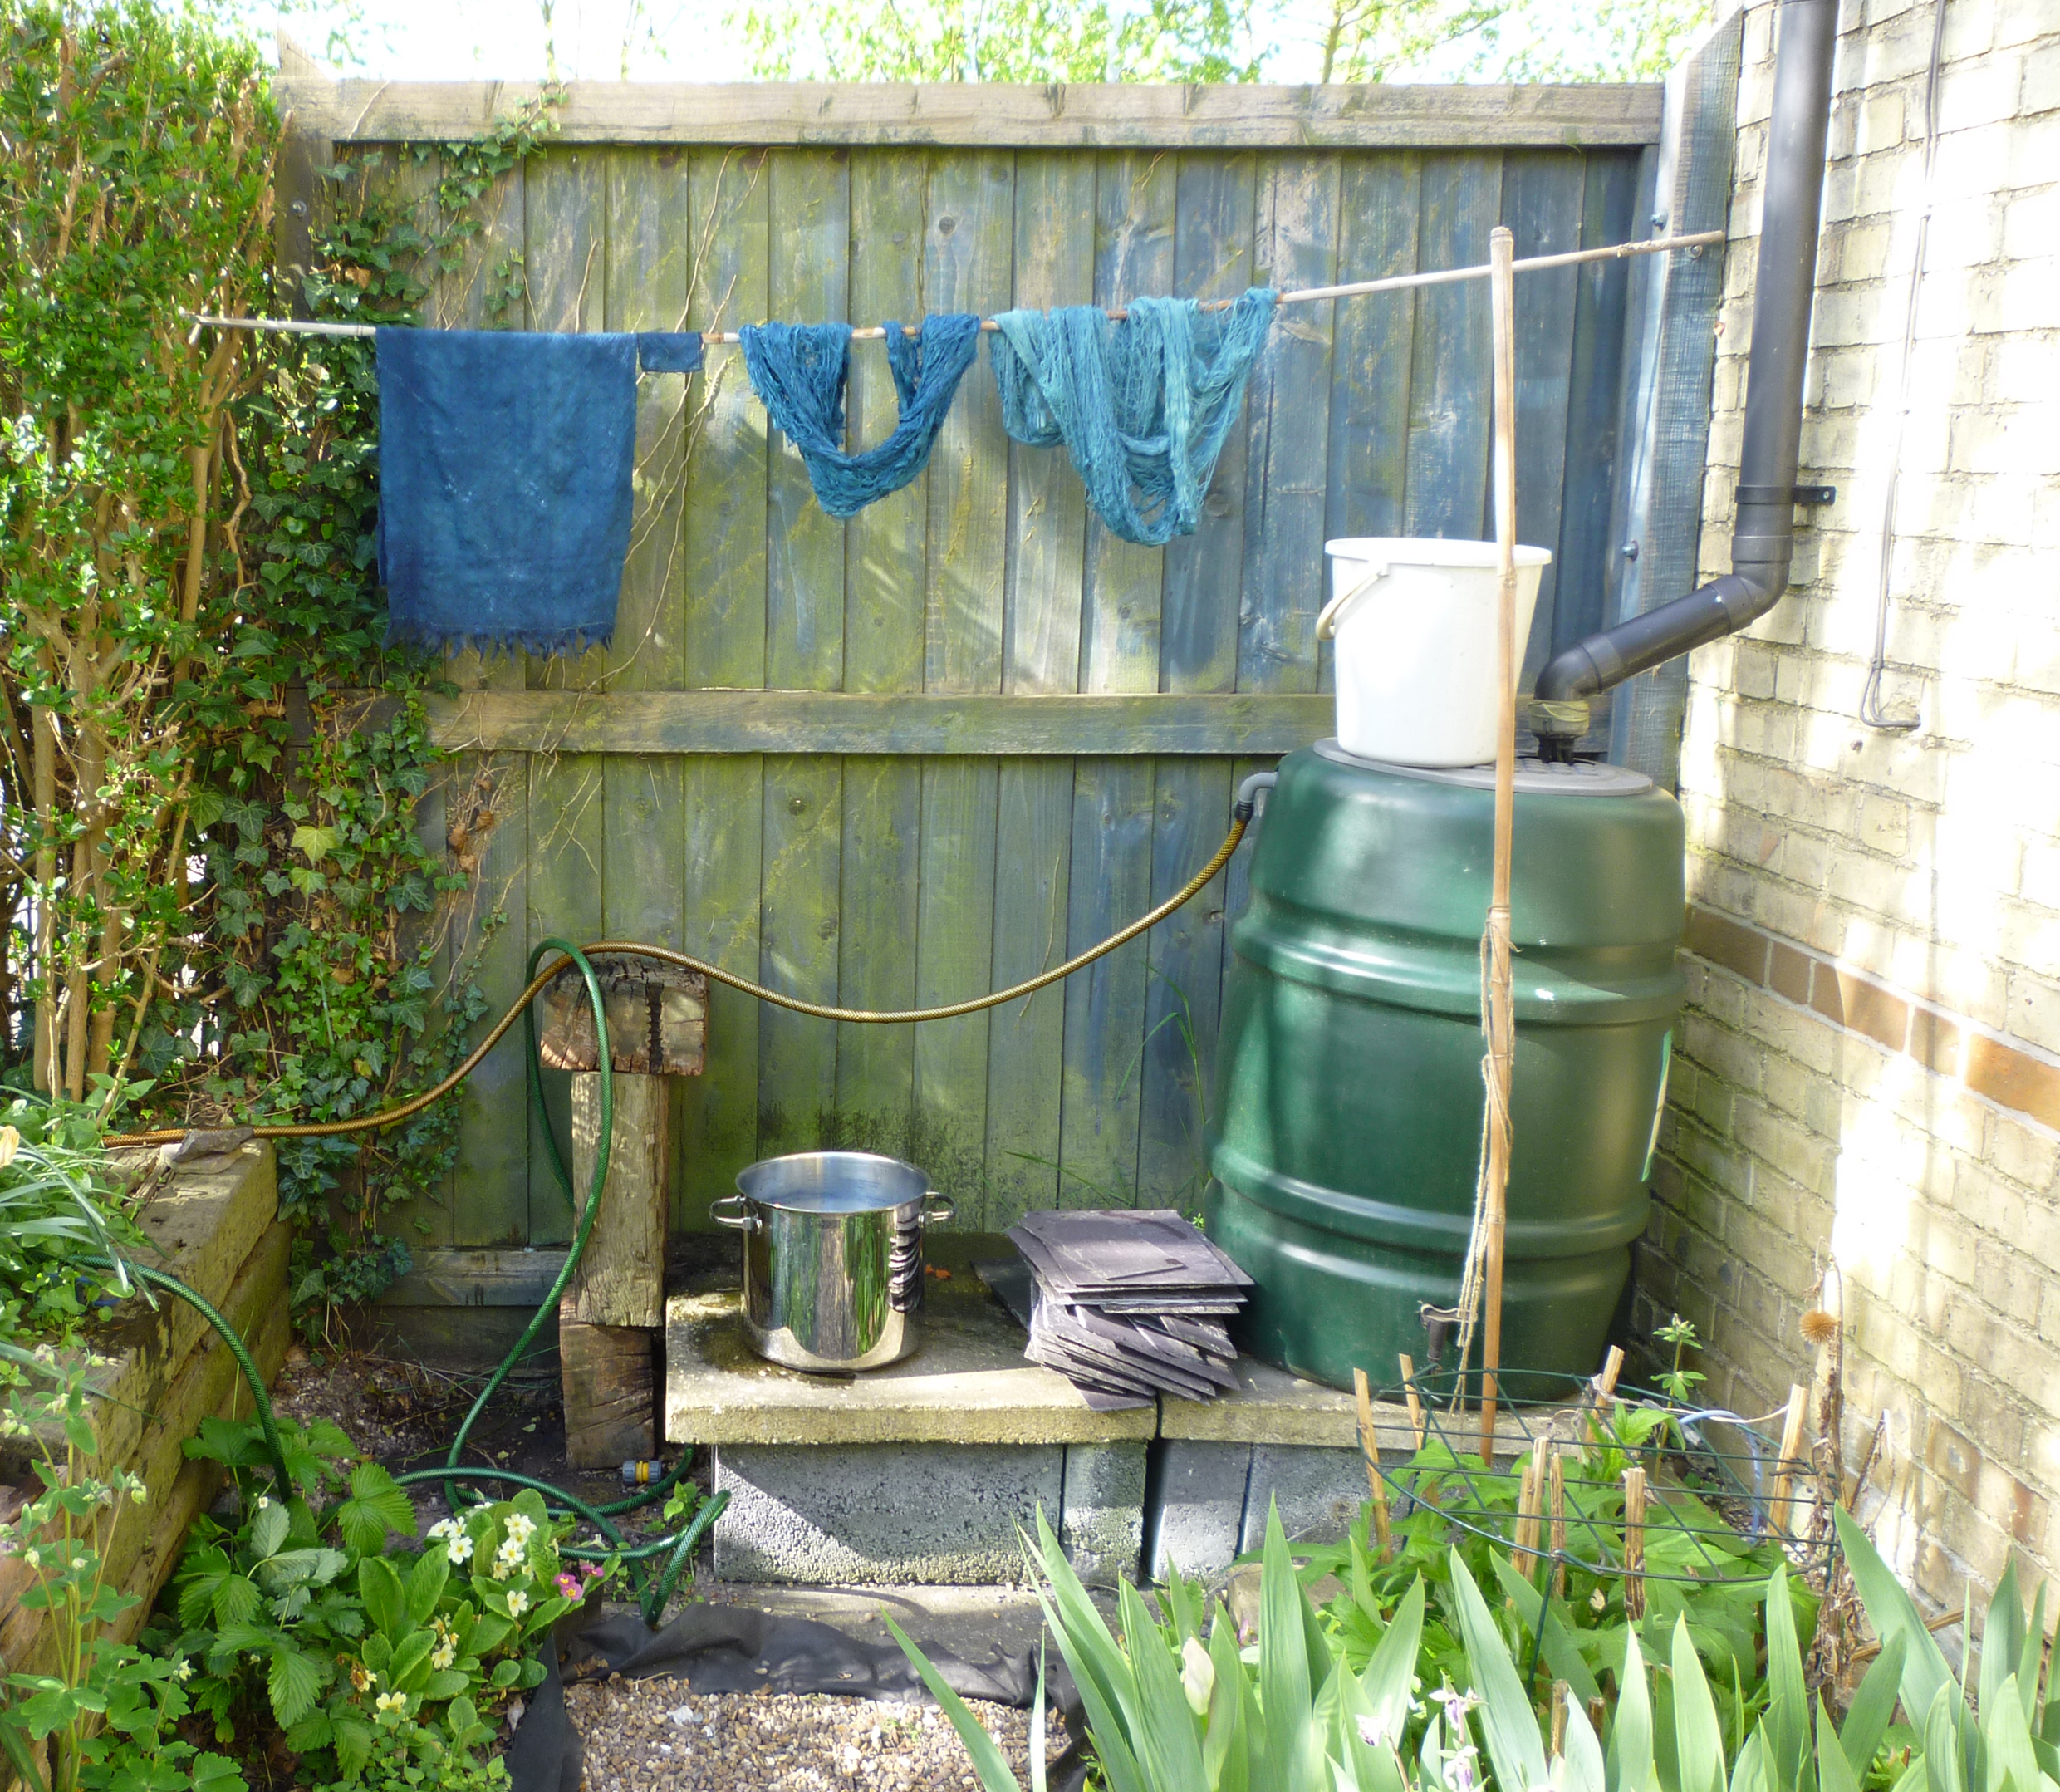
IMG_3109Indigo-dyed handspun cotton singles drying on the rosemary bush by the kitchen door. I miss that bush, and our North Ronaldsay sky-blue doors.

IMG_3111I had to finish drying the yarns on the radiator. Hmm. Clearly I dyed silk fibre, too. I wonder where that is? In one of the many boxes, of course.

IMG_3117The gelatin-sized yarns drying under light tension – those water bottles are not full! – suspended between the hoe and an old rake handle wrapped in clingfilm aka Saran wrap on the clothes tree. The old grey lunchbag contains clothes pegs.

The shorter skeins were hard-spun ( which means with lots of twist) on the tahkli; I put them to one side for use as sewing thread, calculated the remaining yardage and wound a warp. I estimated the set, the number of warp threads per inch from wpi, wraps per inch around a ruler, then beamed the warp and wove a bit.

A digression dealing with the value of my time and the lifespan of the cloth I want to make. Modern fabric is generally soft when you buy it, even before you use it. The yarns are relatively softly spun, the cloth is woven and finished to be soft. Soft yarn, soft cloth doesn’t stand up to wear. It stretches out of shape, fibres pill and pull out of the fabric. This suits our ‘I want it soft and I want it right now’ society and, even better, it makes money for the manufacturers of clothing that will wear out as well as go out of style in under a year. But I invested a lot of time in spinning the yarn for this. Pre-Industrial fabrics, handspun, handwoven and hand-sewn, expensive as reflected the time needed to make them, wore well enough that clothing and bedlinens are often included in wills. I want to make cloth that reflects the time it took to make, that serves me well for years, that wears well. It will be hard to the touch to begin with but soften with wear and age.

Deciding the set for handspun yarn is tricky unless you’ve spun yarn to replicate an existing fabric. Standard set charts may be misleading: you can set your yarn like a commercial yarn of similar grist, but if your handspun is a different fibre and/or more or less tightly twisted, it will behave differently from the commercial yarn when finished and you’ll end up with a different fabric. With handspun I start with wpi, tweak it according to what I think of the cloth on the loom, and keep samples for future reference.

I looked at what I’d woven at 40epi, decided it was sleazy, unwove the inch, re-sleyed, wove a bit. Looked at it, decided it was still too open, unwove the inch, re-sleyed, wove a bit. I may have done this a third time, but kindly time blurs painful memories. Eventually what I’d woven looked enough like the fabric I wanted, warp-dominant to emphasize the stripes, that I cut the woven strip off to see what it looked like after hand washing. The small block shows the set and picks per inch off the loom, the long strip has been washed. The brown and tan cottons have dyed greenish. Other stripes are variations in the cream and white cottons, perhaps the result of variations in twist or in the fibres themselves.

IMG_3578

That doesn’t show how washing affected the density although you can clearly see the that the warp has shrunk (the unwashed sample is taller). With the light behind it the overall shrinkage is more obvious, as are the reed marks, the open lines between the groups of ends (threads) that run in each dent of the reed. They’re almost inevitable given that I had no finer reed, but I’m trying to think of them as a design feature – they can be – and they’re less obvious in the washed strip anyway. Notice also that the warp threads have moved in the washed fabric: hot water revives the twist, but the weave structure locks the threads into position. I may see some tracking in the final fabric.

img_3581-e1515077975775.jpg

On balance that sample was acceptable. It’s 50 epi set in an 8-shaft twill currently woven plain weave according to my Plan. It’s 9″ wide on the loom and I think the warp is about 5m long (the one thing I forgot to write in the book). The washed sample shrank roughly 10% in both warp and weft.

I’d hoped to have this woven and off the loom before we left the UK, but I had no time. When the movers arrived I simply folded the Baby Wolf, roughly wrapped paper around the beams, and left them to pack it. Unlike our more fragile ceramics (yes, I am bitter), the loom arrived undamaged. The warp had shifted somewhat, but less than I feared, and as it wasn’t well-wound or beamed in the first place that’s the lesser problem. I’m getting better at warping, but I need a lot of practice.

IMG_4622I have started weaving some fine yarns with the lease sticks in place. Like back-to-front or front-to-back warping, lease sticks in or out is something weavers seem to choose as habit early in their careers. I didn’t like the lease sticks in when weaving thicker, fuzzy yarns: my impression was that the sticks were encouraging fuzziness and binding of threads in the warp. But feeding firmly sized, finer yarns through the even tension of the lease sticks seems to correct some of my warping issues. 
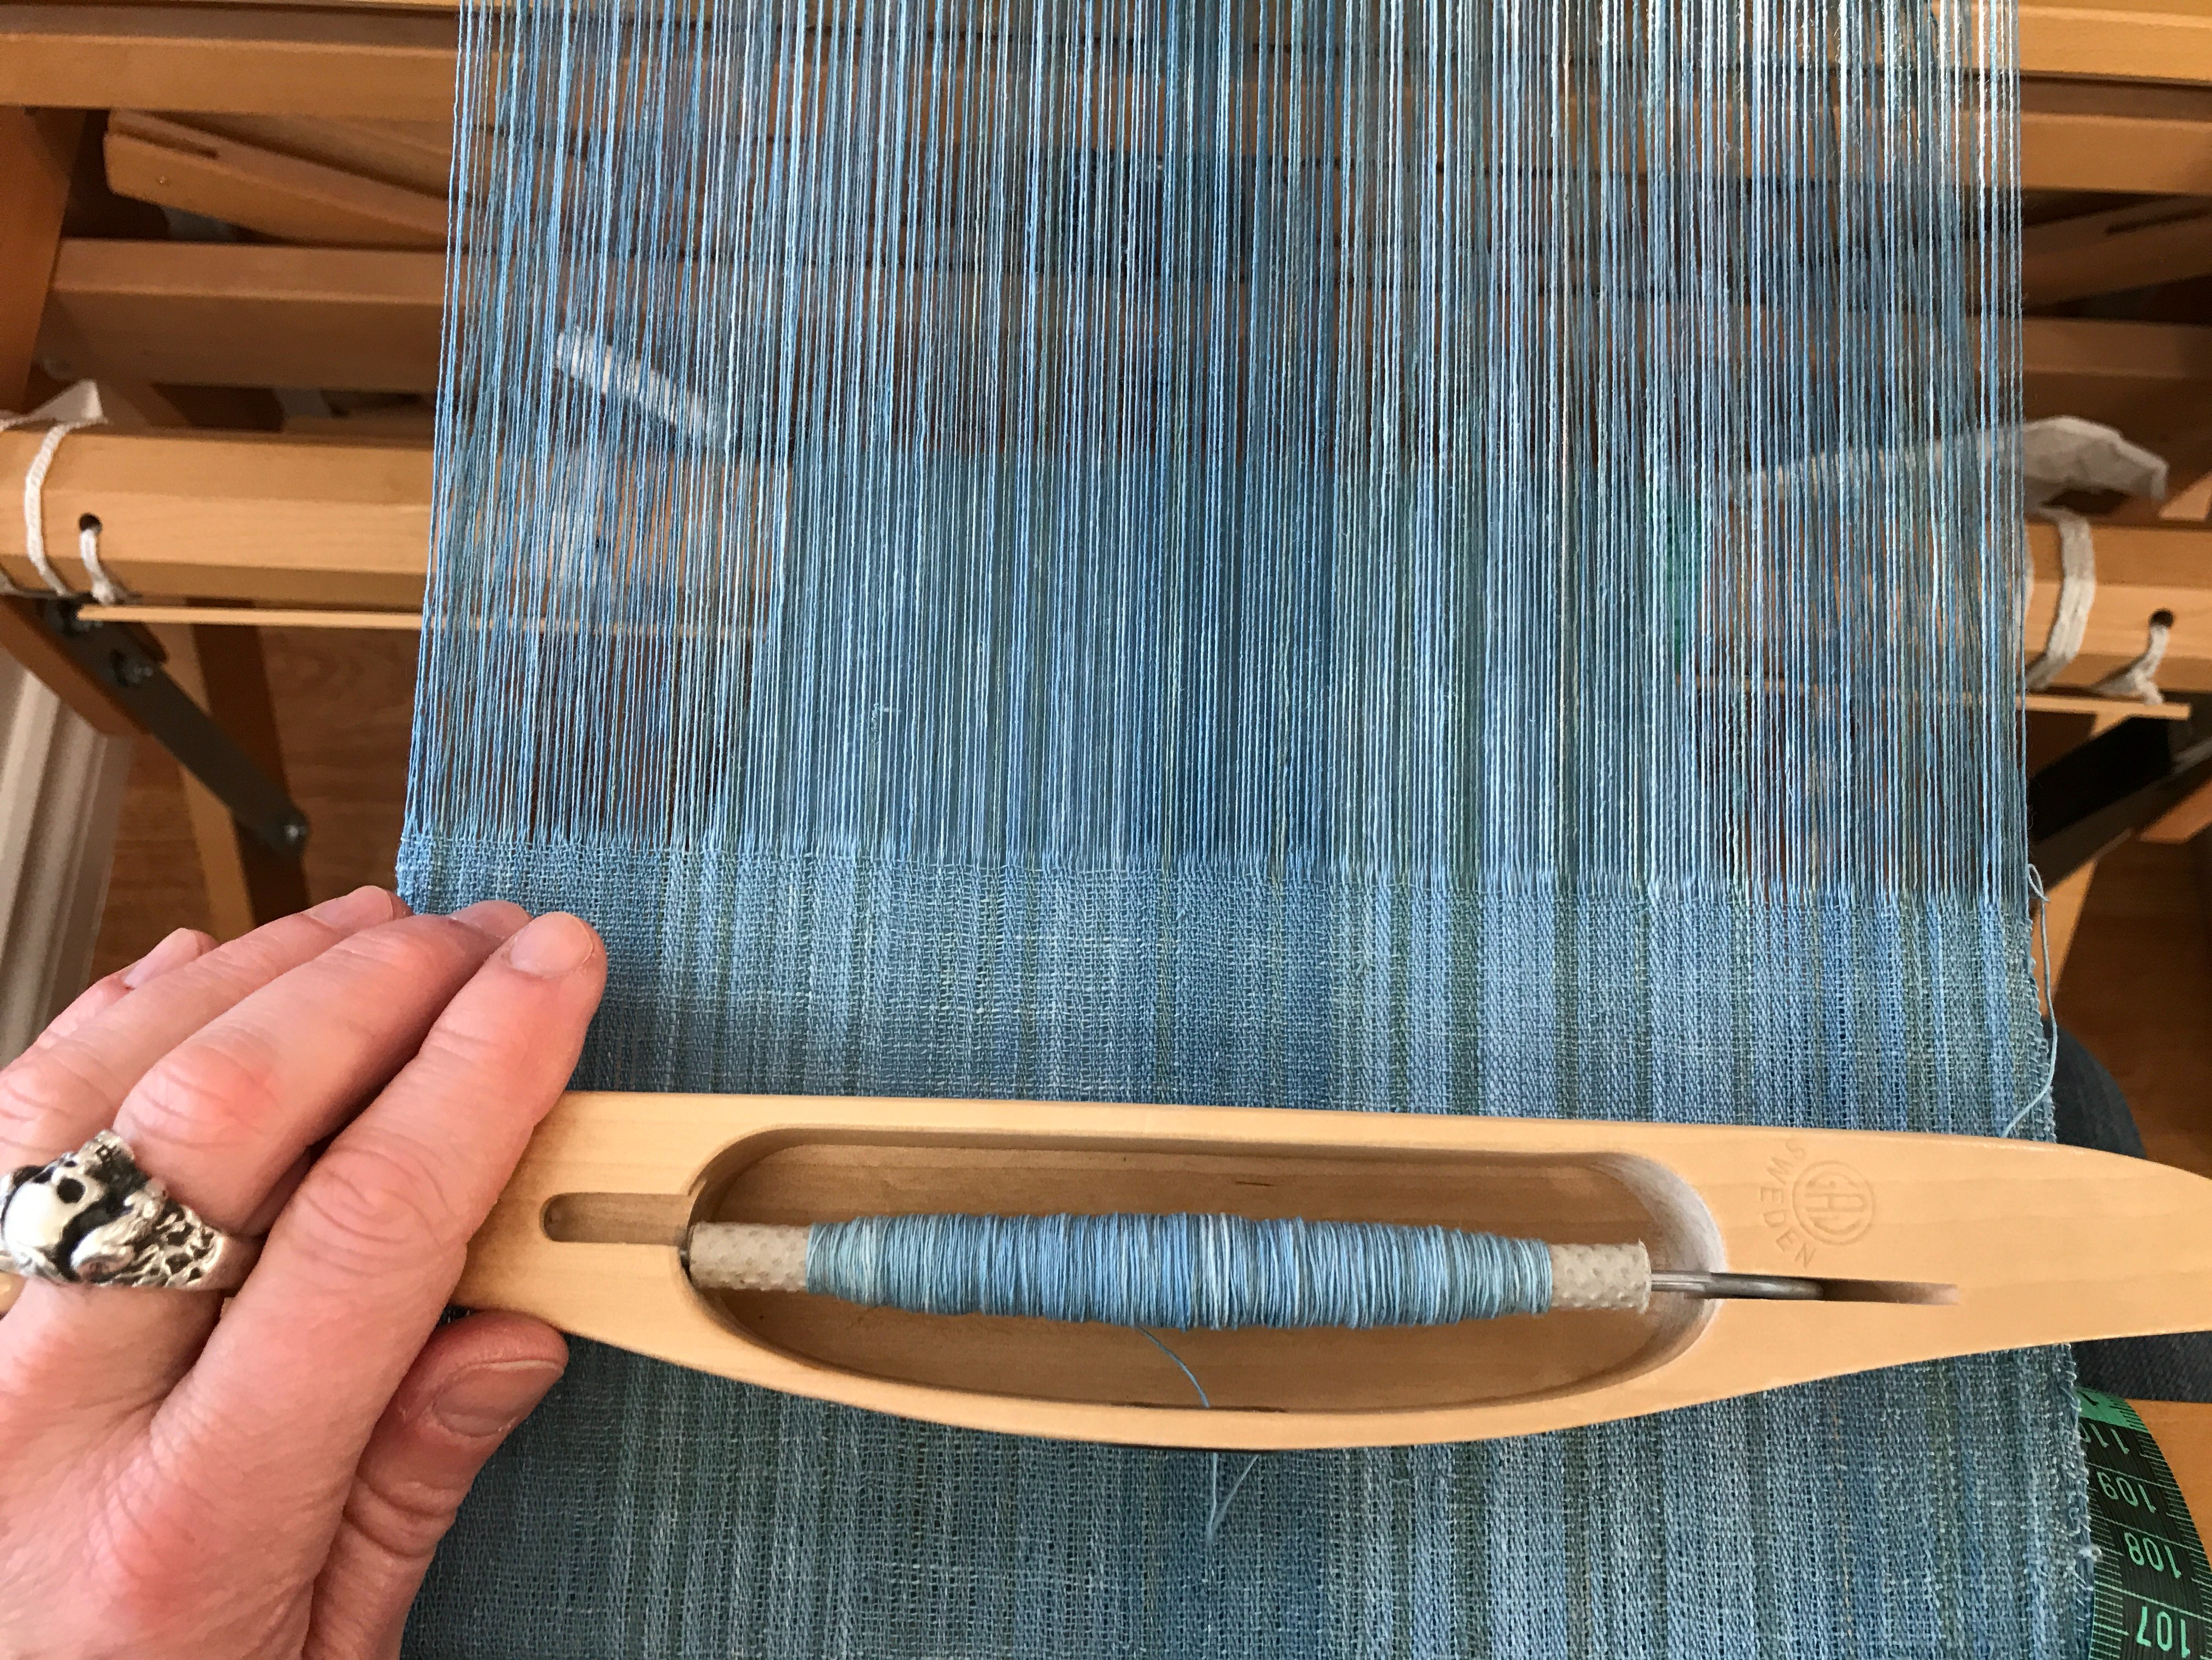
img_4607.jpg

The colour is more accurate above. Below, a closer view of the fabric on the loom. The slightly more open weave below my thumb is where I started weaving again in Canada. Below that you can see some annoying imperfections, places where slightly thicker areas of the sized warp threads are stiffer and refuse to conform around the weft when beaten. They become much less obvious after washing and one could argue imperfections are part of the charm of khadi fabric, handspun and handwoven, but I’d prefer perfection. I see no reason to pursue anything less. To me the imperfections in this are a reminder that some of this is my earliest cotton spinning and weaving, because they’re less obvious now after I greatly increased the tension on the warp to pull them straight.

img_4608.jpg

At any rate my handspun singles stand up to the test. They are weavable, and they are teaching me more about weaving. Time to start spinning more cotton!

The Hat of Authority

That’s a gripping title if ever I saw one. Thanks to Freyalyn, who named the hat during the ‘Spinning for Weaving’ workshop on Saturday as I put it on to call the class to order. It’s hard to miss, especially as the coins and charms chime as I move.

hatwalkingWearing The Hat in public for the first time, hiking in Derbyshire.

Two previous blog posts tell the story of the fabric of the hat: ‘The wrong fibre in the wrong place at the wrong time‘ describes how a highly unsuitable fibre preparation was re-processed to become something far more suitable (if any of the workshop attendees are reading this, note the use of a small cardboard loom-equivalent to establish whether the fabric would full), and ‘A project for the Cotswold.‘ briefly describes how I came to make a hat from it. I didn’t post more because the description became an article for Spin-Off Magazine (Summer 2014, ‘Uzbekistan by Hat’.

The executive summary, in pictures:
I work primarily with handspun singles. To prevent loss of twist, to make the yarn easier to manage and (to some extent) to protect it during the weaving process, the singles may be sized. Here the sized warp is drying on a makeshift stretcher in front of the bathroom radiator. (Workshop people, note that’s a hiking pole and chopstick stretcher, not the broom handle and hoe I use if I have more skeins!)WarpSized

From left to right: the Cotswold warp as it came off the bobbin, after steaming to set the twist, and lastly the dry sized skein.Warp

The hat fabric on the loom: Cotswold warp and handspun ‘Falklands’ (unspecified blend of Romney, merino and similar) weft.Fabric

I chose Falklands for the weft because I wanted to full the fabric, which I did in a hot indigo vat. Here the fabric is drying immediately after dyeing. I agitated it considerably in the vat to aid the fulling; the end result was not entirely even, but very beautiful. Or at least I think so.FabricDyed

Samples of the fabric for my records. Despite the fact it would be difficult to duplicate these handspun yarns (not that I can see any reason to try), the samples are useful records of how the wools and the fabric behaved. Note the tracking (the twill-like diagonal ridges) visible in the finished samples.Samples

I’d never made a hat from fabric. Clearly before I could make a hat I had to make a pattern. Having decided to make a hat inspired by those worn in Uzbekistan, I chose a style that looked as though I might be able wear it in public without dying of embarrassment, and started cutting up bits of paper to work out a pattern.hatplan

My first attempt proved to be a tiny yurt suitable for wearing on my head. But after some adjustments and more waste paper, I tacked together a fabric version to test the size and fit, then untacked it for use in cutting my fabric.TheHatProject.hats

Time passes. A LOT of time passes.

Sheila Paine and many others have written many words about the significance and meaning of folk embroidery. A gift from Sara Lamb, ‘Skullcaps of Uzbekistan‘ proved particularly interesting and useful. Reading and re-reading, I eventually could no longer postpone putting needle into cloth. What to use for the embroidery? Silk, in bright – and significant – colours. Some I dyed and spun for The Hat (it had acquired initial capitals in my thoughts), some were thrums of silks dyed and spun for my tablet-woven bag.embroiderysilks

Research suggests traditional makers usually embroider the hat fabric before the pieces are cut but, as I had never made a fabric hat before and had very little clue about what I was doing, it seemed wisest to make a hat that fit and embroider that. Having used some of the finer silk to sew the hat together, I rapidly discovered that I needed guides for the geometric patterns, hence the lines of white sewing thread.HatAgain1

Each of the patterns has – or is thought to have – a meaning or purpose, generally protective: bringing good fortune, or warding off bad luck and demons. The colours, too, have meaning: in many cultures across the globe red is apotropaic: it wards against evil.

In the photo above, the maze of complex swastikas is a demon trap in the making: entranced by the complexity they wander into the maze and are lost. The mirrors of the shisha embroidery dazzle and confuse any that elude the maze. Above, ram’s horns symbolise strength, courage and protection.

Below, one of my personal favourite symbols, a non-traditional orobouros symbolising infinity and the cycle of life becomes two owl eyes to frighten demons. The mother-of-pearl buttons used for the eyes and the silver coins are traditional embellishments, catching the sun to distract and confuse evil spirits. Hatback

Below, just visible on the left side band are two traditional Uzbek stylised birds. Apparently there is an old belief that if a bird sits on a man’s head it will make him happy (don’t ask, I don’t know). At the front is a sun disk, offering protection from the evil eye and any passing impurity. It is flanked by guardian cats.hatFront

Somewhat distorted by perspective, at the top of the hat is a band of shepherd’s crooks (protective), below which is a band of ‘amulet triangles’. Thought to be based on very, very early depictions of the Goddess, these are protective. Some of mine have diamond-shaped ‘heads’ containing four squares, the shape known as ‘fertile field’ that usually means fertility in the sense of offspring but I’ve used as heads because I’m interested in fertility in the sense of ideas. Tiny gold stars (light to distract demons) and the s-shape that may be a greatly simplified dragon (protective) also appear.  Dangling from the top of the hat are glittering, noisy coins and a miniature silver Maes Howe ‘dragon’.

Hattop

When I presented my project to the spinning group I found my voice breaking with emotion as I tried to convey how I’d felt as each stitch linked me more closely to the many, many others who for millennia have made clothing to protect those they loved. Writing this I find the same emotion rising again. Think of the work involved in making a garment, even a hat, when women clothed their families in the days before millspun, machine-woven cloth. Gathering the fibre, preparing it, spinning it, weaving it, thinking of the person for whom you’re making it. Saving and bartering for cherished bright silks, shiny coins. Hoping and believing with every stitch that your embroideries are more than embellishment; you are creating a garment that may offer guidance and protection to the person who wears it, a tangible expression of your love and skill.

We’ve lost that. Our lives are so much easier… but we’ve lost something along the way.

A handspun, handwoven, mostly hand sewn jacket: almost finished!

In April 2014 I decided to spin and weave fabric a fabric from singles (unplied yarn) for my first planned garment. I bought black (‘black’ in this context means very dark brown) Shetland for the weft, above top left. It was a bit boring when spun from the top, so I carded bats including some slivers of multi-coloured silk. I thought Black Massam (the other two images) would make a good warp. Massam being the offspring of a Teeswater ram put to Dalebred or Swaledale ewes, the fibres should be longer, a bit coarser, and have more sheen than the Shetland. In the event neither of the tops were quite as I expected: the Shetland had a lot of kemp (very coarse flattened hairs) and more hair mixed in with the wool, and the Massam was shorter and very variable in thickness. Nonetheless I persevered. Once spun the warp was steamed to set the twist then sized to make it easier to manage; the weft was steamed (otherwise it can twist into little pigtails after the shuttle is thrown and before it’s locked into place by the changed shed).

30001485335_1bb50924af_c
The sized warp dries under light tension.

I warped and threaded my Baby Wolf loom for an 8-shaft broken diamond twill at 30 epi. The yarns behaved reasonably well on the loom although I had more breakages than I like, mainly where I’d made quick-and-dirty joins while spinning, laying the spun end from the orifice onto the fibre instead of opening up the spun end to join fuzz-to-fuzz. I wasted far more time protecting fraying joins with hair gel than I’d have done making them properly in the first place! The quick joins are fine for yarn to be plied, but they’re disasters waiting to happen if you’re weaving singles.14410873262_a0ab954361_c

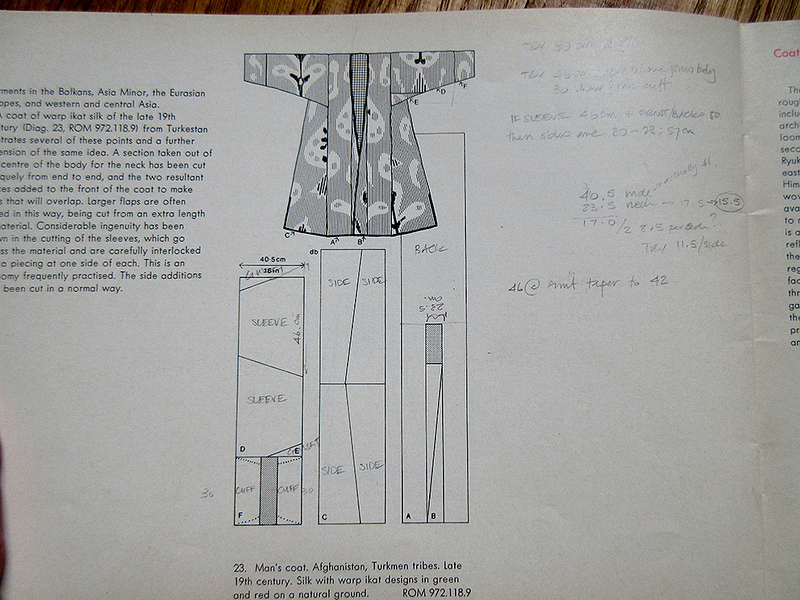
I can’t remember how much fabric I had when I finished, but I do remember the wonderful feel of it washed (zig-zag stitch the ends, throw in the washing machine wool wash cycle, remember to clean the filter afterward!) finished (hot iron both sides, no cloth) and the satisfying weight of the roll. But what should I make? Laying out modern pattern pieces on my narrow fabric would be wasteful, and I’m not a tailored jacket sort of person. I decided on a jacket based on Pattern 23, ‘Man’s coat, Afghanistan’ from Dorothy Burnham’s extremely useful Cut My Cote. Never having made anything other than commercial patterns, and never having made anything that actually FIT me, I wasn’t sure how to work from Burnham’s sketches of the pattern pieces laid out on the fabric width.

29918301781_0c8a3dee92_c

I enrolled in one of Alison Smith‘s ‘Three Day Own Choice’ workshops and – amazingly – emerged having learned to translate the sketch to paper pattern pieces, use these to make a toile, adjust the pattern, cut my fabric, overlock/serger all the edges, sew the jacket AND insert a mandarin collar into the existing collar band. I can’t recommend Alison too highly! I returned home with a lightweight unlined jacket, on which my exposed selvedges are a decorative detail. (Alison’s suggestion, she liked them. All weavers may now pick their jaws off the ground and replace them.)

16000784954_d314845ca9_c

The lack of internal seam finish annoyed me. I decided to weave lengths of inkle band to cover the seam allowances but, several months and about 8m of band later, concluded this was a bad idea: the decorative bands were too bright and, worse, made the seams too stiff. The jacket went into time out (also known as a plastic bag in the closet).

Imagine the flickering calendar pages of time passing…

After seeing one of the reconstructed Herjolfsnes garments at the Ship Museum in Roskilde in 2016, I started thinking about making some of the dresses for myself, first in a commercial fabric and then in handspun handwoven. Reading about the garments and sewing techniques in Woven into the Earth: Textile Finds in Norse Greenland and its companion Medieval Garments Reconstructed, I remembered the abandoned jacket: I could rip off the inkle bands and practice medieval sewing techniques!

In order to sew, I had to have thread. Handspun thread. Not being able to carefully select the best hairs from my fleeces after washing and shearing my double-coated sheep, I dug through my stash to find the remaining twist of Shetland from the weft. The mix of kemp, hair and wool means it’s far from perfect, but it works.

Top left, singles spun on a light spindle; Below, my plying spindle and mugs;
Right, the final 2-ply thread.

I take pride in my ability to wind fine spun singles into balls without using a core but it is easier to ply from the balls if they don’t bounce around: using a pebble as a core adds weight, and putting each ball into a mug and wrapping the singles around the handle before taking it to the spindle makes it much easier to control. The plied yarn is well within the parameters of those used on the Herjolfsnes originals.

The book mentions the possibility that the threads were finished with something, perhaps beeswax, before sewing. I found quite a lot of information about thread finishes, something that I – a non-sewer – knew nothing about, on the internet. I decided to try running the thread across beeswax before using it, and now I’m a convert, at least for handspun wool thread.

29967316896_06a8b7b467_z

The wax stiffens the thread, making it easier to thread the needle. Being slightly sticky it pulls off some of the fuzz from the thread (see the hairs left in the wax), which makes the thread much easier to work with. And it smells lovely.

Three or four inches at a time, I’m trimming the overlocked finish off the raw edges and binding them down to the garment.

29918300041_dc623a3d3e_c

Pebbles from California on which to wind thread, the snips I use to trim the fabric, and the bowl from Dawn P.  in which for some reason I kept ALL the edges I’d trimmed off the seam allowances.
I think it’s time I threw that lot away.

Before sewing, the raw edges on the Herjolfsnes garments were stabilised by ‘singling’: a fine thread was sewn to and fro into the thickness of the fabric, in from the edge, not stabbed up and down through the fabric. I haven’t enough raw edge on the seam allowances to do that, so I’m taking pains to run the needle in and out of the fabric for additional stabilising as I sew one way, then I take it back over the fabric to the starting point. A picture is worth a thousand words:

30001260165_7bbd1bb8c1_c29707495680_197ace097b_z

I’m trying to stitch every 2mm or a little less. You can see the waxy whiteness of the beeswax on those recent stitches, but it soon disappears as the garment is handled.

I think the end result looks good, is appropriate for a handspun, handwoven fabric, and will allow me to tell people about the astonishing finds at Herjolfsnes.

29887748732_dc92f20c17_z

Some of the internal seams. The stitches are not generally this visible: I chose the light angle to highlight them.

29373713994_59e0ffcbdb_z

Seams as they appear on the outside of the garment. The stitches pick up a thread or two of the fabric at both ends, so create a subtle and decorative ridge.

Once I finish all the internal seams (as you can see from the pattern, there are more than a few), I will try my hand (and foot) at fut-slyinging, incorporating a foot-tensioned tablet-woven decorative band along the hems. I think all this handspun thread, hand sewn and woven really should outweigh the fact that the garment seams are machine-sewn!

Also, some of those seams were even sewn with an appropriate needle. Bone.

29918308991_84df1accc9_z

In January 2020 I realised that I should tell the story of the jacket that stars in my article on seam techniques from Norse Greenland in Piecework Magazine Summer 2020. And then 2020 went a bit pear-shaped for the entire world. As I begin to pick up the juggling balls where I left them, I can start by clearing out my Blog drafts folder!