That traditional sig vat: results!

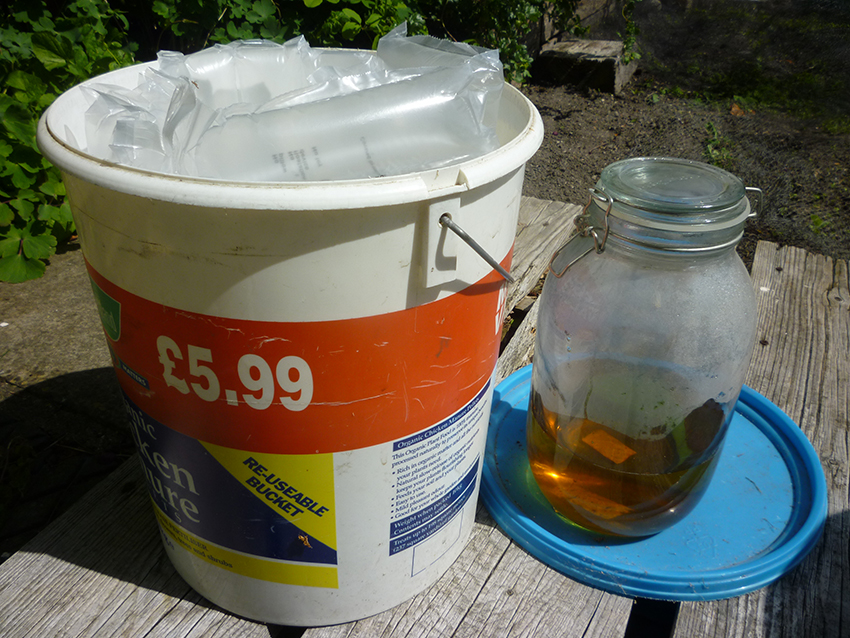
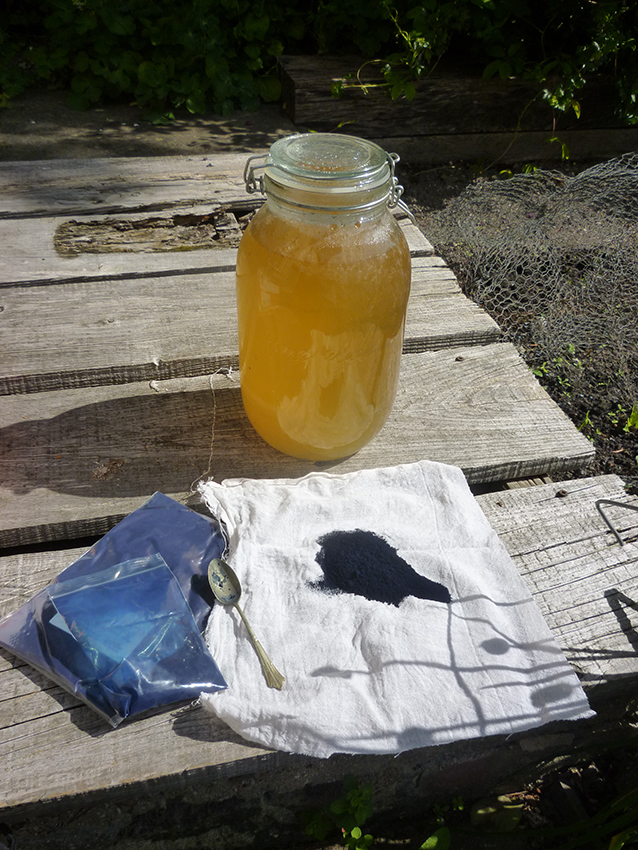
We left our trusty sig vat on May 15th, hoping for a warm day that didn’t occur for another two days. But by the 17th the liquid was very definitely yellow-green although there was a lot of sediment and  particulate matter adhering to the glass of the jar. I think this is a combination of vegetable and mineral matter in the indigo powder – the actual indigo content of ‘ordinary’ indigo may be well under 30% by weight – and some debris from the urine itself. At any rate, Sunday the 17th was forecast warm and sunny, so on Saturday I de-gummed 2 smallish skeins of handspun silk, neutralised the washing solution with a vinegar rinse, then rinsed them thoroughly to remove the vinegar, and left them soaking in water ready for dyeing. Remember that the soluble leuco-indigo needed to dye material converts to the insoluble, non-dyeing blue form in the presence of oxygen: it is generally advised that fibre be thoroughly wetted to minimise the amount of oxygen it introduces into the vat. If you’re dyeing in a urine vat, urine is the obvious fluid to use for wetting, as it adds nutrients for the fermentation.

Sunday morning I cracked open the lid of the jar in the greenhouse and the smell of the vat rose to greet me. A powerful aroma, now with some ammonia in the mix. I put both skeins in the jar, which on reflection was a bad move: there really wasn’t enough room for both. Also, as they were loose in the jar, they came into contact with the sediment.

May17Silk
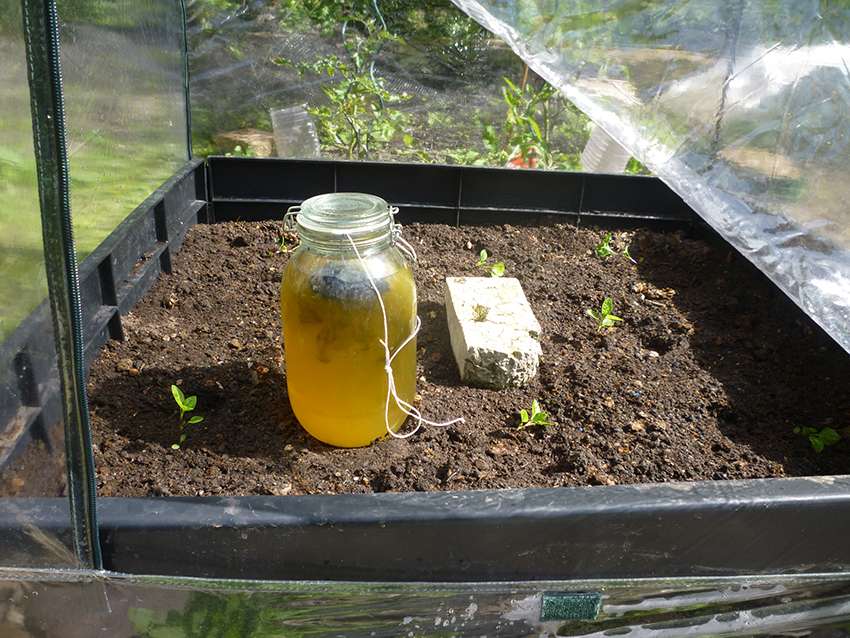
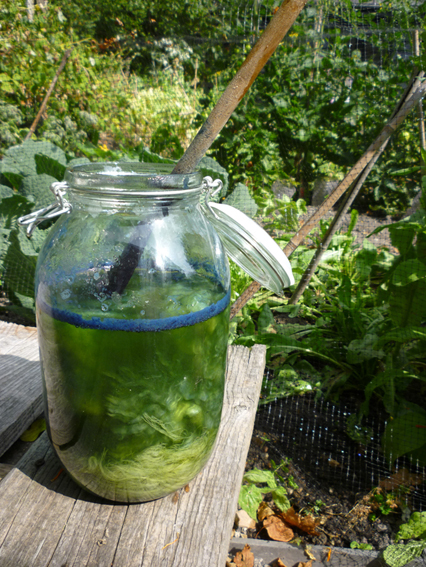
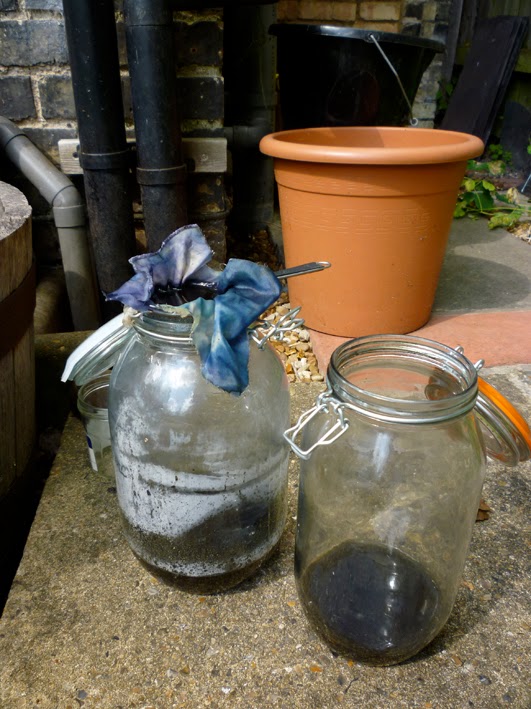
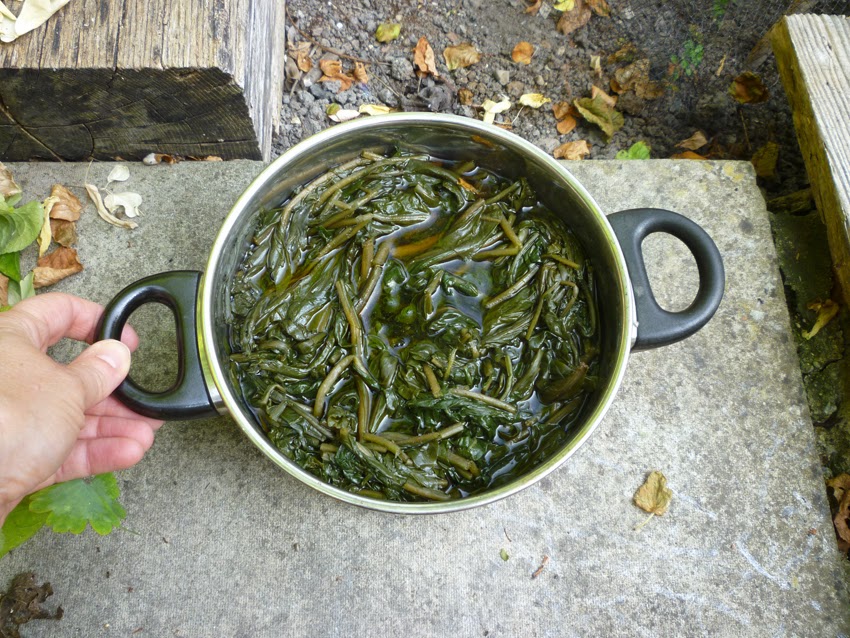
My handspun silk in the urine vat in the greenhouse with the Japanese Indigo plants.

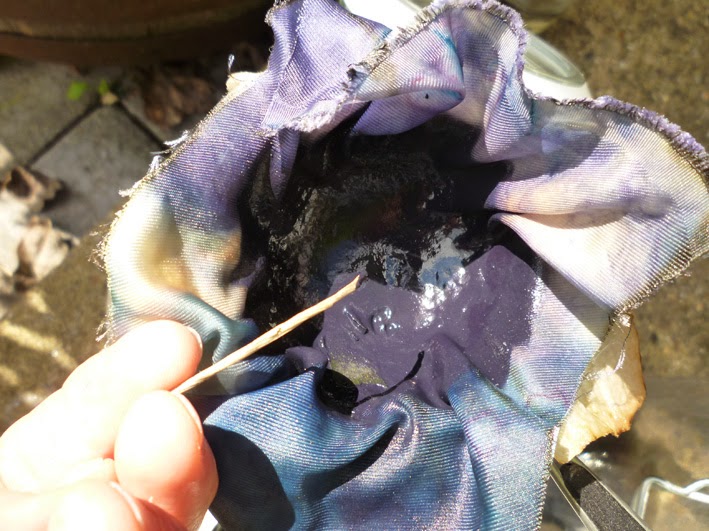
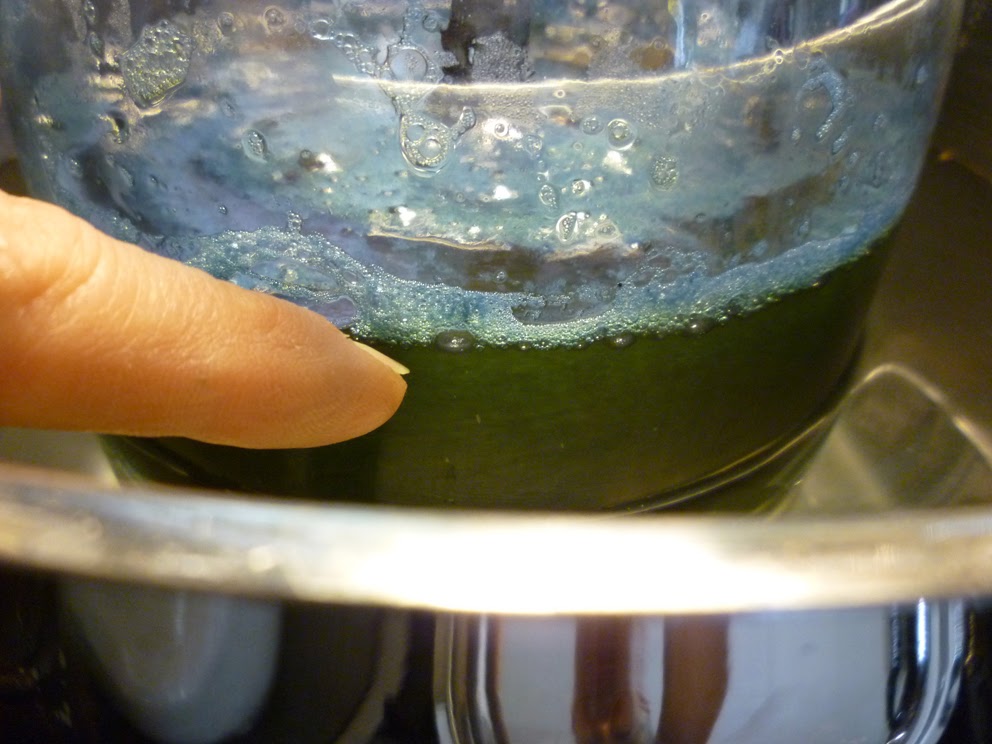
I couldn’t wait to check whether it was working. Literally. The timestamp tells me this photo was taken only three minutes after the skeins went into the vat. How sad is that?

May17SilkTest

But look! It’s going blue! I pushed it back into the jar to go bluer.

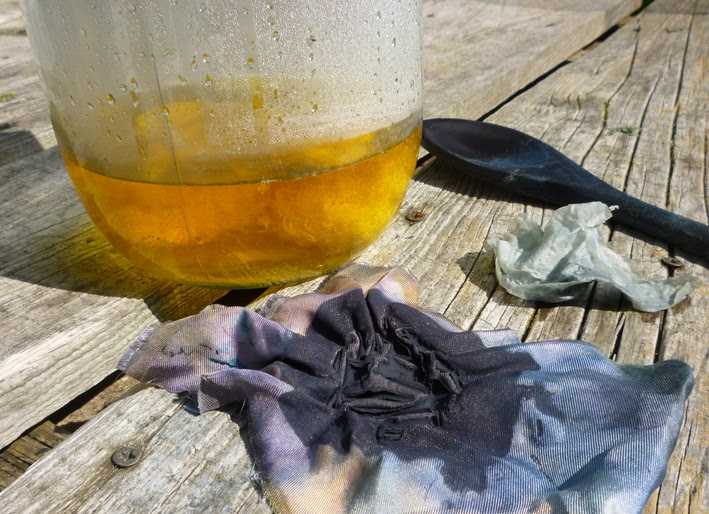
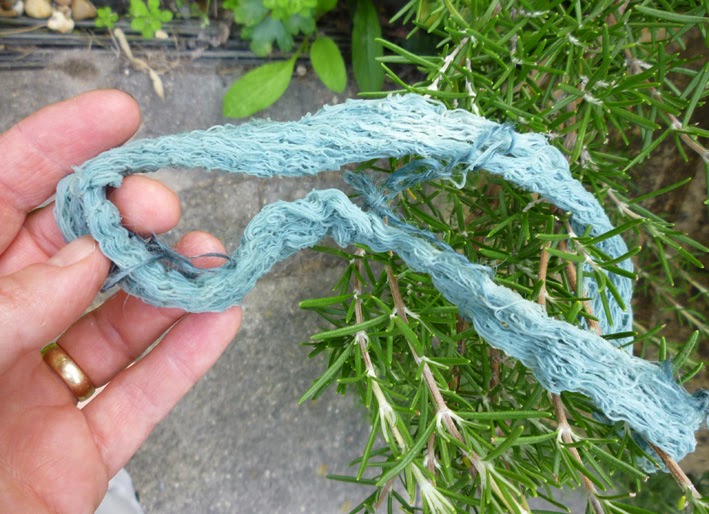
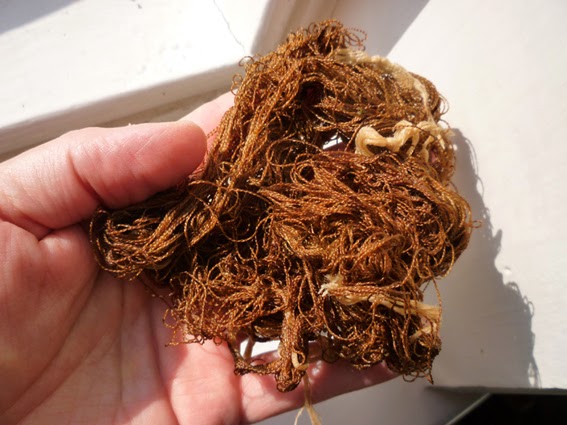
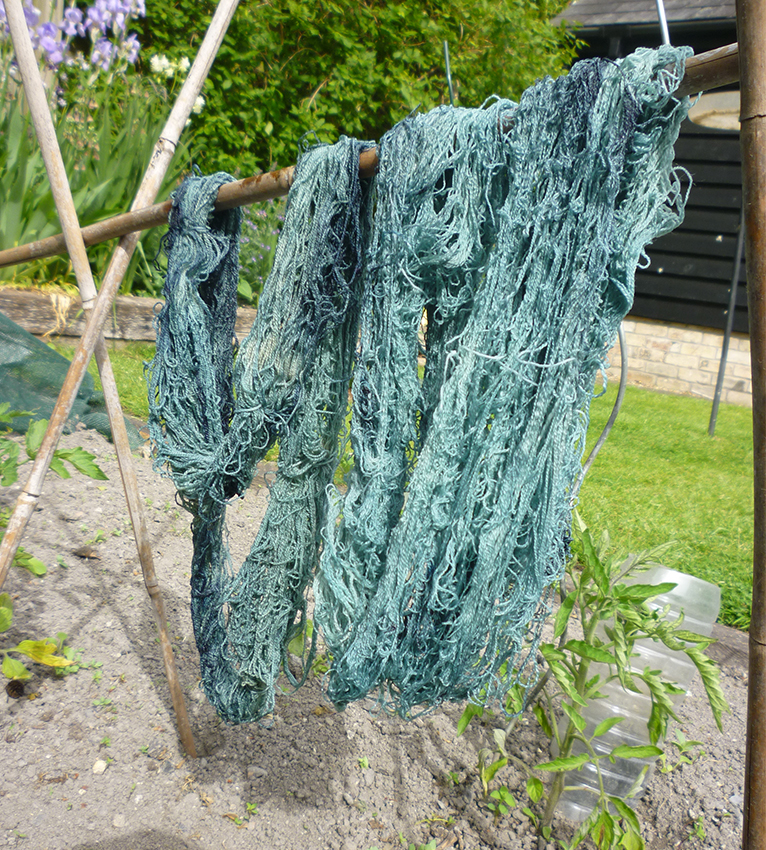
I removed both skeins from the jar after 1.25 hours and hung them to dry on an improvised rack to oxidise. Note how turquoise the yarn appears at the beginning of the oxidation.May17SilkOne

Now, at this point I digress to explain that throughout the afternoon my husband was walking back and forth from house to garage past the greenhouse and, eventually, the yarn from the vat. When he first encountered the smell of the vat he commented that it was a bit whiffy. I quickly shut the greenhouse to trap the odour. But by 1530, with the yarn out to oxidise, his comments were more forceful, along the lines of “The birds are falling dead from the trees!” The smell does fade from the dyed material; it’s much less noticeable when the material is dry, and I find that after washing with scented detergent and hanging to dry outside on the rosemary bush, I can only smell it if I press the fabric to my nose. The distinctive scent of the urine vat was once regarded as an indicator of good cloth well-dyed: when chemical vats were introduced in the second half of the 19th century, cloth-buyers would check for the smell of the urine vat. Some cloth merchants used commercially-available fake urine vat scent to mislead them!

May17SilkFirstOut

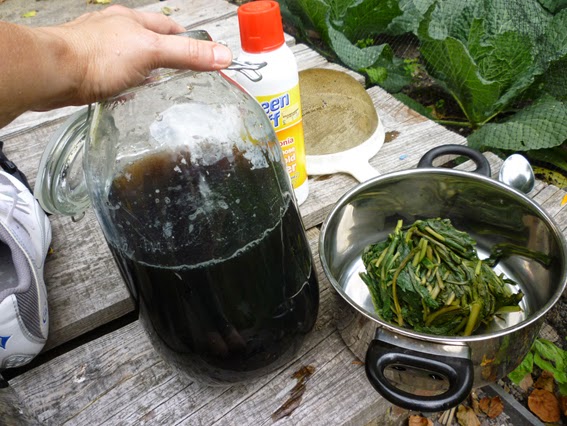
As the oxidation proceeded I was able to see just how much gunge was stuck to the skeins, but could reassure myself that it will wash off (and it mostly did, even in the quick post-dyeing wash). I put the vat to bed (as it were), topping it up with fresh urine and replacing the bag of indigo.

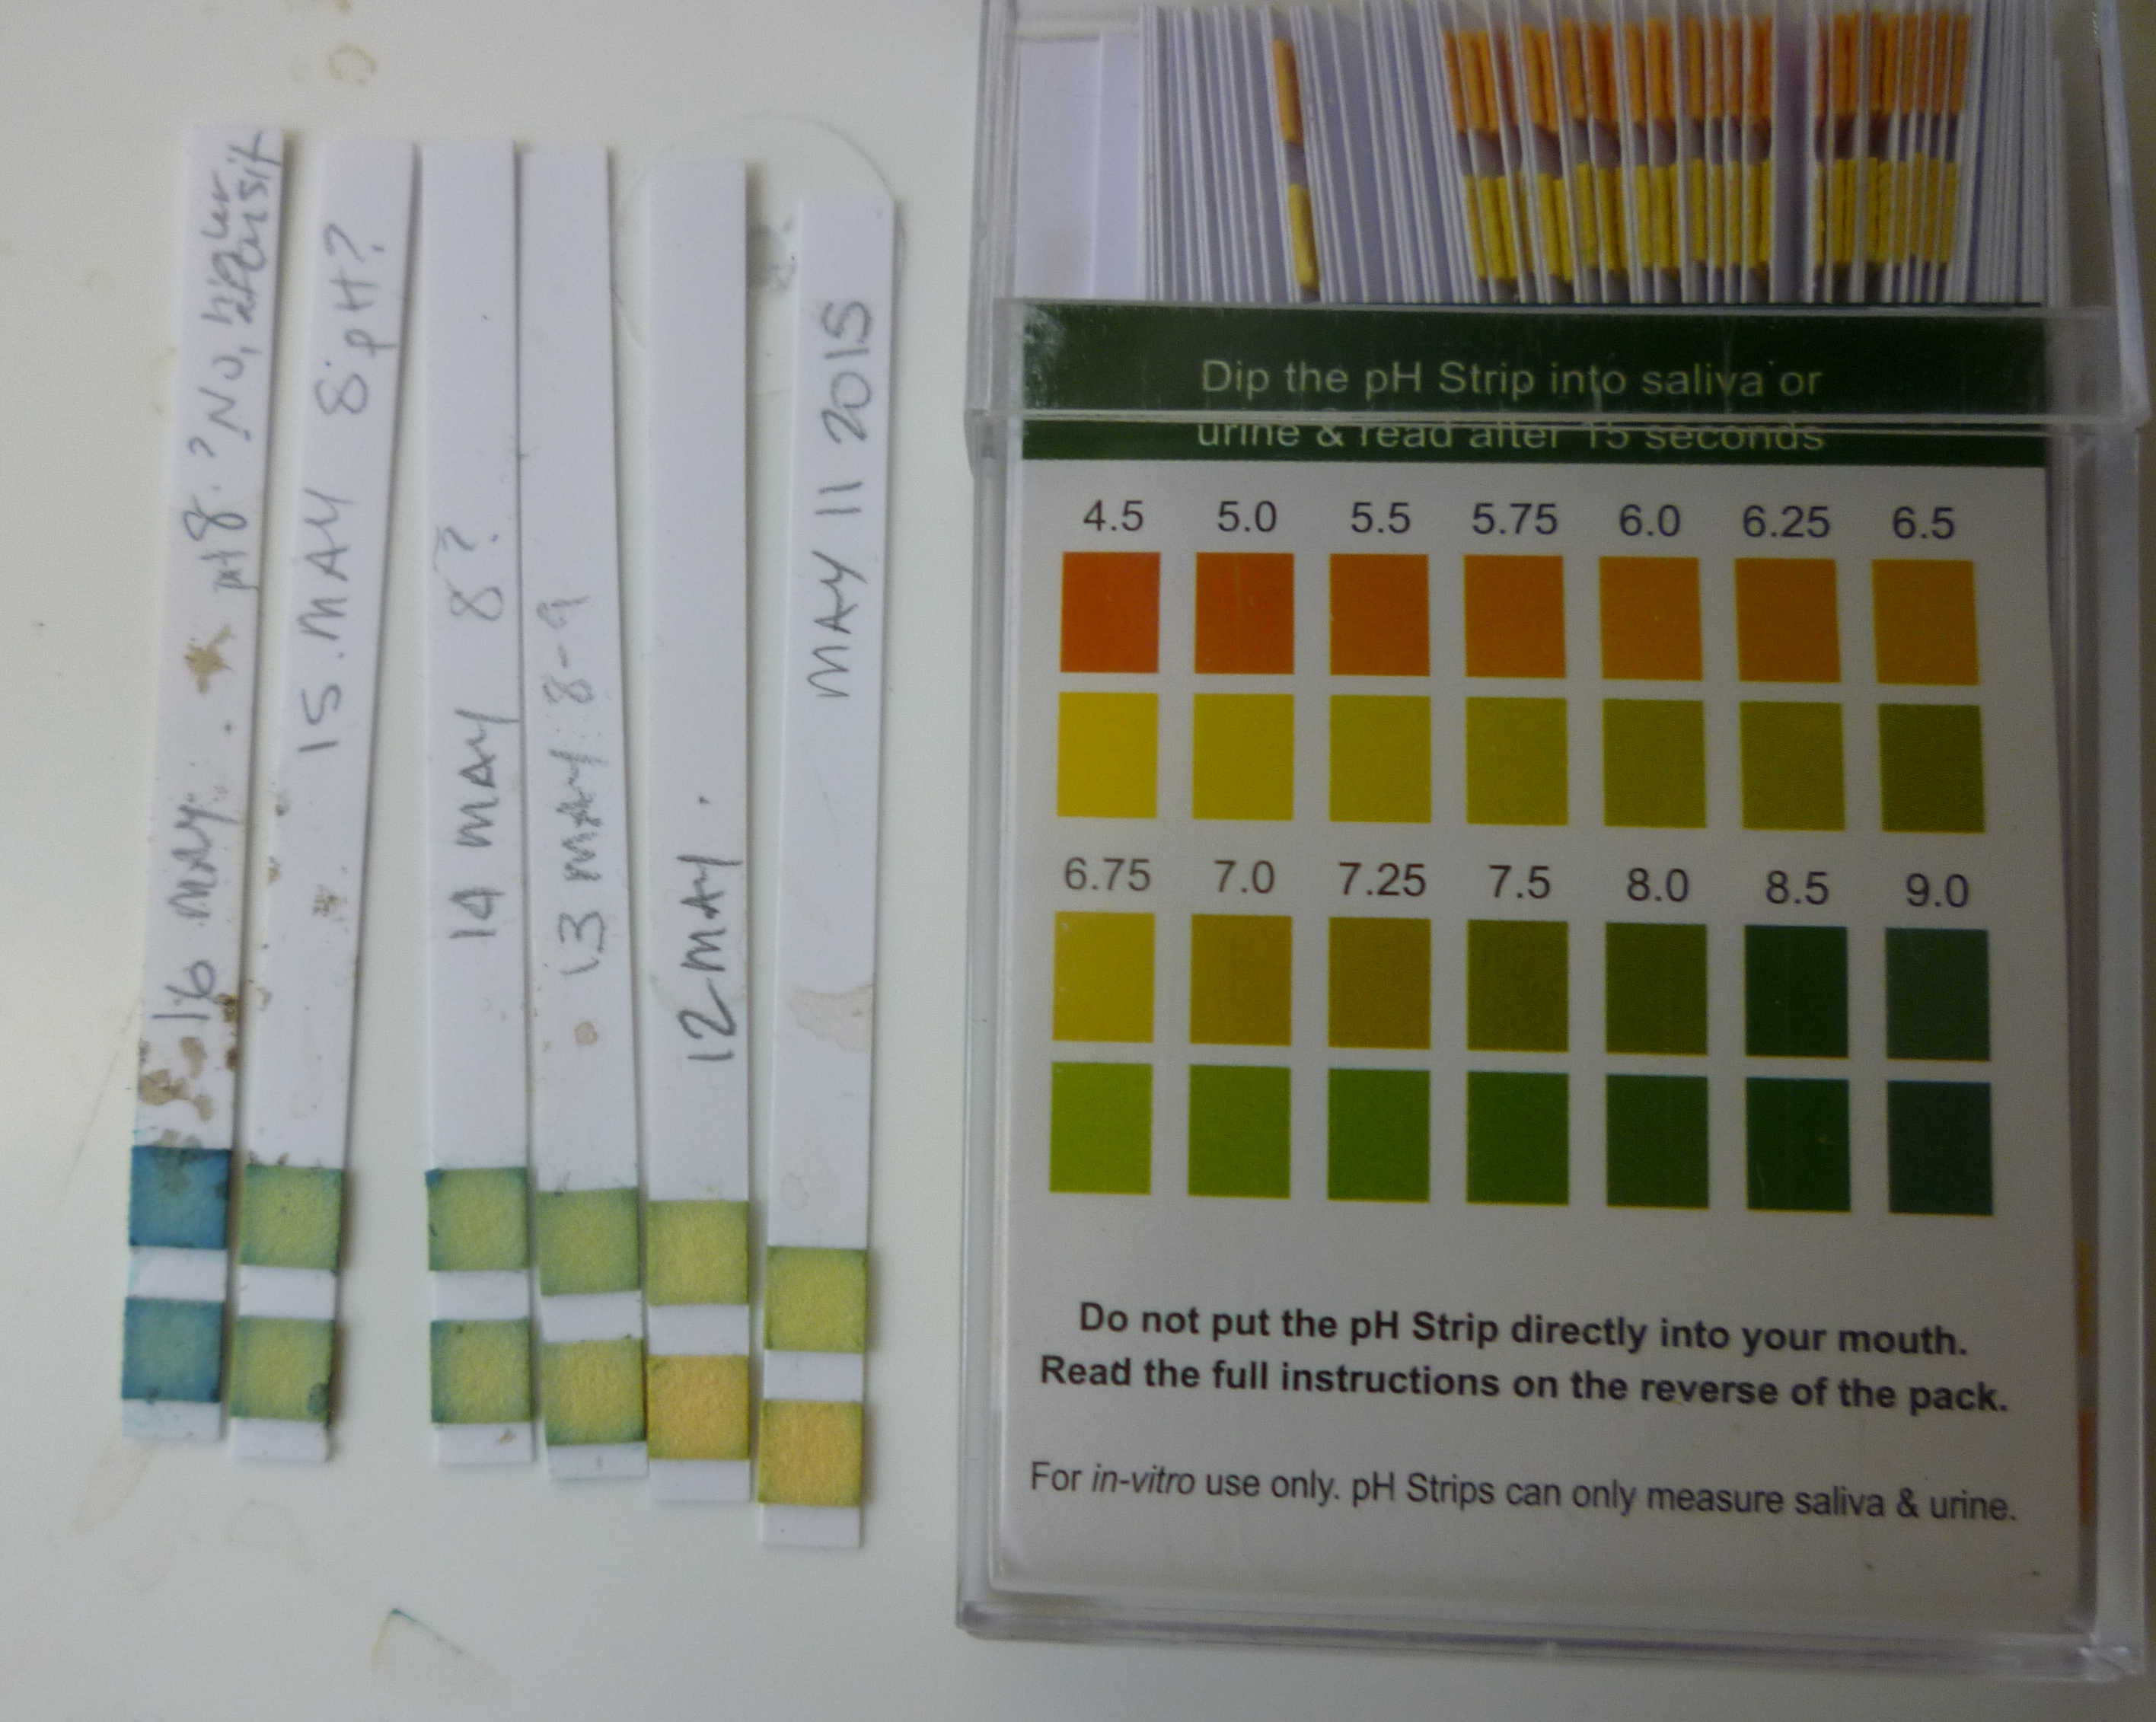
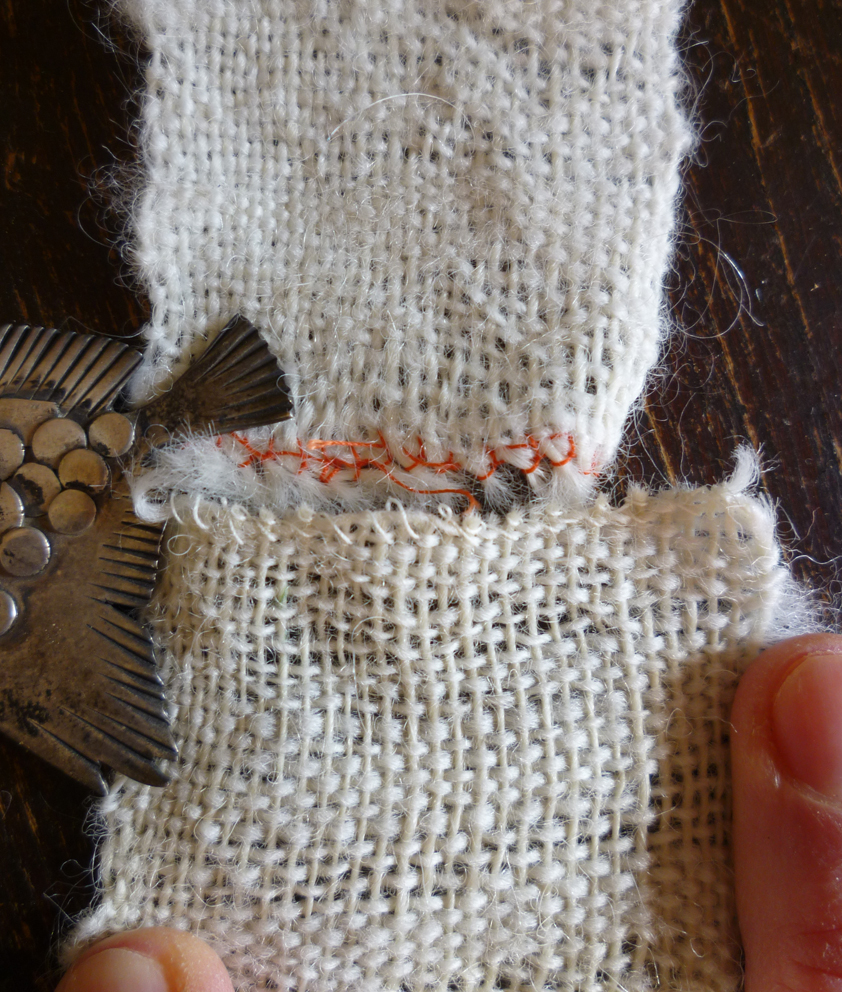
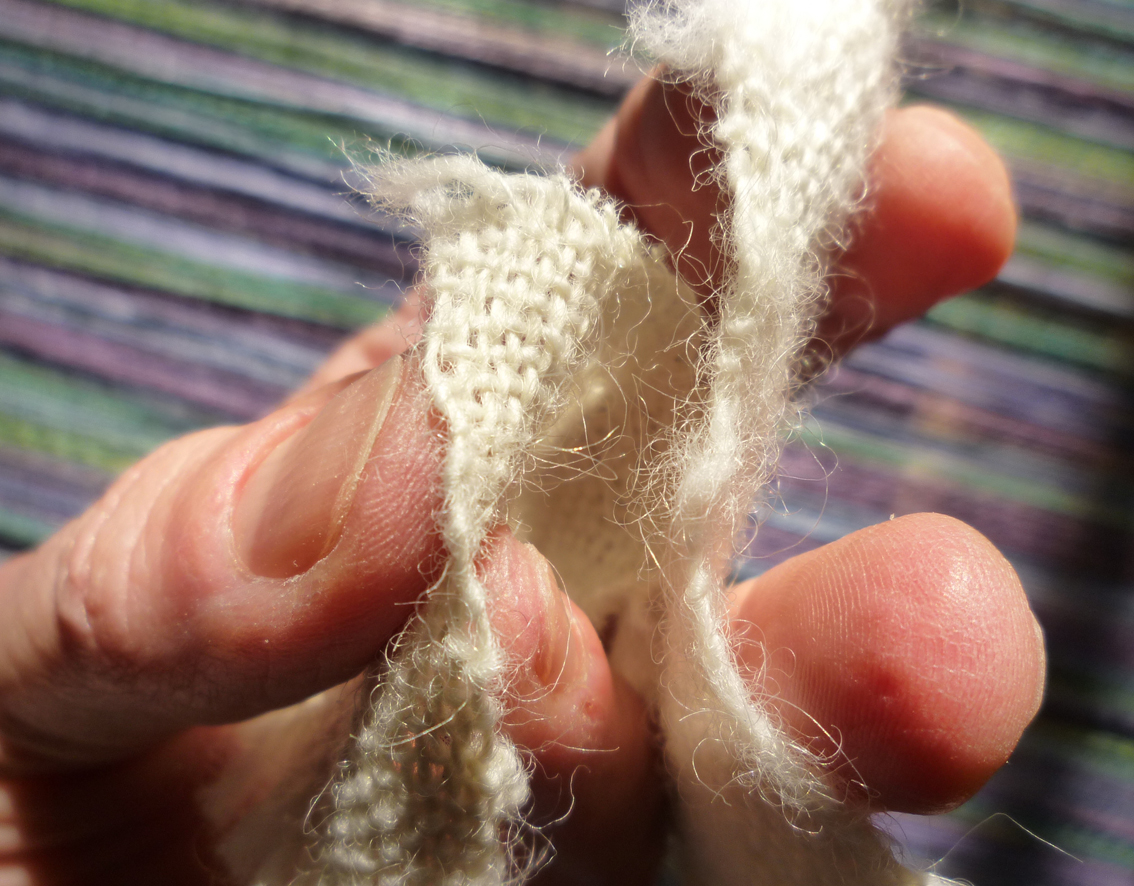
Once washed and dried the skeins proved paler than I’d hoped, so I tested one of the characteristics of the urine vat. With pH paper. Most indigo vats are strongly alkaline (my post on Indigo chemistry explains why), running at pH11 or even higher. This alkalinity degrades and damages protein fibres such as silk, so repeated or lengthy dips to get greater depth of colour are a bad idea. The urine vat, however, is much less alkaline: this one, yellow-green and ready to dye, tested pH9 on the 24th May. I decided to see what happened if I put a dry skein of silk for a longer period (dry because I had read that putting the fibre in dry could give a greater depth of colour). I pushed a skein into the jar late in the afternoon, took it out to oxidise for a couple of hours in the early evening – it was noticeably darker – and then replaced it in the jar overnight. End result: a significantly darker indigo.

May25thSilkCompare

It’s still a little bit turquoise, but obviously much darker than the skein next to it. Which is in fact a bit darker than it looks in the photo: light reflecting off the silk makes it paler.

Conclusions

Pros: This is the easiest and least expensive of the vats I’ve tried so far (more than I’ve written about so far), and it’s kinder to protein fibres such as silk and wool than the other vats. The results are good, but I think they’ll be better in a different vat. I think a higher grade of indigo (containing less waste material) will give me darker colours, and a larger, deeper vat will make it possible to avoid any sediment, perhaps by placing something like a colander or strainer at the bottom of the vat to keep the material off the bottom. So I’ve ordered a better grade of indigo and I’m about to start collecting more urine.

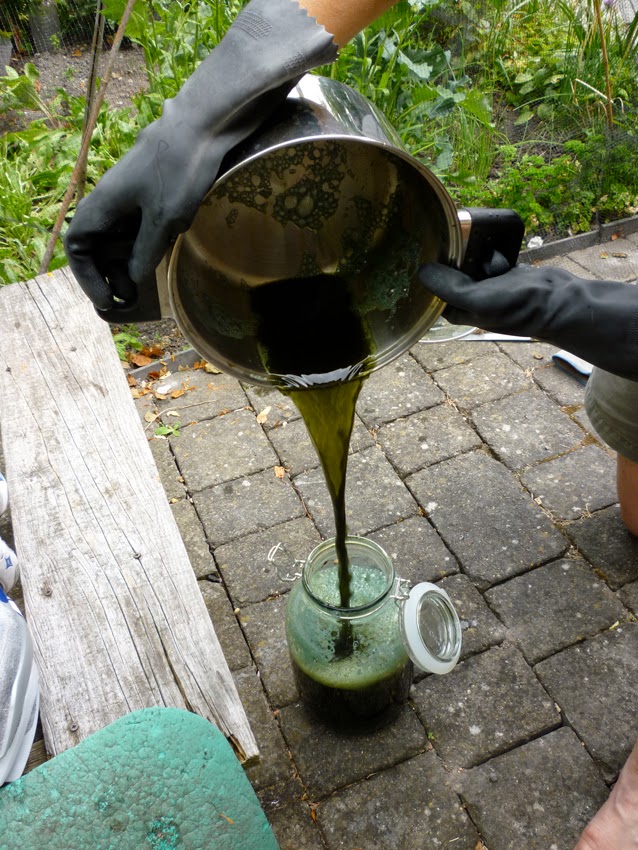
Cons: This vat has a strong, distinctive, and – to some people at least – highly unpleasant odour. While the odour from the vat can be controlled and contained, the smell coming off the dyed material as it oxidises is less easy to contain if it’s hung out to air. However, it is possible to oxidise the dyed material in well-oxygenated water: allow the cold water (cold water holds more oxygen than hot) to plunge into a container in such a way as to generate lots of aeration bubbles. Immerse the fabric in that water, swirl it around, keep the tap running to refresh the oxygen. This is not a technique to use with warm wool, but I have tried it with silk and found no damage, although the skein could have done with more ties. In theory it should not remove indigo that wouldn’t be lost in the normal washing process, but I have no real way to test that theory at the moment.

How the magic works: the chemistry of blue.

dd541-woad6The transformation from green-yellow to indigo blue that takes place before your eyes when something is removed from an indigo vat is the nearest thing to real magic that I know of. But it’s not magic, it’s chemistry, and understanding it is helpful in troubleshooting vats and in choosing vats for specific fibre types.

Where does indigo come from, and why is it there in the first place?

Most of the indigo used commercially is now synthetic indigo, one of the myriad colours chemists derived from the magic compound aniline in the 19th century. I’m more interested in natural indigo, which is extracted from plants such as Woad (Isatis tinctoria, a member of the Cruciferae, related to cabbages) and Japanese Indigo (Polygonum or Persicaria tinctoria, a type of knotweed) in addition to ‘true’ Indigo, Indigofera, a member of the Leguminosae (related to beans and peas) which has several species including tinctoria and suffruticosa. In fact many plants will yield indigo, but only a few yield it in sufficient quantity to be of any use in dyeing.

I haven’t yet found a reference giving a firm reason for the presence of the indigo compounds in plants, but a couple of papers suggest in passing that it might discourage pests.

Indican, the compound that yields indigo blue, is a glycoside: a sugar (in this case a form of glucose) bound to another molecule, indoxyl. When the glycosidic bond is broken, the indoxyl is freed. When the indoxyl compound is oxidised, it becomes blue: indigo blue. Sounds simple enough, but how does the processing of the plant material and the dyeing accomplish this?

The indigo-bearing leaves (it’s usually the leaves; the lower the amount of other plant matter, the better the final grade of indigo) are harvested. In Japan the Japanese Indigo leaves are dried in the sun and stored for later use. Elsewhere the leaves are then physically damaged – chopped, pounded or trampled – presumably to release larger quantities of indican. This is the point at which woad was traditionally made into balls of leaf matter and dried for easier storage and transport. In West Africa the pounded leaves might also be dried and stored at this stage. Alternatively (in West Africa and elsewhere) the mass of fresh leaf material might be fermented; in Japan the dried leaves are later moistened and fermented; in Europe the woad balls are moistened and fermented (the process known as couching). In other words, bacteria are encouraged to consume the glucose in the indican, leaving the indoxyl molecules as highly reactive free radicals. The bacterial breakdown of glucose may be an aerobic process in which the bacteria consume oxygen, creating the reducing (low oxygen) environment necessary for the next stage of the process, or an anaerobic process in which the bacteria release hydrogen that acts as a reducing agent in the next stage.

The indoxyl free radicals bind to each other to form indigo. If an alkali is present (pH is above neutral), this takes the form of water-soluble leuco-indigo (leuco means white), also known as white indigo or white indigotin. The ‘white’ refers to the compound’s relative lack of colour: the leuco-indigo solution is a clear yellow or yellow-green. This is the form in which indigo dyes, so at this point it is possible to convert the fermentation vat to a dye vat, or to continue the process to extract indigo from the solution. Extraction is simply a matter of converting the soluble leuco-indigo to its insoluble blue form by adding oxygen: straining the fluid off the leaves, then pouring it back and forth between two containers may be sufficient, after which the blue particles of indigo can then be filtered out of the liquid. I wrote a post (with lots of pictures) about processing woad leaves in this way in 2013; you can see it here.

The actual indigo pigment content of the particles is reported to vary from 12% for Japanese Indigo, through a maximum of 40% for woad and 77% for Indigofera indigo. The remained of the mass is plant matter, mineral matter and other pigments such as indirubin (known as indigo red and one of the components of Murex purple). This mix is one reason that natural indigo produces more variable shades of blue than the purer synthetic form.

ThioxSilkonVatsilks

Handspun Bombyx silk indigo-dyed in three different vats. The dark blue on the left was put dry (unwetted) into a 1-2-3 Fructose vat, to which I added a little more fructose and heat to raise the temperature back to 50°C before leaving the silk for 45 mins. The patchy warm-grey-blue on the right was well-wetted before spending an hour in the urine vat. The curl of bright blue silk in the centre had 5 dips in a standard Thiox vat.

How does indigo dye?

Water carries the soluble form, leuco-indigo, as it soaks through the material in the vat. When the material is exposed to the air (or another source of oxygen such as well-oxygenated water) the leuco-indigo oxidises to blue indigo particles that physically lodge in unevennesses in the material. Unlike many other dyes, the particles are not chemically bound to the material, just wedged into cracks and crevices. This means that dense, smooth materials or those that are not easy to wet will not hold a lot of dye or will not be easy to dye. Indigo is one of the most light-stable natural dyes, but the way in which it dyes means that materials dyed with indigo ‘fade’ in two ways: as particles of indigo are dislodged and fall away from the material, and as the dyed material itself wears away to reveal undyed material. Taken together, these largely explain the classic fading of denim. (Light does degrade indigo into compounds such as isatin, but the physical damage is more significant.)

Making leuco-indigo: reducing the vat to remove oxygen

Whether they’re based on synthetic or natural indigo (including plant material that contains indigo), all indigo vats work on the same basic principle: convert the blue indigo into soluble leuco-indigo, then allow that solution to penetrate the material to be dyed. As leuco-indigo only maintains that form in the absence of oxygen, the vat must be reduced – the oxygen removed – in some way. Traditional vats use bacterial fermentation: the vats contain organic matter on which bacteria feed, such as the nutrients in urine, rice bran, the plant material that contains the indigo compounds, or even the skin flakes, sweat and manure held in a sheep fleece.

Chemical vats use raw chemistry, compounds including sodium hydrosulphite or thiourea dioxide or reducing sugarssuch as fructose to remove oxygen from the vat.

Making leuco-indigo: the vagaries of pH

pH – the acidity or alkalinity of the vat – is important, as the conversion to leuco-indigo requires an alkaline environment. It’s easiest to predict and maintain in a chemical vat, with recipes calling for measured amounts of lye (sodium hydroxide) or washing soda/soda as/soda crystals (sodium carbonate) or calc aka calcium hydroxide aka slaked lime. It’s just as important in a biological vat, but much trickier to maintain, because the fermentation process produces byproducts such as lactic acid that lower the pH. Apparently dyers in the past learned to manage their vats by tasting the fluid or feeling it between their fingers, trying for something that’s slippery (alkaline), but not too slippery. Fortunately we have pH paper, which works even for indigo vats – the blue does not appear so quickly that it prevents reading the pH.

pH also influences the dyeing process in other ways. Both cotton and indigo are ionised at higher pH; there are two forms of leuco-indigo, and the most ‘efficient’ of these in terms of dyeing is most common at pH11, which is also the pH at which de-protonation/ionisation of the cotton (and possibly other cellulosic fibres) has begun, making it attract the dye. So cellulosic fibres are best dyed at pH11.

But protein fibres such as silk and wool are damaged by high pH, and heat accelerates the damage. pH paper allowed me to confirm that my sig (urine) fermentation vat does indeed run at about pH 9 in the relative coolth of the pop-up greenhouse, whereas the 1-2-3 Fructose vat I created yesterday was pH11 at 50°C. So: to dye my handspun silk (a smooth, dense fibre, hence takes up less dye) a dark blue, I had the option of multiple dips in the urine vat OR a shorter single dip in the Fructose vat.

Having said all this, pH paper and knowing how to use it doesn’t guarantee success with a biological vat. I think the current woad vat may be a loss, possibly because I used garden lime instead of calcium hydroxide to try to control the pH. But perhaps there’s so little blue present that I’m not seeing it on the material. Further work required.

NDamask1

There are far too few pictures in this post, so here’s a Norwich damask, a dress fabric dating from the early 1700s. Handspun 2-ply wool warp; the purplish shadows in the pale areas hint that the warp was once dyed reddish-purple, probably with logwood, long since faded except where protected inside the seams. The handspun singles weft is clear pale indigo blue. The original fabric was probably lavender-lilac purple with red-purple patterning.

Further reading

Balfour-Paul, J, 2011. Indigo: Egyptian Mummies to Blue Jeans. British Museum Press

Hall, K, 2012. Indigo background (written specifically for South Carolina teachers).

Click to access Indigo-Recipe.pdf

Melo, M J, 2009. History of Natural Dyes in the Ancient Mediterranean World. In Handbook of Natural Colorants, John Wiley & Sons. http://www.researchgate.net/profile/Maria_Melo8/publication/227979187_History_of_Natural_Dyes_in_the_Ancient_Mediterranean_World/links/0deec5374a69835606000000.pdf

Vuorema, A, 2008. Reduction and analysis Methods of indigo

Click to access AI388%20Vuorema.pdf

A traditional indigo sig vat.

Oxford English Dictionary: Also seg, sigg, zig(g). Of obscure origin, the form does not correspond to older Flem. seyck, G. seiche, in the same sense. Urine.

Anyone horrified by the idea of working with urine should leave the room now…

Urine has been a valued ingredient in the dyeing process for many centuries: dyers had containers on the street to collect contributions from passing members of the public. Fresh urine is sterile, or nearly so (If you can’t get clean water to wash out a wound, the next best thing is to pee in it. Honest!) but bacteria soon begin breaking down the proteins, sugars and other compounds in the urine to produce ammonia, which gives stale urine that pungent, penetrating odour. Ammonia is a very useful alkali and, just as important for working with indigo, the bacteria that create it consume oxygen as they work. The resulting low-oxygen, alkaline environment is ideal for converting indigo into its soluble form for dyeing – and all that’s needed is pee! Incidentally, the first pee of the morning is better than any other, as it’s richer in nutrients for the bacteria. The urine of children is better than that of adults, as their higher metabolic rates mean more nutrients in the urine. The sugar-rich urine of diabetics is good, too. But beware the urine produced by those indulging in diuretics such as beer: it contains fewer nutrients as the body tries to flush out the toxins with higher volumes of fluid. Some urine vats fail to ferment for no obvious reason; it’s possible that some medications interfere with the bacterial action.

The simplicity of this process has interested me since I first read about it, and it’s an obvious candidate for inclusion in my Summer of Blue. So, as the teaser image on the first woad vat post suggested, I made some preparations.urine

That’s a 3 litre jar, half-full of our urine, with a bucket containing thermal insulation to keep the fermenting urine warm. I collected more urine over the next day. All that’s needed for a urine-based indigo vat: urine, natural indigo, and a twist of fine cloth to contain the indigo powder.

SetupThe cloth with the indigo is tied tightly and dropped into the jar. At this point the urine has almost no smell at all, certainly nothing offensive.

DayOneSigVatMayThe bag of indigo is squeezed gently every day to release more indigo into the fluid, which will be blue until bacterial action – fermentation! – creates the high pH, low oxygen environment in which the blue indigo converts to the form in which it dyes, the yellowish soluble ‘white indigo’ or leuco-indigotin. Fermentation requires gentle warmth; I was going to put the jar in that bucket on a hot water bottle surrounded by insulation, but the warmth of the sun persuaded me to try an easier solution:

DayOneSigVatWarm

I simply sat it on the warm soil in the pop-up greenhouse that is sheltering my Japanese indigo plants. That was May 13. On May 14 the temperature plummeted and we had rain; the 15th had slightly more sun, but was still cold. Today, the 16th, is warm again. I foolishly didn’t take a photo of the fluid surface before I squeezed the indigo, so I can’t show you the tiny patches of metallic scum, a sign that it is working. But in this photo you might be able to see the greenish rather than bluish colour of the liquid. More important is the smell: it has the rich organic odour of stable manure or something similar. Nothing like the acrid ammonia of stale urine.

DayFourSigVat

And look at the change in pH over the course of three days! No lime needed here:

DayFourSigVat.pH

If tomorrow is as warm as today, I might put some wool in that jar tomorrow evening, just to see what happens. The urine fermentation vat works at a far lower pH than the vats reduced with thiourea, so they’re much kinder to protein fibres. At pH 9 wool and silk can sit in the vat for several days without damage, or they can be dipped repeatedly, both processes yielding darker shades of blue. Blue!

Woad Fermentation Vat No. One: Day Seven.

In fact a summary of days 2–7. In pictures and words. I really, REALLY wish I could share the smell as well, as I think that’s significant, but I daresay many of you wouldn’t enjoy the, er, pungency. It’s living in my office/spare bedroom, and I’m just hoping the smell won’t linger once the vat is finished. I had intended to keep it in the garage, but it wouldn’t be fair to inflict it on my husband.

According to the thermometer on the vat the brewing belt is running slightly hot, I think, nearer 28 than 23°C, so I’ve wedged a pencil between the belt and the vat to reduce the heat input.

pH papers from vat testing over the week:

pH.papers.Day7

The vat on Day Three, 12 May. pH 8-9
The organic matter is waterlogged and has sunk to the bottom. There are a few bubbles, some patches of scum, the vat smells of rotting vegetation. The pH is low (acid): I sprinkled 1/2tsp of garden lime on the surface and stirred it briefly and gently.

Day3.Vat

Over the next three days the vat liquid became darker, the smell of rotting vegetation intensified, the greyish scum became thicker. Daily pH tests gave readings of 7–9, lowered by the acids produced by the rotting woad and bran; I sprinkled another 1/2 tsp of lime on the vat on Days 3–7. When in doubt, go alkaline as indigo will not convert to the soluble form in an acid environment. The smell became more complex. I can’t think of a good way to describe it, but no longer ordinary rotting vegetation. Richer, darker.

Day Seven. I suspect fermentation has peaked, as after yesterday’s lime the pH remains high – it’s well over 9, the maximum on my packet scale. The vat liquid is dark, there are now scattered patches of a thin shiny, almost metallic scum on the surface. The smell is richer, more complex, and not particularly pleasant (I much prefer the odour of a fermenting urine vat!).

Day7.Vat

The combination of changed odour and high pH made me think it might be worth testing for blue: the strings are tied to some scraps of scoured muslin that I’ll leave in overnight, and for multiples of 12 hours. I have a strong suspicion that 100g of woad leaves won’t produce a strong blue in any case.

Woad Fermentation Vat No. One, Day One.

So it begins. Over the last couple of days I’ve been assembling and collating information about indigo, woad, and fermentation vats. I’ll post a summary in due course; today I started my first woad vat using my first ‘best guess’ for a process based on my reading. It’s largely based on the instructions for a woad vat in Liles’ The Art and Craft of Natural Dyeing, but without the addition of indigo powder: I want to see what blue I get from 100g of woad ball before I add indigo. I aimed for the pH levels described by Dorothy Miller in Indigo, from seed to dye.

In Indigo Jenny Balfour-Jones describes the couching of woad balls. According to her sources, when the process is complete good woad is dry and mouldy, a condition known as “well beavered”. Mine wasn’t completely dry (I’d left it covered), but it was covered by a remarkable fine grey-white mould. The entire couching process seems to have taken place very quickly, perhaps because I used rainwater rather than tap water to avoid chlorine and other inhibitors of bacterial growth: on 7 May I crushed 100g of woad ball, moistened it with rainwater, and set it next to my desk so I could see what happened. I kept a lid on the dish to retain moisture. It heated up within hours; I turned it on the 8th and again on the 9th, by which time it was cool.

CouchedWoad.Finished

I assembled my kit. The white bin holds 25l/6 gallons; the black strip on it is a liquid crystal thermometer, and the orange thing is a ‘brewer’s belt’ that should maintain a good fermentation temperature, somewhere between 22-28°C. I plan to put that coil of plastic mesh or something similar at the bottom of the vat to keep cloth and fibre away from the fermentation debris.

Equipment

Liles gives quantities for 6-8 gallons; I halved them for a 3 gallon/12.5 litre vat to begin with, and used washing soda rather than lye as an alkali. I dissolved 0.5oz washing soda in 1 litre hot boiled tapwater (boiling should drive off the chlorine), added 0.5oz wheat bran (slow release carbohydrates to fuel fermentation) and 0.5oz madder root (traditionally added because the bacteria on the roots kickstart the fermentation process). I left this to soak for an hour to hydrate the bran before pouring it into the bin and adding 8 litres of rainwater (total 9 litres). I boiled 2 litres of tapwater, added 1.5 litres of rainwater, and brought the entire volume to 70°C on the stove: woad contains both indican, the precursor for indigo blue, and isatan B, a related compound that will create blue, but which according to Balfour-Paul requires a higher temperature at the start of the fermentation process followed by rapid cooling.

I scraped the couched woad into the hot water, stirred it thoroughly for 5 minutes, then dumped it into the vat solution to cool it rapidly.

Vat.Day1

Maintaining the correct pH range is critical for a healthy fermentation vat, and the dyeing process. If fermentation is too enthusiastic, lactic and other acids will drop the pH to the point that the vat will not dye. The acidity must be countered by an alkali, but if the pH is too high fermentation will cease and the vat will damage protein fibres. A pH of c. 10 appears to be good for both fermentation and dyeing, although the woad vat should operate down to pH 8. I decided to aim for pH10 in the vat before fermentation starts. According to my pH meter I was bang on. Remarkable! I therefore omitted the 1/2 tsp lime called for by Liles’ recipe; it may be that our rather alkaline tapwater (pH 8.4) rendered it unnecessary.

I bought pH paper – litmus paper – to check the pH of my fermentation vats a couple of years ago, but neglected to check that the range was appropriate. Mine are intended to check the pH of body fluids (don’t ask, I don’t know and I don’t want to know) and the chart only goes to pH 9 whereas for these vats you’ll need them to go all the way to 11. However it seems that the paper will indicate the higher readings, I just have to create my own calibration records based on the pH meter. Note that the pH 10 paper is in fact more blue-green than it appears. The very blue paper on the right was the 1 litre initial stock solution, which had a pH of 11.2.

pH.papers

One thing is very clear from my reading: a good working fermentation vat is as much a matter of luck as judgement. Japanese indigo artisans pray to Aizen Shin, the god of Ai (indigo) for success. I shall drink a toast to Ai tonight, just in case.

I’ve started preparing for the next vat, too. Guess what that will be based on?

urine

2015: A Summer of Blue

Or so I hope.

I’ve had a thing about indigo for longer than I care to remember. I think it started when my mother included indigo vats in a summer school dyeing class she taught in the early 1970s; in my mind’s eye I still see the shimmering metallic blue-copper-purple surface of the liquid and the cloth emerging from the vat green, turning deep indigo blue as I watched. Some years ago I started to recreate the magic. I began with the simplest chemical ‘colour run remover’ (I’ll explain these terms later) vat, and managed to dye some spinning fibre blue. I felted it too, but still: blue! I read of traditional fermentation vats and HAD to try to establish a sig vat based on the bacterial breakdown of urine. I briefly managed to get it working and saw a different blue, murkier and darker, on wool that 4 years later still retains the faint barnyard odour that for centuries indicated the finest blues.

Woad5

In 2013 my first attempt to grow Japanese indigo failed to thrive outside in a typical British summer, but I discovered that woad – the traditional blue of northern Europe – thrived. I wrote a blog post “Blue! From leaves!” about the fun I had crushing the leaves and extracting the indigo to dye blue, then using the ‘waste’ leaf matter to dye a second completely different colour known as woad pink.

The fabulous gift from A. of John Marshall’s new book on working with fresh indigo has inspired me to plan greater efforts this summer. Woad and the various plants known as ‘indigo’ that grow in warmer climates all contain the same compound – indigotin – that produces indigo blue, but woad contains less than most other indigos.

The summer of blue

I’ve made careful preparations. I want to try some of the interesting techniques that John describes; to be sure of them, I need fresh tadeai, the Japanese indigo Polygonum or Persicaria tinctoria. It won’t thrive in our semi-continental climate and clay soils; it requires a warmer maritime climate, higher humidity and reliable summer heat, and moist soil rich in organic matter. So I’ve bought a tiny greenhouse, the appropriate size for our tiny garden, complete with raised bed that I’ve filled with compost and leaf mould. I’m hoping this will allow me some control over heat and humidity.

IndigoHseGarden

I sowed the tadeai seed that John Marshall kindly included with the book indoors in April, keeping the seed tray in the warmth upstairs next to my computer. I even repurposed my drawing desk light with a grow light bulb. And I’ve had some success! Now the tadeai seedling are hardening off in the greenhouse, and seem to be thriving.

IndigoSeedlingsIndigoHse

In theory woad leaves could be used for the same techniques, although the colours might be fainter.  I need more woad! Sadly my first woad sowing either failed to germinate or, equally possible, the seedlings were eliminated by the horde of slugs and snails that reside in the garden. To the far left of the greenhouse there are three rows of woad re-sown a week ago, and I’m about to go outside to apply slug pellets and cover them to protect the birds and other animals.

Fortunately there are other sources of woad in the UK. The Woad Centre in Norfolk has been growing and harvesting it for some years. They sell indigo pigment extracted from the leaves and a variety of other products, but I am most interested in their woad balls. For centuries woad was a valuable commercial crop, preserved and transported to dyers in the form of balls formed from the chopped and kneaded fresh leaves, then left to dry. The balls can be reconsitituted for various forms of indigo vat, including the same extraction process I used in 2013. I’m now more interested in the various forms of fermentation vats, and have begun to prepare for my first attempt by ‘couching’ 100g of woad ball. This entails crushing the balls as finely as possible, moistening the mass, and leaving it to rot down/ferment into a dark green-black mass which is then used in the dye vat. I haven’t yet come across any explanation of the reason for the couching process; my guess is that the fermentation breaks down cell walls to ensure more of the indigotin compound is available to the dyeing process.

WoadBallPrepThe crushed woad ball in that dish were prepared and wetted with rainwater two days ago and I’m very happy: the mass is darker and warm to the touch. It’s working! It has a strong odour, the smell from the centre of a pile of grass clippings, and that seems right.

I have three 25litre plastic fermentation bins waiting in the garage, along with 2kg wheat bran (I can’t find rice bran) to fuel further fermentation, a pH meter, LCD thermometer strips and a ‘brewing belt’ heater to warm the vats if the British summer fails again. I have commercial natural indigo to add more pigment for a deeper blue. I am almost ready… I just have to set up a, er, urine donation facility next to the toilet :-)

This Friday is for fixed. And for making!

I finished repairing my tabi earlier in the week, and immediately bought a pair of flip-flops to protect the repaired surfaces, because I think they’re beautiful.

FinishedTabiRepair

I might even Pin(terest) my own work.

FinishedTabiRepair1

FinishedTabiRepair2

The spiralling stitches were much faster to work than the blocks, but that might have been because I wasn’t fiddling about deep inside the sock.

Having repaired them, it was time to think about making my own from the pattern and instructions in John Marshall’s book. More bits of my husband’s old trousers, plus some light white cotton sheeting for lining and heavier white cotton, almost canvas, for the outer soles.

NewTabiPieces

I found kohaze (the fasteners I need) on Etsy(!) and have ordered enough for two pairs of tabi. I’ve been Pinning images of tabi, paying special attention to those with sashiko stitched reinforcement or repair. I will embellish this pair, but have to decide whether the stitching should be done before assembly (far easier) or after (the stitching could be used to add shape to the structure). Decisions, decisions, but I don’t have to decide now. First I have to make muslins, as it were, testing the fit. I’ve cut the external fabric larger than the pattern piece, adding allowances to adjust for a high or low arch. I’ll start by basting to the line of the original pattern, and work from there.

I’ve discovered that this sort of hand-sewing is as safely executed as mindless spinning in the evenings while watching TV (unlike knitting the Orenburg lace scarf, which requires my full attention at all times). So I have another tiny project: to replace the little earbud pouch that A. finds invaluable for storing his keys in his pocket.

A.Keypouch

It has a sort of flex frame opening: there are two thin strips of metal either side of the opening. Or were; one cut through its pocket and was lost, and the fake leather fabric is disintegrating. Real flex frames have hinges and are supplied with one closed and a pin for the maker to close the other. I’ve made a prototype, adding darts to create more space for the keys. Only minor adjustments are needed – it’s a little too deep, and might benefit from fractionally greater width (longer darts) so I will test the next version in leather. I have leather needles, I have linen thread, I have beeswax. Maybe tonight.

Also, it occurs to me I could mention my previous Blogger blog at

http://cinereous.blogspot.co.uk

Fridays are for fixing.

Some time ago someone started a ‘Fridays are for Fixing’ thread in one of my Ravelry hangouts. It seemed a good idea – I have lots of fibre-ish things that need repairing – but I couldn’t bring myself to commit to the work. Last Friday evening found me sitting on the couch happily fixing something I love; I’d had a tiny lightbulb moment I’d like to share.

tabiOn

These are my tabi. Japanese sock/slippers, with a gap between the big toe and the rest so the owner can comfortably wear zori, which resemble UK flip-flops or what I called thongs in my Canadian childhood. It’s perfectly possible to ram feet wearing ordinary socks into a pair of flip-flops, but it’s very unkind to the socks. I like tabi. They’re comfortable.

tabiSide

The ankle opening is closed by interesting fasteners, faster than buttons: metal tabs that neatly slide over and behind threads, like hooks and eyes, but larger and very much more … Japanese. Elegant.

tabiFasten

Sadly I haven’t been wearing my tabi because they’re broken: they weren’t very well made and the snug fit that makes them comfortable and safe to wear has pulled the material of the sole out of its seam in several places on both.

tabiDamge

They’ve been sitting in the bag of things to do for almost a year because I was intimidated by the damage. I felt it should be repaired to be ‘as good as new’, and I couldn’t think of a good way to do that; there’s simply not enough fabric to mend that seam. I could handstitch entirely new soles, but for the work involved I might as well buy a new pair. Or make my own, which is on my short list of projects, but I’m waiting until I have some special fabric for that. Last week the solution became instantly obvious as I cut up an old pair of my husband’s trousers for scrap fabric to test slipper patterns, stacking the pieces next to my sashiko project bag. Sashiko is the Japanese art – it IS art – of repairing, reinforcing and embellishing fabric with simple stitches. I’m fascinated by it, and by boro, the textiles (usually indigo-dyed ‘country cloths’) that have been patched and mended using these stitches. Personal revelation: I didn’t have to make my tabi as good as new. I just had to make them function as they should. I didn’t have to use indigo cotton and white thread, I could use whatever I had, which is true to the tradition of clothing repair. What I have is pieces of trouser leg and a box of embroidery threads, some of which are over 40 years old.

EmbThread

RepairDet

I tested the patches before I started and no, I can’t feel that overlap. The repair might not last a long time – the embroidery thread is probably a bit too fragile – but it should last long enough for me to make my own slippers.

I’m not a seamstress. I’ve done my best to avoid sewing for most of my life. But I’m beginning to enjoy it as part of the process of bringing real things into existence. I hope I’ll get better at it. I think I will.

RepairInSide

After all, practice makes perfect and I’ll get more practice now that I know perfection is not the goal. Fridays are indeed for fixing.

Blue! from Leaves!!!

The Hat has been my main focus for the last few months and I can’t blog about it because I hope it will be published. Sorry …
But I can tell you all about another chapter in My Adventures with Indigo. It’s a long one; you might want to make a cup of your favourite beverage now, before you start. 

About 12 months ago I ordered both Japanese Indigo and Woad seeds, my cunning plan being to throw cabbages to the wind and grow blue instead. Alas, I have no greenhouse: the bitterly cold winter and late, wet spring put paid to the Japanese Indigo, which even indoors scarcely showed a leaf before giving up the ghost. This isn’t the climate it was looking for. Woad, on the other hand, was and still is grown here as a crop, so I expected more of it. To its credit, it delivered. Woad is apparently a gross feeder, in this case meaning that it needs nutrients and lots of them, rather than having no table manners. I fed it regularly with blood, fish and bone, and watered regularly in dry weather. It’s biennial; the first year leaves give colour, the second year there is no colour (can’t vouch for this yet), but you get seeds to grow more. Harvest the leaves from midsummer on. This post depicts events on July 21, my first pick.

I have both Jenny Dean’s Wild Colour (I have an earlier edition) and Rita Buchanan’s A Dyer’s Garden, both of which give instructions for dying with fresh woad leaves. It’s extremely straightforward. 

First grow your woad. I suspect it’s important to move as quickly as possible from harvest to hot water, so I set up my kit next to the woad, which is the lowish, bright green, elongated leaves to the right of the cabbages. The net is essential: everything under the net is extremely dangerous is food for the caterpillars of Cabbage White butterflies. If you don’t prevent the adults from laying eggs on the leaves, you will have no leaves. Ignore our bike gear, it’s just drying out/absorbing UV to kill bacteria.


Basic equipment for an afternoon of fun: well-wetted materials to be dyed blue, plus a large container (I used a jar because I can see the colour of the liquid in it), a large wooden spoon, rubber gloves, a glug or two of household ammonia, a BIG saucepan or stockpot (it will hold only water), with trivet and a thermometer accurate from 0–100°C. For further excitement you’ll need a saucepan you don’t use for food, and 1 tsp of alum mordant. Read the instructions below to make sure you understand what you’ll be doing and why.

Fill the kettle (really full) and put it on for tea. 
Pick the leaves as quickly as possible, and stuff them into a container. A large glass jar is good because you can see the fluid change colour, which is helpful. No need to shred them finely or anything, I just grabbed handfuls, slugs and all, ripped them in half and stuffed them into that large jar. 
The kettle should be boiling by the time you finish: pour the boiling water into the jar, enough to cover the leaves. Make tea with the leftover, if you want any; I opted for squash instead. Leave the leaves to soak. 

If you plan to go straight to dyeing once you’ve got the indigo from the leaves, at this point you should half-fill a saucepan or stockpot large enough to hold your jar with water at least halfway up the sides, put the trivet in the bottom (to prevent the glass jar from overheating on the metal) and put it on low heat (you’re aiming for 100-120°F (38-48°C). If you haven’t got a trivet, I use a layer of metal table forks.

The jar of leaves soaking in hot water.
The fluid will change from water-clear to dark sherry-brown as the leaves wilt. After an hour, remove the leaves (I used a kitchen strainer), squeezing out every drop of fluid, and put them carefully to one side. You will use them again.
 
 
The chemistry of indigo dyeing is not complicated, but it’s important. The dark brown fluid in the jar contains indigo from the woad leaves in the form of indoxyl (more detailed info on Wikepedia, scroll down to Extraction). To extract the indigo from the fluid, add a glug (about 1 tablespoon for this jar) of household ammonia to the fluid. Buchanan says baking soda will also work, I haven’t tried it.). Now pour the fluid back and forth between two containers, exposing it to the air as much as possible. You want bubbles and lots of them!
 
The foam starts yellow but turns a beautiful turquoise as the fluid is oxygenated, transforming the indoxyl into insoluble blue indigo. Once it’s as blue as blue can be, it’s decision time. You can dye with the fluid and indigo, or you can filter out the indigo particles and save them for another day. Filtering takes longer to do but much less time to describe, so I’ll show you that first. If you want to DYE NOW! skip the next section.

Filtering the indigo particles
My reading suggested that coffee filters and such aren’t fine enough to trap the bulk of the indigo particles. Some people use proper filter paper, but I didn’t have any. Instead I used two layers of extremely finely-woven commercial silk fabric to line a small tea strainer. Straining a smaller volume (I did this with the second batch of woad processed in August) took the best part of two days. Save the filtrate (the filtered fluid): it probably still contains enough indigo to dye something else blue if you follow the instructions for dyeing with the fresh indigo solution, below.


I suspect that’s very impure; there’s probably a lot of vegetable debris as well, but I see no reason for it not to work. 

I dyed a skein of cotton with the fluid that ran through the silk. A paler blue, but still blue!


Dyeing with the fresh indigo solution
If you decide to go ahead and dye with the solution, from this point the process is similar to a standard chemical indigo vat. Make a solution of reducing agent (thiourea or Spectralite), 1 tbsp in a jar of warm water and add it to the fluid in the jar. The reducing agent absorbs oxygen in the water, which transforms the insoluble blue indigo particles to the yellowish soluble form. In this form they are absorbed by the materials you want dyed. Now, given that you’re trying to REMOVE all the oxygen from the solution, once you’ve added the reducing agent you should take great care not to ADD oxygen (air!) unnecessarily. Stir gently, don’t create bubbles. To activate it, the solution must now be heated to 100-120°F (38-48°C) for about an hour. Check the temperature of your water bath and adjust it by adding boiling water or cold water as needed. Put the jar in. Stir it gently from time to time and check the colour of the fluid. It should become yellowish: with luck you can see that the bottom of the bubbles and the fluid is in fact yellowish.


When it looks like that it’s ready to use. Take the jar off the heat if it’s more convenient. Squeeze excess water from whatever it is you’re dyeing and add it to the jar.


Note the bluish tinge to the merino locks, which still contained some air. A hint of what is to come. I left the fibre and yarns (wool and silk) in the jar for about 15 minutes. When removed from the jar oxygen hits the pale green-yellow liquid: it begins to turn blue. First turquoise, then darkening further. 

You can dye more material in the jar until the indigo is exhausted, but remember that each batch adds oxygen. If the fluid becomes more blue than yellow, add more thiourea or Spectralite and repeat the heating process to drive off the excess oxygen, thus reducing the indigo to the soluble yellowish form that dyes.

Different fibres take and hold indigo differently: unlike ‘chemical’ dyes, in which the dye molecules chemically bond to the material, the soluble yellow indigo penetrates into microscopic cracks and crevices where, with luck, the insoluble blue particles are trapped, wedged firm. Those that aren’t trapped firmly will come off on your skin (and everything else) as the indigo blue ‘fades’ over time. Silk and other very smooth fibres have fewer places to trap indigo, so tend to end up paler than wool or cotton. But when they first come out of the vat, everything is simply glorious blue. In this case, glorious blue FROM LEAVES!!!


Well, not quite everything. That pinkish-brown skein of silk is just as magical, or even more. Remember I told you to save the leaves strained from the initial solution? 

Dyeing with indirubin: Woad ‘pink’
If you now treat the woad leaves from which the indigo was extracted as if they were standard fresh plant material, they will yield a totally different colour: woad pink. Mine was more brown than pink, but still absolutely astonishing to get two such different colours from a single leaf. The technique is simple: stir the strained leaves into a pan of water (I used rainwater, in case our very hard water affected the chemistry) and simmer for an hour or so.

Strain off the leaves – this time you can discard them! – and add 1tsp of alum mordant to the dye solution.


Add the material to be dyed and simmer for another 15 minutes or so, then allow the solution to cool with the material in it – leave it overnight if you can – as this yields a deeper colour. Here’s a closer view of the silk to show the indirubin colour:


A project for the Cotswold.

The ‘wrong fibre, wrong place’ Cotswold now has ambitions, or more accurately I have an ambitious goal for it. I was whining on Ravelry about lack of desire/inspiration for the 2013 Rampton Project of a Fun and Frivolous Hat when …

(insert wavy lines and flying calendar pages here). 

Some weeks previously Sara Lamb had recommended books by Sheila Paine as of use to someone else; I thought they sounded interesting and worked my way through the travel trilogy (begins with The Afghan Amulet) and then acquired Embroidery from Afghanistan. So naturally I began a search for hatty inspiration by looking for various hats from Afghanistan online. Google images promptly gave me this link, which I posted to Ravelry because one shares the good stuff, right? To cut a long story short, Sara suggested I make a similar hat from fulled handwoven handspun. Good plan, I said, or words to that effect, despite knowing next-to-nothing about how such a thing would be made. An expedition to a local purveyor of New Age crystals and ethnic jewellery proved unexpectedly rewarding: it’s a real one. Well-worn and faded: that pale orange was once fluorescent, and the pale grey-green was screaming lime. 
Close examination shows the embroidery almost completely conceals a blue woven cloth. I think a couple of layers of that are lined with other fabric, then quilted and embroidered. Most of the embroidery stitches are worked within the quilting.
As always, I am moved when my hands feel the work of someone else’s hands. Work, not art: an item made because the maker or someone she cares for truly needs or wants that thing, or the money that can be made by selling it.  
Although I don’t plan my hat to look much like that hat – it’s a man’s hat, to be worn with a turban wrapped around its sides, and sits foolishly on the top of my head – the women’s hats are so ornate that I can’t imagine wearing one. I am inspired instead by this child’s hat. I doubt mine will look much like that, but it’s a starting point. 
To make anything I need cloth, and to make that I need yarn. 
I had about 450g of the sliver, which yielded 171g of singles spun short forward draw. I’ve put 157m to one side in case I want to submit it as part of my work for the Guild of Weavers, Spinners and Dyers Certificate of Achievement in Spinning; that weighs 30g, so the remaining 141g should give me about 740m of warp. But what to use for weft? The combing waste was horrible, full of short cuts and nepps, dirt and dark hairs. I surveyed the stash. Not something precious, not my fine shetlands and other soft wools. And it has to full and/or felt, which ruled out the Dorset Horn and Southdown tops. I was looking thoughtfully at the BFL top when I remembered the Falkland. ‘Falkland’ is the wool clip from the Falkland Islands, originally Corriedale and Romney, now with Polwarth and some merino crosses.  Three minutes with soap and water told me it would full. So I spun a sample from the fold for a more woollen yarn (leave space for the fulled fibres to compact) to roughly the same grist as the warp (it looks thicker in that photo but that’s because it’s woollen). 
I’ve only once made a fulled fabric, and that was a tiny sample spun and woven for Stephenie Gaustad’s ‘Spinning for Historical Reenactment and Museum Replication’ class at SOAR. I needed some idea of what these yarns will do together. How much might the fulled fabric shrink? What sett should I use? I used a straightforward sampling tool, another gift from Sara Lamb. When I say I am fortunate and truly grateful for all that my mentors have given me, I am totally serious. All they ask in return is that I use it: so I do, and I pass the knowledge on.
It’s foamboard covered with graph paper, with pins along the top edge to space the warp. I use the knitting needle at the bottom of the warp as a heddle stick, holding the threads for one pass of the weft for plain weave; I needle-weave the other pass (using a heddle stick and beating with it gives better, denser fabric than needle-weaving alone). It’s faster than you might think. I hemstitched the edges, then hemstitched to isolate 1/3 of the strip to be cut off and kept as a loom-state sample. The other 2/3 I fulled by hand on the kitchen counter this morning.
Although Cotswold will full slightly, the Falklands is much better at it: it’s lost 1cm in width. The strips are oriented in the same way, with that slightly denser band down the same side. I like the fabric, I like it a lot. The overall sett is 34 ends/2″, which is 17 epi. The denser areas have fulled to a tight plain weave; I have to check the loom-state sample/fragment (it’s a very small sample!), but I think that’s nearer 20 epi. If I use size to reduce hairiness and sticking in the warp I think I can achieve that lovely even plain weave fabric on the loom. So this tiny sample has told me a lot: my fibres do what I hoped and I have an approximate sett to make a functional fabric. I might put half the fulled sample through the washing machine to see how much denser it becomes after a normal wash cycle… but then again I may not.
 I don’t know if this fabric will be ideal for the purpose, but I think it will suffice. It’s not so thick and stiff that it will become cardboard when further stiffened by embroidery. It’s soft, but feels hardwearing; I can imagine a winter coat or cloak made of this. It’s fabric of character. I like it. And I’m so proud that I planned it from nothing and I made it real with my own hands.