In March a friend asked me what I knew about fustian weaves. I’m fascinated by European textiles from the Medieval period through the Middle Ages, so I started talking about fabrics woven from mixed materials. Linsey-woolsey is a well-known example, wool weft on a linen warp, but there were cotton wefts on linen warp and wool weft on cotton warp too. But she was interested in the fustians of the late 19th and early 20th century, by which time it had come to mean a pile fabric.
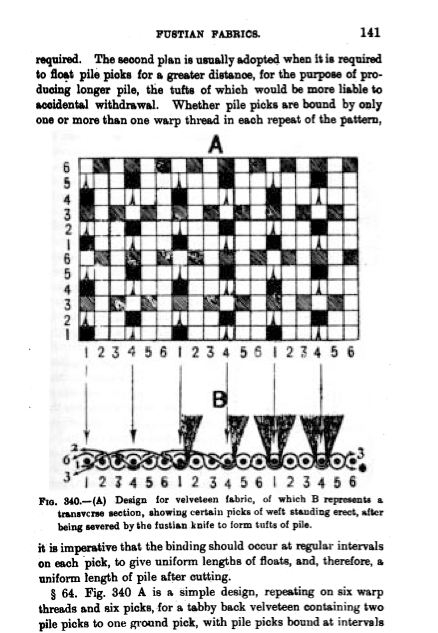
Pile fabrics are interesting. The pile is created by weaving a fabric with floats: where normally the threads might interlace over-under-over-under-over-under, in a pile fabric either the warp (the threads held on the loom) or the weft (the thread held on a shuttle and passed through the warp threads) will float over several threads before it is locked down again. If warp threads float, the fabric is a velvet; if weft threads float, the fabric is a velveteen. This will make more sense if you read it again, looking at the diagram of a velveteen. Start at the bottom and work up:

Rough diagram of a velveteen, a weft pile fabric. I have completely ignored the structure of the selvedges (the edges of the fabric); these are often different from the main fabric.
Because the pile weft is not structural – it’s not needed to hold the warp threads together because the ground weft does that – the floats can be cut, taking great care not to cut the ground weft or the warp thread. The red arrows mark the most obvious cut lines, straight down the middle of the floats. When the floats are cut, the cut ends rise up to form pile. If all the floats are cut, the entire fabric is covered in velveteen pile. If vertical groups of floats are cut and uncut, there will be ridges of pile alternating with furrows of smooth fabric: corduroy!
My friend and I searched for pattern drafts – diagrams of how to set up the loom and weave the fabric – of fustian weaves from this time, and found H. (‘Harry’) Nisbet’s Grammar of Textile Design, third edition (with 669 illustrations!) published in Bombay, as a PDF on the invaluable cs.arizona.edu weaving archive. Chapter II is Fustians, from Imperial or Swansdown through Corduroy and Corduroy Cutting Machines. Nisbet gives a good if somewhat … Victorian … description of the structures of these and many other fabrics. If you want more information about fustians or are interested in fabric, it’s a decent free book.
On page 141 there’s a velveteen draft/diagram, together with a useful illustration of the way that the cut floats form pile.
I redrew the ‘design for velveteen fabric’ as a modern weaving draft. The bright pink threads mark the centre of the floats.
By now I was entranced by the idea of weaving velveteen. Not a lot of it, as I suspected cutting the pile was going to be very tricky without a fustian cutter’s table and knives, or even full-fledged mechanisation, but still. Worth a try. Handwoven velvety stuff. Cool!
From what I could find about sett (the density of threads on the loom) and the velvets and velveteens I remembered seeing in shops, I thought sewing thread might be a reasonable warp. I assumed there must be a good reason that most silk velvets I looked at online had cotton warp and ground weft, so I bought a bargain bag of variously coloured cotton thread on eBay. I had some odd cones of 20/2 silk in the weaving stash. It occurred to me that the ground weft should not show in the areas of cut pile – the pile expands to conceal it – but would be visible on the back of the fabric, so I chose three (red, orange, gold) that looked good together and wound a 2m warp. The three spools gave me 200 ends; set 60 ends per inch (6/6/6 in a 10-dent reed), that’s only 3″ wide. Still, proof of principle and all that.
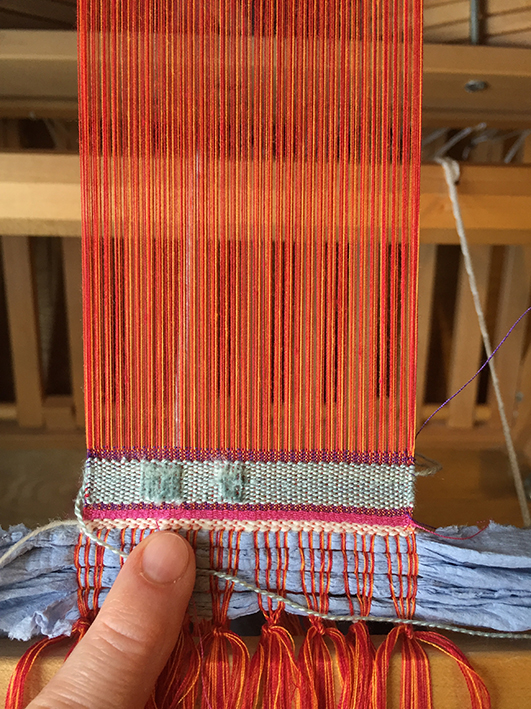
This gives some idea of the warp colours and the scale. I used some ugly silk for my first pile weft and purple cotton for the ground weft. Note that there’s a band of plain weave (the ground weft weave, over-under-over-under) before and after the strip of velveteen floats in greyish silk.
Cutting the pile floats was indeed tricky. When this sort of thing is woven commercially, the equipment includes long grooved rods to be inserted down the cutting lines. The rods lift the floats and protect the warp and ground weft threads; the grooves guide the cutting blades. I used a medium-fine darning needle and a single-edge razor blade instead. Wearing strongly magnifying reading glasses I ran the needle under a line of floats, then ran the razor blade down the needle. It worked. The finest (Clover) chenille cutter I could find didn’t work, it was far too coarse for this.
As one might expect of something sharp running against steel, the razor blade required regular sharpening. I kept my fine whetstone next to the loom and re-touched the edge after every strip of velveteen.
But it was a phenomenally slow process. Each group of three red or blue velveteen stripes (at left, below) separated by bands of plain weave (the ground weft alone) took 3 hours to weave and cut.
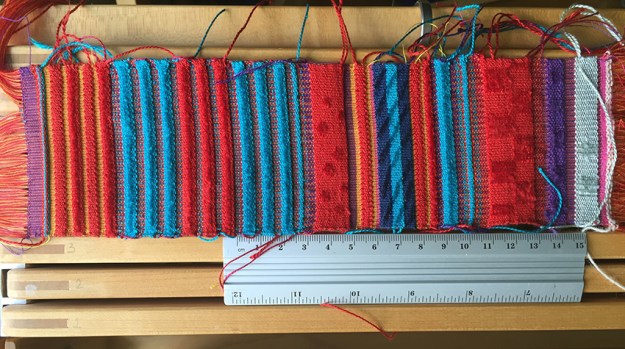
The truly horrible uneven selvedges are a result of alternating plain weave (the ground weave stripes) with the velveteen float weave. The silk weft is much thicker than the sewing thread weft of the plain weave stripes, so the velveteen stripes are wider. Note that the shiny uncut pile floats contrast beautifully with the pile, and that the pile can be cut in patterns. Lots of scope for fabric design here.
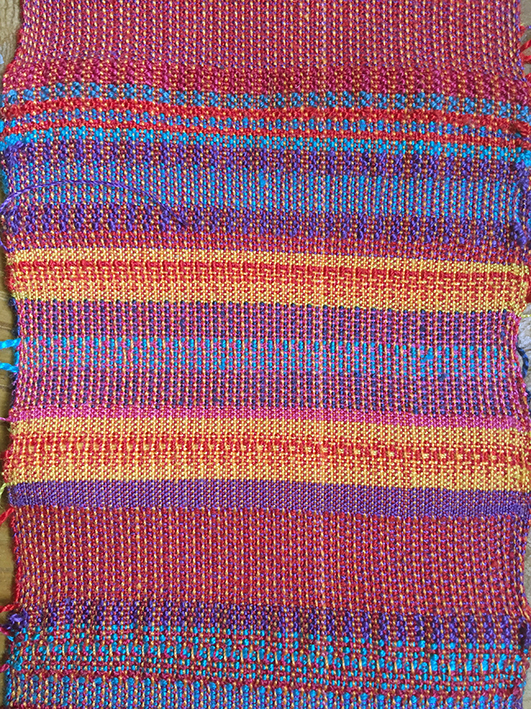
I was right; the reverse/back of the fabric was beautiful! The stripes are different colours of cotton thread ground weft – purple, yellow, pink – plus the red and turquoise silks I used as a pile weft. The pale vertical line is a repaired warp thread.
I learned a lot from this.
- Even weft tension is important, otherwise loose loops of ground weft may be caught by the needle and cut.
- Contrasting ground weft helps the weaver to spot this.
- 100% silk velvet is unusual and expensive because slippery silk warp and ground weft wouldn’t grip the silk pile weft as firmly as cotton does. Of course silk is more expensive than cotton, too. Mercerised cotton is shiny enough and works well for warp and ground weft.
- While inserting something down a line of floats in order to cut them, keep an eye on the adjacent cut edges: if your needle/whatever you’re inserting is too thick, or you lift it too high, you may pull the adjacent cut edge under the locking thread. I found it better to cut long lines of floats in two tranches because one long one required lifting the needle too high.
- If you want nice, even pile, try hard to run the cutting blade down the middle of the needle. It’s easier to cut down the side of the needle, but this means one side of the cut float is shorter than the other. The uneven pile doesn’t reflect the light as evenly, and the shorter ends are more likely to pull out when you cut the next float.
I now had a tiny gemlike strip of precious fabric, too pretty and too interesting not to be used for something. Obviously it had to be a hussif or housewife, a little needle case that I could use when travelling with embroidery.


While I was sewing it, wearing magnifying glasses and swearing under my breath, A. asked if I honestly enjoyed making tiny things, as I make so many. Why don’t I make bigger things to work out the details? Well, I only had enough fabric to make one of these, and it wasn’t so complicated (except for the scissors-keeper) that I felt I needed to make a tester. The scissors-keeper I made twice to check the details. The final version is sewn from scraps of sari silk; the snap is off-centre to fit neatly inside one of the finger loops of my cherished Bohin scissors. The felt is handmade; the thimbles are sitting on top of their tiny pocket.
And I do like making small things. I enjoy pernickety attention to detail, I do it well, which is why I was a good technical illustrator and a very bad landscape painter (I wanted to show every leaf, accurately). Of course I enjoy making things even more if I know what I’m doing, but it’s fun even when I haven’t a clue and am working it out as I go along.

Lovely to see this process written out.
LikeLike